Tips on Disassemblings Cylinder Head 1990 V4 115 Bubbleback

Klink

Petty Officer 1st Class
Joined
May 27, 2013
Messages
254
I ran the engine three minutes or so at idle with a Temperature Gun Infrared Thermometer W/Laser Sight and got 183 degrees maximum on port side and 104 on the port. No alarm went off, but the manual says it goes off at 203 +- 6 degrees. Sounds like I'm going to have to go at the thermostats, by what I read, a big hassle.
Yea, that quite a difference in temperature.... might be a good idea to also look at the water deflectors if the thermostats don't cure that problem.

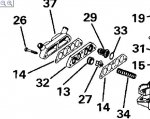
(Water Deflectors)
(J. Reeves)

Water deflectors are actually lengths of 3/8" outside diameter rubber hose, installed between the top cylinder and any cylinder beneath it, and also between the bottom cylinder and the block. The purpose of the deflectors is to have the water follow a definite path around the cylinder walls. Unfortunately the deflectors between the cylinders will at times swell sideways due to either a previous bad overheating problem, or simply due to age and salt corrosion. This causes a water flow restriction which usually allows the water to cool sufficently at low rpms but not at the higher rpms.

This hose material can be purchased reasonably at any automotive parts type store if you care to make your own, or you can purchase individual deflectors at any Evinrude/Johnson dealership at a somewhat higher cost.

Removing and installing them can be a hassle at times, but not always. I use a sharply pointed scribe with about 1/4" of the tip bent at a right angle whereas I can reach in, jab the tip sideways into the rubber, then yank it out. It's necessary to clean the seating surfaces where the ruber contacts the block with a small rat tail file to eliminate salt deposits etc. When installing the new rubber deflector, coat the deflector and the metal surfaces with WD40 which will act as lubrication to allow it to go in as easily as possible.

Make sure that you insert something into that deflector area before cutting and installing the deflectors if you make your own so that you will be certain that they are the right length and also that they will be seated properly. Usually a very small amount will be left extending about the block sealing area..... simply cut the excess off with a single edge razor blade.

OK, I replaced the thermostats, both were stuck, one totally open and the other almost totally closed. Don't remember which was which but assume it was the 183 degree head that had the almost closed. Re-tested again and got 184 on port side and 135 on starboard. I am going to take apart the port cylinder head

Any tips? I have a spare engine for parts and removed the port cylinder head cover (it overheated there and froze the engine) to see how it goes before doing it on the good engine, and found that the screws were very easy to break, they look like Grade 3, and not stainless. Is that normal? Why not Grade 5 or 8? Expansion contraction in aluminum? Were these just cheap repair screws? I was able to get the 3 broken screws out with some lubricant and a vise grip.

Any tips for doing the real cylinder head cover and the cylinder head head?
 
Last edited:

Fed

Commander
Joined
Apr 1, 2010
Messages
2,457
Re: Tips on Disassemblings Cylinder Head 1990 V4 115 Bubbleback

My bolts are original and they have UNC 3F written on the heads, not SS just plated & painted.

How about a little list of everything you've done so far?

Are you sure the little bleed holes were clear after you put the new t'stats back in?

Now that you have a quick release cover on the cowl I'd replace the t'stats & poppets with genuine OMC ones, that spring pushing the guts out of them would really worry me.
 

Klink

Petty Officer 1st Class
Joined
May 27, 2013
Messages
254
Re: Tips on Disassemblings Cylinder Head 1990 V4 115 Bubbleback

re: How about a little list of everything you've done so far?

Installed overheat audible alarm (it went off now when I tested engine). I change the thermostat housing components as described in my thread http://forums.iboats.com/johnson-ev...replacement-1990-115-v4-crossflow-617693.html.

Let me add that this 1990 Johnson 115 is on a used boat that I bought recently, that would not run faster than idle speed for prior owner. I found practically all of the hose connections leaking (changed all hoses), and the VRO had the top 90 degree fitting and barb tip cutoff, I tried everything to make it seal, but finally just changed the pump to a diaphragm pump. The binnacle throttle/shift controls were connected wrong, and so the engine could not accelerate in forward. I rebuilt the carbs, and put in all new gaskets on the silencer and front and back of carbs. I set the timing Joe Reeves -4 method. Have not been able to test engine WOT on the water to see if that problem is fixed, because I found this overheat problem when testing with the flusher at home.

re: Are you sure the little bleed holes were clear after you put the new t'stats back in?

The valve body of the thermostat assembly has a bleed hole in the middle, and it was clean. That's the only bleed hole I've seen, other than the v notch on the thermostat itself.


re: Now that you have a quick release cover on the cowl I'd replace the t'stats & poppets with genuine OMC ones, that spring pushing the guts out of them would really

I don't really know if the springs I took out of the engine are original either. Like I said, the one I took out had much less coils per inch, much less spring resistance. I later checked and found pictures online of original part and it too has more coils per inch than the old one I took out.​
 
Last edited:
Bob_VT

Moderator & Unofficial iBoats Historian
Staff member
Joined
May 19, 2001
Messages
26,071
Re: Tips on Disassemblings Cylinder Head 1990 V4 115 Bubbleback

Remove the heads and change the deflectors. Do both heads and also clean out the water passages. That should balance things out and the water will flow and cool properly. I bet the deflectors are no good in one head.
 

Fed

Commander
Joined
Apr 1, 2010
Messages
2,457
Re: Tips on Disassemblings Cylinder Head 1990 V4 115 Bubbleback

The BRP website shows 2 bleed holes for your motor.
bleed.jpg

Have you tried running it with the 2 water hoses disconnected from the thermostat housing to check the water flow & temp at that point?

The deflectors are easy to change.
 

Klink

Petty Officer 1st Class
Joined
May 27, 2013
Messages
254
Re: Tips on Disassemblings Cylinder Head 1990 V4 115 Bubbleback

The BRP website shows 2 bleed holes for your motor.
View attachment 205213

It appears that they updated the valve body to have only one bleeder hole, as my search for pictures of part # 321693 shows the part as looking like mine:
Thermostat Valve Body 0321693.jpg

While searching for used parts I found the two hole model for a 1984 (so it says):
Thermostat Valve Body two hole older version.jpg

I can't find any new part #321693 with the two bleeder holes.
 
Last edited:
Klink

Petty Officer 1st Class
Joined
May 27, 2013
Messages
254
Re: Tips on Disassemblings Cylinder Head 1990 V4 115 Bubbleback

Have you tried running it with the 2 water hoses disconnected from the thermostat housing to check the water flow & temp at that point?

Good that you reminded me again. I will do this before doing the work on the head.
 

boobie

Supreme Mariner
Joined
Nov 5, 2009
Messages
20,826
Re: Tips on Disassemblings Cylinder Head 1990 V4 115 Bubbleback

Have you checked the water deflectors yet as stated above ??
 

Klink

Petty Officer 1st Class
Joined
May 27, 2013
Messages
254
Re: Tips on Disassemblings Cylinder Head 1990 V4 115 Bubbleback

0221ea23235e8425194575593adf7a4f.image.280x142.JPG
Have you checked the water deflectors yet as stated above ??

No I have not. I have not taken the cover or head off yet.


Joe Reeves says we can get the deflector hose material from any auto parts, that it is 3/8" OD. I looked at pictures of the hose and it is like 3/16" ID, looks like radiator or windshield wiper fluid hose? I suppose the composition of the rubber must be important being inside next to the heat of the top of the cylinder. Exactly what type of hose should I ask for?

0221ea23235e8425194575593adf7a4f.image.280x142.JPG

Looks to me like I could make the four deflectors out of size part they show from BRP #322411, yet it says you need 4 parts.
 
Last edited:
emdsapmgr

Supreme Mariner
Joined
Dec 9, 2005
Messages
11,551
Re: Tips on Disassemblings Cylinder Head 1990 V4 115 Bubbleback

By the either the late 80's or early 90's OMC changed the valve body from the early two pinhole model to the one with the single oval hole. It was a lot less sensitive to accumulating debris and flowed warm water to the back of the stats better.
 

Klink

Petty Officer 1st Class
Joined
May 27, 2013
Messages
254
Re: Tips on Disassemblings Cylinder Head 1990 V4 115 Bubbleback

OK, took the port cylinder cover and head off. The middle deflector was blocking the water from going down to the port side of cylinder #4. The passageway after the deflector was full of packed sand, corrosion, I cleaned it all out. I had to take out the deflector piece by piece. The bottom deflector looks good, and is not in a place so easy to reach, and does not look to be in a critical position regarding the water flow. I will leave it alone.

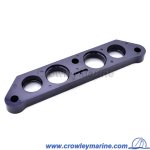
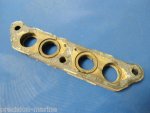
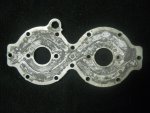
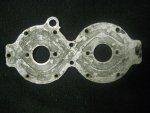
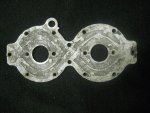
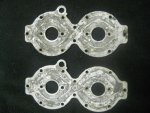
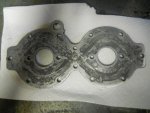
I'll be putting in all new screws. The only part that looks worn somewhat is the cylinder head cover. I have a spare engine and took the part from that one to compare, and it looks like the better one is the boat engine one (and not by much). Is it possible to put in a product like JB weld to fix up the corroded ridges that seal with the gasket, or it does not matter much for this part since all the circulation is internal? Here's what the parts look like:​

The 1st picture is the one off the boat engine. The 2nd & 3rd is of the spare engine. The 4th are both side by side.
Cyl Hd Cover 318333  BW Port.jpgCyl Hd Cover 318333 spare eng, port.jpg

Cyl Hd Cover 318333 spare port II.jpgCyl Hd Cover 318333 spare top, BW bot.jpg
 
Last edited:

Klink

Petty Officer 1st Class
Joined
May 27, 2013
Messages
254
Re: Tips on Disassemblings Cylinder Head 1990 V4 115 Bubbleback

Update, I took the other cylinder head cover off the spare engine and it is much better than the two above, though not perfect. I also found one on Ebay for $31 delivered that looks even better. Will use some JB Weld to fix up the few flaws in the better spare engine piece, and post pictures.
 

Klink

Petty Officer 1st Class
Joined
May 27, 2013
Messages
254
Re: Tips on Disassemblings Cylinder Head 1990 V4 115 Bubbleback

Update, I took the other cylinder head cover off the spare engine and it is much better than the two above, though not perfect.... Will use some JB Weld to fix up the few flaws in the better spare engine piece, and post pictures.

Here is the 2nd cylinder head cover from the spare engine after I JB Welded some worn ridges in the middle (2 repairs), and one repair in the right below the spark plug hole. I shaved the JB Weld with a sharp chisel to match all the original lines, and sanded them down to the correct height.

DSCN2534.jpg

The gaskets, and deflector came in tonight, so I'll use this repaired cover on the port engine repair tomorrow, and use the Ebay bought one for the Starboard when it comes in and when I get to it.
 

Klink

Petty Officer 1st Class
Joined
May 27, 2013
Messages
254
Re: Tips on Disassemblings Cylinder Head 1990 V4 115 Bubbleback

My bolts are original and they have UNC 3F written on the heads, not SS just plated & painted.

I've now taken those bolts off of three cylinder head covers (one from the boat engine and two from the spare parts engine) and they all have the same Grade 3 bolts. I broke 4-5 of the 14 on each head cover. I'd like to go with stainless steel or grade 5 or 8 gold or black. Anyone see a problem with that?
 

Bosunsmate

Admiral
Joined
Apr 7, 2012
Messages
6,135
Re: Tips on Disassemblings Cylinder Head 1990 V4 115 Bubbleback

Not me,
If you havent run a thread tap through the threads if possible so you get an accurate torque
 

Klink

Petty Officer 1st Class
Joined
May 27, 2013
Messages
254
Re: Tips on Disassemblings Cylinder Head 1990 V4 115 Bubbleback

These are the bolt markings on the original equipment OMC cylinder head cover bolts:
sae-5.gif

The only difference is that the bolts on the engine have a lower case u at the top. Looking at the SAE Standards at SAE & ASTM Bolt Grade ID Marks & Properties Reference Table - Engineer's Handbook, this is a Grade 5 bolt.

I read up on stainless steel bolts and rarely do they go above Grade 2, so I'll go with Grade 8, considering that bolts are not marked with country of origin, and the sources today (China) are not reliable on meeting specs. I figure a China Grade 8 will at least meet Grade 5.

The cylinder head bolts are much bigger, and look in good condition, so I'll re-use them.​
 
Last edited:
Klink

Petty Officer 1st Class
Joined
May 27, 2013
Messages
254
Re: Tips on Disassemblings Cylinder Head 1990 V4 115 Bubbleback

Cleaned up the cylinder head bolt threads and installed them with Never-Seez, since the female threads of the aluminum block had oxidizing. The manual says to coat the cylinder head gasket with gasket sealing compound , however, maybe that's old advise, since the Sierra head gasket I used has a good coating on it.

I bought new Grade 8 bolts for the cylinder head cover. I did thoroughly coat the head cover gasket with sealing compound since it is just made of paper.

I torqued everything as the manual calls for 18-20 ft lb for the head bolts, and 60-84 inch lb for the head cover.

I tested the engine with the flushete and it started right up, and after it warmed up, it ran at maximum 130 on the port (the side I fixed) and about the same or maybe overall 3 degree more on the starboard, therefore, I will hold off doing the starboard. It may have been done before, since it is the easier side to do.

Should the head bolts be re-torqued after x hours?

I previously installed a water pressure gauge and it read 10 lbs. Will be wiring in a temperature sender tomorrow. Will put it where the engines run the hottest (according to the infrared temperature gun), the top middle on the starboard head. I know what the port head passages look like since I just cleaned them out. I know that the alarm on the port works, since it went off before. I don't know either information on the starboard, so I'll place the temperature sender there.​
 
Last edited:

Fed

Commander
Joined
Apr 1, 2010
Messages
2,457
Re: Tips on Disassemblings Cylinder Head 1990 V4 115 Bubbleback

The manual says head gasket dry, sealing compound on head bolt threads & head cover screws.

Retorque head bolts after the engine cools down.

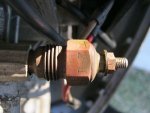
My 1988 has a special hole for the temp sensor.
 

Attachments

  • temp_opt.jpg
    temp_opt.jpg
    33.4 KB · Views: 0
Top