Transom Experts Needed

local

Seaman Apprentice
Joined
Jun 10, 2012
Messages
31
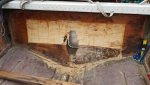
Need advice. I recently resumed work on my rebuild. Upon drilling into my "new" transom I found wet wood in the lower portion. I have removed a decent amount and found the extent of the water. The remaining wood is in excellent condition, cannot tell a difference between it an the new stuff I just bought.

I found that the lower ~1/3rd of the transom around the hole was wet. The question is given good wood could I splice another piece into the bottom and re-glass avoiding hours of work and itching or go ahead and make a single all new transom? I went ahead and split the second layer of wood off so I can make a good bond with a single piece.

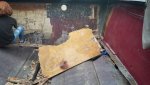
Pic attached is with 75% of the second layer gone and all of the wet wood removed back to solid like new wood on the right side. I am figuring that the moisture soaked into an approximately same size area on the left.

I am concerned about strength of the finished product. I am pretty sure with a decent enough glass job it will be fine but I wanted to ask the question before proceeding.
 

Attachments

  • photo331394.jpg
    photo331394.jpg
    277.1 KB · Views: 1

local

Seaman Apprentice
Joined
Jun 10, 2012
Messages
31
Just do it right. All of it,
your already 85% there.

85%, LOL no. Closer to 25% and that is just the wood chipping, next comes the sanding and extreme itching. Also I am not chipping wet rotten wood out at this point I am having to use a mini-sledge hammer to make decent progress. Doing the limited replacement also dramatically reduces the sanding. If gluing multiple pieces together already how bad is it to have one extra glue joint?

I agree. I'd do all of it.

I need something more than feelings about doing it. Would it be measurably weaker? This isn't about someone cutting out rotten wood and leaving wood that is affected but dry in the boat. All affected wood has been removed and it will be several times the amount of work to continue whereas I am not sure there is a tangible benefit.
 

chevymaher

Commander
Joined
Mar 29, 2017
Messages
2,937
No it is not as strong. That is why they sister in stringers. Which you can't do. In any construction a seam is a serious compromise in strength. Would it be strong enough only time will tell.
 

JASinIL2006

Vice Admiral
Joined
Feb 10, 2012
Messages
5,737
I would do it all because you now have a seam that runs right through the middle of your keyhole. How will you keep that from being a weak spot as your outdrive transfers all that thrust to the boat? By patching, you basically have reduced the strength of your transom core by 50% in a very important spot. If you wanted to patch in pieces of transom over by sides, you might get away with it.

Trust me, I understand about the work and itchiness. I've been there.
 

local

Seaman Apprentice
Joined
Jun 10, 2012
Messages
31
No it is not as strong. That is why they sister in stringers. Which you can't do. In any construction a seam is a serious compromise in strength. Would it be strong enough only time will tell.

I would do it all because you now have a seam that runs right through the middle of your keyhole. How will you keep that from being a weak spot as your outdrive transfers all that thrust to the boat? By patching, you basically have reduced the strength of your transom core by 50% in a very important spot. If you wanted to patch in pieces of transom over by sides, you might get away with it.

Trust me, I understand about the work and itchiness. I've been there.

Thank you, that is what the little voice in the back of my head was telling me just wanted to make sure I wasn't being too perfectionist as that is what killed my rebuild originally.
 

chevymaher

Commander
Joined
Mar 29, 2017
Messages
2,937
It didnt kill your rebuild. It is what is going to make it better than new. Once it is done the piece of mind is priceless.
 

JASinIL2006

Vice Admiral
Joined
Feb 10, 2012
Messages
5,737
Thank you, that is what the little voice in the back of my head was telling me just wanted to make sure I wasn't being too perfectionist as that is what killed my rebuild originally.

Actually, when it comes to the structural elements of your boat, perfectionism isn't a bad thing... but I know what you mean. It's easy to get carried away.
 

local

Seaman Apprentice
Joined
Jun 10, 2012
Messages
31
Ok, so perfectionism kicking in here. I have managed to remove almost half of it, at once. After two days of chiseling I sound a spot where the new glass pulled up from the hull. Using a pry bar I just worked it lose in a large area and got the idea to pop the whole section off. I cut lines with a circular saw then chiseled a three sided perimeter. It took some work separating the wood from the hull, was getting close to my limit on stressing the hull itself when I managed to pop it free.

See pics, the area to the right and above the keyhole is where I delaminated it and the upper right is where the new resin just came apart, some on the wood some on the hull. I am not sure whether to be happy I skipped a week of manual labor, I am going to pop off the other side too, or if my original install was a failure to begin with.

Should I have been able to pop the wood out like this? Do I need to change the way I did the install? Thickened poly resin with some chopped fibers on clean glass wiped down with acetone then clamped down as best I could. It seemed solid but now I am having second thoughts.
 

Attachments

  • photo331566.jpg
    photo331566.jpg
    1.3 MB · Views: 0
  • photo331567.jpg
    photo331567.jpg
    1.4 MB · Views: 0

sailor_medic

Recruit
Joined
Jun 3, 2020
Messages
3
If you're still hammering away with a chisel and hammer, might I suggest an air chisel? You can pull layers with one hand and jam that thing under and blast away. Made short work of my manufacturers installed 3 piece transom. Just be very careful you don't punch through the glass and gel coat. Still kicking myself for that one....

Plus, if you get bored, you can always play James Bond...
https://9gag.com/gag/ag5N9N6?ref=pn
 

rad1026

Chief Petty Officer
Joined
May 1, 2006
Messages
443
You should not be able to pop the wood off like that, but you already know that. When I did my transom I had to sand the new transom wood around the edges in order for it to lay flat. You don't want to rely on the clamps to pull the two surfaces together, they should be flat against each other before clamping to ensure maximum surface to surface contact. Do you have any pics of your clamping process?
 

Scott Danforth

Grumpy Vintage Moderator still playing with boats
Staff member
Joined
Jul 23, 2011
Messages
50,944
I needed to put a 4.5" carbide saw blade in the angle grinder as well as an electric chainsaw to clean the wood from the fiberglass when I did my last transom, then go back over with 24 grit
 

JASinIL2006

Vice Admiral
Joined
Feb 10, 2012
Messages
5,737
From the pics of your partially cleared transom, it almost looks like the wood was not making contact with the adhesive agent (thickened resin?) in places... it is hard to tell from a photo, but does the light-colored wood on that removed section look like it was even touching anything? It looks like a big void in that area, maybe...

Anyway, thickened resin with chopped strand is a good way to adhere the new transom core to the hull. Just be sure to lay down a sufficiently thick bed of the resin to really fill any voids. When done correctly, the wood and the hull will become one!
 

local

Seaman Apprentice
Joined
Jun 10, 2012
Messages
31
You should not be able to pop the wood off like that, but you already know that. When I did my transom I had to sand the new transom wood around the edges in order for it to lay flat. You don't want to rely on the clamps to pull the two surfaces together, they should be flat against each other before clamping to ensure maximum surface to surface contact. Do you have any pics of your clamping process?

The wood was plenty flat, the variable was in the hull glass. It was clamped as I have seen multiple times with 2x4s through the key hole clamping the inside or outside alternating. Then I used through bolts on the top side to suck it in.

I needed to put a 4.5" carbide saw blade in the angle grinder as well as an electric chainsaw to clean the wood from the fiberglass when I did my last transom, then go back over with 24 grit

40 grit flapper wheel on a grinder works fine for me, no problem getting to pristine hull glass.

From the pics of your partially cleared transom, it almost looks like the wood was not making contact with the adhesive agent (thickened resin?) in places... it is hard to tell from a photo, but does the light-colored wood on that removed section look like it was even touching anything? It looks like a big void in that area, maybe...

Anyway, thickened resin with chopped strand is a good way to adhere the new transom core to the hull. Just be sure to lay down a sufficiently thick bed of the resin to really fill any voids. When done correctly, the wood and the hull will become one!

I agree that it may not have been making great contact in places based on the patterns left. The light colored wood is where it pulled off the wood and stuck to the hull. The dark spot lines up with that hole in the hull you can see lots of resin on the hull to the right of it.

My biggest concern is the areas where the new resin just popped off the old hull while chiseling. To the right of the keyhole and the really dark area on the left side of the removed piece. I know that had contact as I could see it but a couple good wacks with a hammer and it just started popping off.

I had to use leverage and used a pry bar with a mini-sledge to pop that majority of that piece off, the right side and top, not too concerned about that much force to break it free.
 

76SeaRay

Lieutenant Junior Grade
Joined
Aug 24, 2017
Messages
1,071
Your transom looks to be the same size and shape as mine that I just finished.. I had solid wood in the top half and rotten along the bottom but made the decision to do the whole thing. Once the wood was off there were a lot of of sloppy highs and lows with voids from the factory since they didn't care with the old OMC stringer drive that was in it.. I used a belt sander with 40 and 80 grit paper to sand the whole thing flat once the wood was off to get it smooth and prepped for installing the new plywood. I used two layers of 3/4 inch marine plywood laminated together and then installed.. I dry fit it first to make sure the plywood fit flat to the hull glass and would draw up tight.. The biggest issue was the weight of the laminated two layers of 3/4 plywood.. An overhead gantry crane was the answer to lifting into place quickly... If I had to do it again, I would probably go with one layer at a time... Ended up right at 2 1/8 inches thick for the Alpha Drive mounting...

Good luck.. I have pictures of mine in process and finished in my thread titled "Transom Questions" if you are interested in how it went...
 

JASinIL2006

Vice Admiral
Joined
Feb 10, 2012
Messages
5,737
I wrapped my transom core in CSM before I installed it. I'm sure that helped with adhesion, but in your case, I am guessing there was a problem when the put in the transom... some possible situations that might have caused your bad adhesion:

- they did not use enough peanut butter (i.e., thickened resin) to make contact with all of the transom core;
- they did not pre-treat the wood with resin (raw wood can soak up the resin and cause problems with adhesion);
- they didn't clamp in the transom core adequately, leaving gaps between it and the thickened resin; or
- the thickened resin had partially kicked off before they installed the transom core.

The good news is that with a bit of planning and attention to details, you can avoid any of those problems and have a really solid, well-adhered transom. When I installed mine, I made sure to trowel on the peanut butter pretty thick, and I drilled relief holes through the transom core so that when it was clamped, air and/or excess resin could ooze through. That allowed the transom core to really settle into the bed of peanut butter.
 

local

Seaman Apprentice
Joined
Jun 10, 2012
Messages
31
Your transom looks to be the same size and shape as mine that I just finished.. I had solid wood in the top half and rotten along the bottom but made the decision to do the whole thing. Once the wood was off there were a lot of of sloppy highs and lows with voids from the factory since they didn't care with the old OMC stringer drive that was in it.. I used a belt sander with 40 and 80 grit paper to sand the whole thing flat once the wood was off to get it smooth and prepped for installing the new plywood. I used two layers of 3/4 inch marine plywood laminated together and then installed.. I dry fit it first to make sure the plywood fit flat to the hull glass and would draw up tight.. The biggest issue was the weight of the laminated two layers of 3/4 plywood.. An overhead gantry crane was the answer to lifting into place quickly... If I had to do it again, I would probably go with one layer at a time... Ended up right at 2 1/8 inches thick for the Alpha Drive mounting...

Good luck.. I have pictures of mine in process and finished in my thread titled "Transom Questions" if you are interested in how it went...

It has been a while since I put this one in but I don't remember it being too bad. I am leaning towards it kicking off before I had the wood clamped in place being the primary cause of it not adhering well.

I wrapped my transom core in CSM before I installed it. I'm sure that helped with adhesion, but in your case, I am guessing there was a problem when the put in the transom... some possible situations that might have caused your bad adhesion:

- they did not use enough peanut butter (i.e., thickened resin) to make contact with all of the transom core;
- they did not pre-treat the wood with resin (raw wood can soak up the resin and cause problems with adhesion);
- they didn't clamp in the transom core adequately, leaving gaps between it and the thickened resin; or
- the thickened resin had partially kicked off before they installed the transom core.

The good news is that with a bit of planning and attention to details, you can avoid any of those problems and have a really solid, well-adhered transom. When I installed mine, I made sure to trowel on the peanut butter pretty thick, and I drilled relief holes through the transom core so that when it was clamped, air and/or excess resin could ooze through. That allowed the transom core to really settle into the bed of peanut butter.

No I did all that, pretty sure I had enough PB anyway, definitely pre-treated the wood and clamped it about as well as I could. I am thinking that the resin may have kicked off though it would explain the one sided good bond with the other side not so good. I'll have to figure out a way to slow down the reaction. I am going to do the relief holes this time, I don't remember that being a thing when I put this one in.
 
Top