Transom Repair Help :)

mustang5

Cadet
Joined
Sep 21, 2010
Messages
27
Hey guys,

My transom is slop, too much movement and the motor bolts have started going through the inner casing, and cracks are appearing along the splashwell.

The boat is a 1990 Haines 1950R signature, and the transom looks a lot different to all the DIY guides that I can find (on the net, magazines and boat building books).

I am looking to do this from the outside, but I am not sure where to cut as it is a different shaped transom.

I have added a few pics of the style of transom of my boat. And one of where I think the ply length of transom ends, given the transom angles inwards towards the front of the boat from these points.

I understand I need to leave a lip for bonding and strength and so forth, just basically need the best profile or information on where to cut the outer skin.

Thanks in advance :)
 

Attachments

  • like this.JPG
    like this.JPG
    15.3 KB · Views: 1
  • 3_2.jpg
    3_2.jpg
    13 KB · Views: 1
  • bp4640302607786194019.jpg
    bp4640302607786194019.jpg
    42.6 KB · Views: 1

Woodonglass

Supreme Mariner
Joined
Dec 29, 2009
Messages
25,930
Re: Transom Repair Help :)

I'm not sure I understand your issue. It appears to me to be a fairly straight forward transom. It may be a little difficult to get at with the top cap on the boat but a lot of them are. You could always pour a Seacast or Nidabond transom but...

MY WORRY is if your transom is MUSH then I HIGHLY suspect that you have OTHER issues below decks with stringers etc... You really should consider ALL of the factors and decide if you want to rebuild your boat the right way and ensure that it is structurally sound. If you want to keep her, and want to invest the time and money then you should consider probing below decks to see what lies below.

I'm just sayin...:D
 

mustang5

Cadet
Joined
Sep 21, 2010
Messages
27
Re: Transom Repair Help :)

Hi and thank you for the reply :)

Sorry i should have specified that I have drill inspection holes to the floor stringers, and at the bottom of the transom and it all looks good. Not like new, but not worth the time and effort at present.

The only question I have is on the rear of the boat, where I have drawn the lines, is that an acceptable way to redo this transom? Will it be strong enough using marine ply, if I dont replace the outside of these lines? (Towards the side of the boat where the transom tapers in).

Im sorry about my lack of skills in explaining it haha :)

Thanks again.
 

oops!

Supreme Mariner
Joined
Oct 18, 2007
Messages
12,932
Re: Transom Repair Help :)

do not cut the outer skin.

you will weaken the hull.

do it from the top or the inside.

welcome to i boats :)

i can tell that you have put some thought into this....but you are thinking wrong, and could harm the boat and at least the resale of the boat.

you need to spend some time here reading to get on the right track......
start with the completed projects forum.....and the link below

cheers
oops
 

mustang5

Cadet
Joined
Sep 21, 2010
Messages
27
Re: Transom Repair Help :)

I have purchased quite a few magazines, and read online a handful of projects that have done it from the outside?? I was under the impression you go from the inside if you have stringers that are rotten, or if you dont want to have to paint the new exterior.. I am also not very keen to deal with the splash well and so forth. Yes, Im sure I could be wrong going about it this way, but I am told different by others. So I will probably go with whats easy.

Also, this hull has a pod like structure, its not a traditional hull. When looking from below, after 2 feet, there is a large separation from the hull. Not a traditional design.
 

Woodonglass

Supreme Mariner
Joined
Dec 29, 2009
Messages
25,930
Re: Transom Repair Help :)

It's your boat but like OOPS said I cannot and will not advise anyone to cut the outerskin of their boat to replace the transom. I do not know WHO is advising you to do this but I would want to SEE THEIR results and investigate THEIR experience before I would go against the years of knowledge and experience that is on this forum. If it's worth doing it's worth doing right and the EASY way is usually NOT the right way.

But like I said it's your boat, if you want to take the chance of ruining it then go for it.


I'm just sayin...:D
 

mustang5

Cadet
Joined
Sep 21, 2010
Messages
27
Re: Transom Repair Help :)

Ok that is fair enough, I am willing to take advise from all :) I understand there are differing views on it.

What would be the process in going from the inside?? Would I have to remove the splash well and same process, cut out the old ply(to the outer skin) but leave a lip around the edge?

Im assuming I am correct in cutting the width of the splashwell?? (Not including the lip of course).

And do I just simply shape the new ply out of what I cut the inner skin, and then feed it from the top?? Epoxy it in, fibreglass new skin and enclose?

Thanks in advance.
 

ezmobee

Supreme Mariner
Joined
Mar 26, 2007
Messages
23,767
Re: Transom Repair Help :)

That looks a PRIME candidate for SeaCast (or Nidabond). Basic steps would to remove the motor and anything else thru-bolted, remove the top capping of the transom, use an electric chainsaw (yes I'm serious) and a shop vac to cut/dig out the the old transom, pour in the new one and reassemble.
 

Woodonglass

Supreme Mariner
Joined
Dec 29, 2009
Messages
25,930
Re: Transom Repair Help :)

What would be the process in going from the inside?? Would I have to remove the splash well and same process, cut out the old ply(to the outer skin) but leave a lip around the edge? It is usually easier to remove the top cap of the boat to do this work. You CAN cut the splash well out and then re-glass it in but getting it top look "Perfect" can be a challenge. You would then fabricate the plywood transom to the same thickness as the one you remove and glass it back in. Not sure what you mean by leaving a lip.

Example of Seacast Transom

http://forums.iboats.com/showthread.php?t=174600&highlight=cutting+splashwell&page=2

This Guy cut the Splashwell
http://forums.iboats.com/showthread.php?t=236044&highlight=cutting+splashwell

This is a pic of one Guys Method. I do NOT approve but it has been done and done successfully.

attachment.php


And last but not least, this is a pic of What I believe you are proposing to do and I HIGHLY advise NOT TO DO.

ImportantSkin.jpg


But as EZ said and as I said in my first Post you Could use Seacast or Nidabond and Pour in a new transom. Do a search on the forum for Seacast or Nidabond Transoms and you will get a LOT of examples.

I'm just sayin...:D
 

mark1961

Ensign
Joined
Apr 30, 2007
Messages
940
Re: Transom Repair Help :)

That looks a PRIME candidate for SeaCast (or Nidabond). Basic steps would to remove the motor and anything else thru-bolted, remove the top capping of the transom, use an electric chainsaw (yes I'm serious) and a shop vac to cut/dig out the the old transom, pour in the new one and reassemble.

ez; Unfortunately none of these products seem to be available in Australia yet, last i heard seacast wont/can't ship and nidabond are somewhat difficult to deal with.

mustang5; I would have a chat with a couple of reputable fibreglass repairers in your neck of the woods, most if not all will be familar with repairing a haines and should know the best way to attack this particular design.
 

Yacht Dr.

Vice Admiral
Joined
Feb 26, 2005
Messages
5,581
Re: Transom Repair Help :)

Hey guys,

My transom is slop, too much movement and the motor bolts have started going through the inner casing, and cracks are appearing along the splashwell.

The boat is a 1990 Haines 1950R signature, and the transom looks a lot different to all the DIY guides that I can find (on the net, magazines and boat building books).

I am looking to do this from the outside, but I am not sure where to cut as it is a different shaped transom.

I have added a few pics of the style of transom of my boat. And one of where I think the ply length of transom ends, given the transom angles inwards towards the front of the boat from these points.

I understand I need to leave a lip for bonding and strength and so forth, just basically need the best profile or information on where to cut the outer skin.

Thanks in advance :)

Hello Mustang...

Here is what I would do ( according to your pics on the TriTrans situation ).

1. Cut the outer skin of glass just around the mount for your OB. ( Your not going to save Any skin from the outside..so just Start Small.. ).

Investigate what you have where you Peeled off the Outer skin and go from there.

IMO you have way more structural integrity going on in your splash well/liner then your trans mount section. Also IMO Do not start cutting Just that whole back side of the deck to expose the inner transom.

This is one of the FEW canidateds that I would say replace the trans/mount point from the Outside as you suggested. Somehow I think you might not have as much rot/gone transome than most..this is not a ONE piece transom..IMO...

Removing your deck will do nothing for getting to your trans..dont remove IMO..

It almost seems like the Hull/trans was a multipart mold with those angles in there..or a custom glassing trans.. Ive done it ;) .

Hope this gives you a better perspective on things...

YD.
 

mustang5

Cadet
Joined
Sep 21, 2010
Messages
27
Re: Transom Repair Help :)

Thank you very much for the advise.

You are correct in saying its not too bad from the investigations I have done. Basically its soft above where the splash well meets the transom. Below this is hard as a rock, and taking the bungs out and drilling a few holes showed me this (of course not to the extent of ripping the outer layer off).

Say I was to start small and reached solid wood just below where the splash well meets the transom, to what extent would I need to keep removing in order to replace with one section of ply so I can have adequate structural integrity? That was the basis of doing the width of the splash well so that there would be enough transfer of load to the outer supports of the one piece of encapsulated ply?

Cheers all.
 

mustang5

Cadet
Joined
Sep 21, 2010
Messages
27
Re: Transom Repair Help :)

Here are some pictures :)
 

Attachments

  • 75681_10150126558346164_549441163_7867714_1720591_n.jpg
    75681_10150126558346164_549441163_7867714_1720591_n.jpg
    56.2 KB · Views: 1
  • 76309_10150126558571164_549441163_7867715_7466231_n.jpg
    76309_10150126558571164_549441163_7867715_7466231_n.jpg
    58.4 KB · Views: 1
  • 76701_10150126558106164_549441163_7867712_4434184_n.jpg
    76701_10150126558106164_549441163_7867712_4434184_n.jpg
    59.3 KB · Views: 1
  • 76955_10150126558246164_549441163_7867713_3585135_n.jpg
    76955_10150126558246164_549441163_7867713_3585135_n.jpg
    87.4 KB · Views: 1
  • 149644_10150126558676164_549441163_7867716_1259283_n.jpg
    149644_10150126558676164_549441163_7867716_1259283_n.jpg
    30.5 KB · Views: 1

mustang5

Cadet
Joined
Sep 21, 2010
Messages
27
Re: Transom Repair Help :)

And some more :)
 

Attachments

  • 155721_10150126557776164_549441163_7867708_5375582_n.jpg
    155721_10150126557776164_549441163_7867708_5375582_n.jpg
    70.9 KB · Views: 1
  • 155765_10150126557686164_549441163_7867707_6498837_n.jpg
    155765_10150126557686164_549441163_7867707_6498837_n.jpg
    55.4 KB · Views: 1
  • 155810_10150126557871164_549441163_7867709_1962060_n.jpg
    155810_10150126557871164_549441163_7867709_1962060_n.jpg
    76.5 KB · Views: 1
  • 156354_10150126558036164_549441163_7867711_5366986_n.jpg
    156354_10150126558036164_549441163_7867711_5366986_n.jpg
    60.4 KB · Views: 1

Utahboatnut

Senior Chief Petty Officer
Joined
Jan 15, 2009
Messages
785
Re: Transom Repair Help :)

Well the lower bolts are sunk in as well so you would need to go that far at least, why not just do it right and redo the whole transom. You might want to contact nidabond, or seacast directly and see what they would reccomend. I would think a poured transom would be the easiest, strongest way to approach that transom. Don't just do 1/2 of it though you will regret it if you plan on keeping it for any length of time.
 

j_martin

Admiral
Joined
Sep 22, 2006
Messages
7,474
Re: Transom Repair Help :)

That's built like a bass boat. I've replaced a transom like that from the top, taking the top cap off just the transom, digging out all the old wood, and building a 7 piece jig-saw inside the cavity.

It came out well, but I wouldn't do it again. I'd just take the top cap off the boat, and rip the transom out and rebuild it from the inside. Odds are good yer cap will come off easier than a bass boat.

Here's the project at Scream and Fly

http://www.screamandfly.com/showthread.php?159482-Wet-Transom
 

mustang5

Cadet
Joined
Sep 21, 2010
Messages
27
Re: Transom Repair Help :)

Well the lower bolts are sunk in as well so you would need to go that far at least, why not just do it right and redo the whole transom. You might want to contact nidabond, or seacast directly and see what they would reccomend. I would think a poured transom would be the easiest, strongest way to approach that transom. Don't just do 1/2 of it though you will regret it if you plan on keeping it for any length of time.

I would LOVE it if there were a sea cast or nidabond equivalent to use, but here in Australia there doesn?t seem to be anything of the sort. As per J_martins thread, It is very tempting to give your way a go. I may try it and see how easily I can remove the ply, and it probably all depends on how soft/hard the outer edges of the transom are.

If I were to go completely from the top, Would I get a strong bond if I simply fibreglass matted the outer edges of the cutout, doused the outer in epoxy and slid in the new ply also doused in epoxy, and clamped?? Another Idea which I am tempted.

My current plan, based on talking to a few boat builders and the manufacturer is as follows:

? Cut external skin to the width of the splash well, and to the depth of the full transom, but leave the 60-70mm edging to both sides, and the bottom of the hull. I plan to include the top capping in this cut.
? Remove all plywood until I reach the outer parts of the fibreglass, thus leaving a lip of 60-70mm??
? Use cardboard to get shape of required ply replacement
? Cut out new ply. I will be using 2 connected sheets, but thickness I am yet to determine until I remove outer skin and measure.
? Connect two sheets using epoxy, with fibreglass matting between the two sheets. (What fibreglass matting is best for this?)
? Cover the entire ply setup in just epoxy?? (Or wait until installed and ready to glass so its ?tacky??) Drill or clamp the sheets together and allow to sit for a day or two??
? Feed new ply from the top.
? Epoxy the cutout, outer skin to the new ply.
? Fibreglass over the rear of the cutout, so long as there is 120mm coverage over the joint??? (Do I need to glass the complete rear section in order to not have a high bit around the joint?? Or is glassing, letting it cure, and then sanding it down level adequate?? Also, is it worth having a larger gap between cutout rear piece and the lip for bonding reasons?? AND, will I need to sand the areas where I plan to fibreglass connect the areas??)
? Fibreglass the new transom capping and throw out the aluminium capping.
? Paint and repair cracked paint in splashwell.
? Let sit and cure (How long?). Test strength for peace of mind.
? Drill bolt holes and re-install motor.
I have still plenty of questions regarding little things, But believe I have an adequate direction in order to gain a strong transom.
The transom design is for 270kg, and a 250hp motor, whereas my motor is a 200hp and weighs 196kg. That just gives me a very small amount of reassurance haha.

Thanks for the replies all.
 

oops!

Supreme Mariner
Joined
Oct 18, 2007
Messages
12,932
Re: Transom Repair Help :)

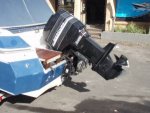
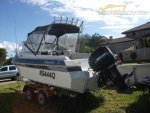
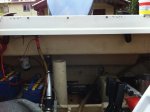
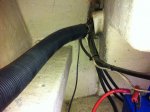
i have done boats like that before.....while the hull/ transom SEEMS different....its not......the flat part on your hull is the transom area....dont worry about the angled parts...

the area where you drew your lines in one of the top pics is where the transom is.

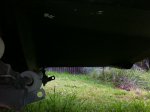
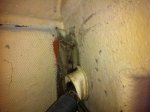
if you are worried about pulling the cap...(dont be....its easy and will save you a world of hurt) you can get in there with a grinder and just grind out the old transom...

(yes....that means stick your head under there in that cramped place and start grinding away)...(see why pulling the cap will save you a world of hurt?)

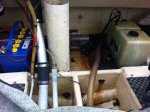
where the transom joins the stringers you can cut out with a diamond blade on your grinder or a swazall.
i think you will find....your transom is actually only about 30x30 ins or smaller.

after you grind that out......you can replace it in the standard method.

time for a pro.....est...
3 hrs cap off
4 hrs removal and clean.....(8 hrs if you dont take the cap off)
build transom. 2 hrs
replace and glass in transom 1.5 hrs
replace tie ins to the stringer 1.5 hrs
replace cap 3.5 hrs

if you decide to do it by cutting the outer skin....

.....you can get the transom out and in quicker.....BUT....
when you remove the transom.....you will have to leave the inner glass skin as a backing plate to set the transom against.....

soooo.....that means (without pulling the cap) you will have to grind out the transom. (there is no way you will get a crowbar in there to delam the transom from the inner skin) (i hope you are following this...its kinda complicated....but i hope you are)

when you grind out the transom....I GAURENTEE you will blow thru the inner skin in lots of places....as you cannot see where to stop. in fact....i highly doubt there will be anything left of the inner skin after you get done.

now.....after you have your old transom out.....you need to fiberglass the new one in place against the old inner skin.
how are you going to get a good bond?.....???....???...:eek:

the best way is to make a pb gype and smear it all over the gouge marks, then add a 1.5 oz matt between the transom and the old skin........now.......how are you going to squeeze the transom against the old glass during cure?...???.....????.....:eek:
you have to bolt thru your transom and inner skin...and brace/squeez them together during cure.
that means you are still in under the splash well from the inside bolting and bracing.

ok....thats done........now......the rest is easy......add a layer of csm over the new transom......then 2 1708 wraps...then a csm.....then a finishing veil of 6 oz.
oh.....uh....you will have to wrap those into the old glass not just against the gellcoat.

now.....lets fair the new fiberglass down to flat......
the problem with that is that the transom didnt go in flat because it was against a flimsy backing plate that was also clamped ...during the process.....it all moved a bit and there are gaps so the outer new transom is not flush with the back of the boat.

now you have to fair the glass.....add more in the low spots....fair that flat in order to gellcoat.
(oh......joy ! sanding fiberglass is itchy at best)

after you gellcoat you will have to fair the gellcoat flat and make it all shiney like it belongs, which, for an amateur is not as easy as it seems....(but do-able)

the process i have just described......is a humongous amount of work....if you dont beleive me.....just try to sand some fiberglass to the point that you can paint it.

after this is all done.......there is still one thing....

you will have a very poor mechanical bond to your transom's inner skin that will fail whenever it wants to.
while the outer skin will probably be ok.....the inner wont, and you will still be looking at water intrusion from the splash well in a short time.

water intrusion in a transom=rot.....rot = square one.

this is your boat......you can fix it however you want. i just hope you get food for thought out of this.

what ever way you go.......there will be help for you here.

cheers
oops
 
Top