Upper Hlinge Pin Bushing Wear

msd58

Petty Officer 1st Class
Joined
Feb 14, 2003
Messages
299
I installed a new gimbal ring on my Bravo 3 in the spring of 2016. At the same time I had new swivel pin installed at the same time. The port side hinge pin bushing behind the trim sender is nearly 100% gone. There's considerable slop there now. The starboard bushing appears OK. What it the cause of this? Gimbal ring was $800.
 

alldodge

Moderator
Staff member
Joined
Mar 8, 2009
Messages
42,968
I installed a new gimbal ring on my Bravo 3 in the spring of 2016. At the same time I had new swivel pin installed at the same time. The port side hinge pin bushing behind the trim sender is nearly 100% gone. There's considerable slop there now. The starboard bushing appears OK. What it the cause of this? Gimbal ring was $800.

Don't know what could have caused it to wear out so fast. Post some pics of what your seeing

Your saying new ring and pins, where they new (mercruiser) or new rebuilt?
 

Fun Times

Moderator
Staff member
Joined
May 16, 2009
Messages
9,197
Are you slipped in fresh or salt waters? With shore power around you too?

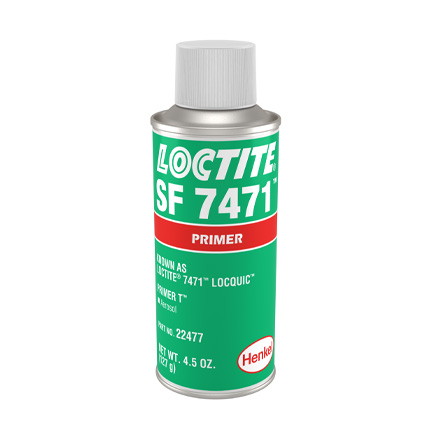
One thought of early wear could possibly be if Loctite Locquic Primer "T" 7471 wasn't applied to the hinge pins threads, bell-housing threads and I'll add along with a little bit on the holes of the ring, etc. that the pins are in contact with may of helped protect things a bit better especially knowing your boats moored in the water vs trailered.

For some reason the Bravo service manuals doesn't seem to be mentioning the use of loctite locquic primer T 7471 when installing hinge pins but it's recommended in the Alpha service manuals as noted in the following manual link under step 4 plus using it was taught early on in my job career so it became standard to just use it without paying much attention if the recommendation to use Primer T followed through to other manuals as time went by. :shame: on me., http://boatinfo.no/lib/mercruiser/manuals/mercruiser14.html#/380

LOCTITE® 7471™ Primer T™ adhesive primer improves cure speed and cleans bonding surfaces of inactive metal surfaces. This anaerobic adhesive cures in the absence of air and in the presence of metal ions. When assembling inactive metal parts, which are low in metal ions, a primer is recommended to ensure proper adhesion.
It is recommended for applications with passive metals or inert surfaces.

What You Need to Know to Ensure a Reliable Threaded …
https://www.ellsworth.com/globalass...e/henkel-loctite-user-guide-threadlocking.pdf
henkel-loctite-locquic-7471-4-5oz_431x431.jpg

https://www.ellsworth.com/products/...471-mil-spec-primer-1-grade-t-4.5-oz-aerosol/

Ensure the marine bonding straps are in place as there ought to be one on the ring too for better marine corrosion prevention. Follow the Continuity Bonding Strap Circuit seen here, http://boatinfo.no/lib/mercruiser/manuals/mercruiser11.html#/556
 

msd58

Petty Officer 1st Class
Joined
Feb 14, 2003
Messages
299
Sorry I was not clear. The gimbal ring itself was replaced. I can't say if the pins were replaced or if the Loctite product was used. I can ask. Boat is kept on fresh to brackish water depending on rainfall. Boat is kept in slip from May to November. Bonding straps all in place on B3 unit. Corrosion does not seem to be the culprit. The nylon bushing is my opinion 95% worn out. The mechanic who did the work is a little puzzled bc the gimbol ring was new when it was installed. Can a new bushing be pressed in?
 

Bt Doctur

Supreme Mariner
Joined
Aug 29, 2004
Messages
19,410
Funny that the early drives used no bushing and grease fitting and the newer stuff uses a plastic bushing instead of a SS one and grease fittings. Have a SS bushing pressed in and avoid future issues. The grease fiittngs are a simple addition
 

Bt Doctur

Supreme Mariner
Joined
Aug 29, 2004
Messages
19,410
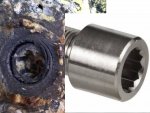
Form the pic it seems that it is not the correct hinge pin.See if a 1/2 inch allen will remove it
 

msd58

Petty Officer 1st Class
Joined
Feb 14, 2003
Messages
299
Form the pic it seems that it is not the correct hinge pin.See if a 1/2 inch allen will remove it

The hinge pins were replaced with new ones bought at a pair. Starboard hinge pin bushing is OK. Only the port side bushing is wore out. I looked up hinge pins part numbers and they are the same for Alpha 1 Gen2 and Bravo
 

Bt Doctur

Supreme Mariner
Joined
Aug 29, 2004
Messages
19,410
still dosent look like the hinge pin, looks like the plastic stub of the trim limit is broken off inside the hinge pin
 

alldodge

Moderator
Staff member
Joined
Mar 8, 2009
Messages
42,968
The pin does not look like a Bravo/Alpha, not enough teeth

pin2.jpg
 

Fun Times

Moderator
Staff member
Joined
May 16, 2009
Messages
9,197
Form the pic it seems that it is not the correct hinge pin. See if a 1/2 inch Allen will remove it.
I noticed the picture in post # 3 turns into a quick 8 second video of the pins play (looseness) of the ring & bell housing. You may have to click on the pic to get it to play if desired.

[video]https://photos.google.com/share/AF1QipMdtDwx5eQxygcqfyw3Lgt6o8_v_rqLPDSHotk1HzSgZw QEWf0ClwIP9p3xzUOrag/photo/AF1QipPZ9rs3ikGRaQUiDtRbddEXeXOcfGo8GBpbdYDl?key=Z DZkYXpMX0JXWjBWZmplQjcxYk54MDBwYktNanln[/video]

msd58, do you happen to have the service/parts receipt handy for part numbers along with your stern drive or transom assembly serial numbers?
 

msd58

Petty Officer 1st Class
Joined
Feb 14, 2003
Messages
299
I noticed the picture in post # 3 turns into a quick 8 second video of the pins play (looseness) of the ring & bell housing. You may have to click on the pic to get it to play if desired.

[video]https://photos.google.com/share/AF1QipMdtDwx5eQxygcqfyw3Lgt6o8_v_rqLPDSHotk1HzSgZw QEWf0ClwIP9p3xzUOrag/photo/AF1QipPZ9rs3ikGRaQUiDtRbddEXeXOcfGo8GBpbdYDl?key=Z DZkYXpMX0JXWjBWZmplQjcxYk54MDBwYktNanln[/video]

msd58, do you happen to have the service/parts receipt handy for part numbers along with your stern drive or transom assembly serial numbers?

I don't have the P/N's for the hinge pins or the gimbal ring that I replaced handy but I will look them up and post them. I cleaned up around the bushing AND took pics of the pin/bushing/trim sender. The pin resembles the one previously posted AND the trim sender gear is intact.

Picture: https://photos.app.goo.gl/DA1LkSsh5fL5ZGRD8

Vid: https://photos.app.goo.gl/8GMg4qAaY9vNAAkX8
 
Last edited:

Bt Doctur

Supreme Mariner
Joined
Aug 29, 2004
Messages
19,410
Your best bet its to have a SS bushing made and pressed in . adding grease fittings an the older style hinge pin with the grease groove or machine a grease groove in your hinge pin.
 

msd58

Petty Officer 1st Class
Joined
Feb 14, 2003
Messages
299
Your best bet its to have a SS bushing made and pressed in . adding grease fittings an the older style hinge pin with the grease groove or machine a grease groove in your hinge pin.

Yes looking to add zerk fitting and grooved hinge pin style.
 

msd58

Petty Officer 1st Class
Joined
Feb 14, 2003
Messages
299
Still don't understand why bushing only lasted 3 seasons.

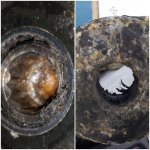
Bushing on the left is current hinge pin bushing three years old. Then one on the right it my old one gimbal ring. 15 years old that was shredded also. Both port side bushings:
​​​​​​https://photos.app.goo.gl/hRjFJBVUV4mzmhx89
 

alldodge

Moderator
Staff member
Joined
Mar 8, 2009
Messages
42,968
Are the stainless ground cables installed?
How are the anodes

20191203_072332.jpg
 

msd58

Petty Officer 1st Class
Joined
Feb 14, 2003
Messages
299
All stainless bonding straps in place and attached. Anodes were in a typically sacrificed state when boat was hauled. Mostly the same in previous seasons.
 
Top