Why do I keep doing this to myself? (hint: because I love a challenge)

archbuilder

Vice Admiral
Joined
Sep 12, 2009
Messages
5,697
Etching primers generally work well on most metals, as long as they are clean and sanded. It will also work on stainless, assuming you have a quality primer. I always wonder about the rattle can versions since they aren't catalyzed, but for sure better than a non-etching primer.
 

AShipShow

Lieutenant Commander
Joined
Jul 8, 2016
Messages
1,803
The best of the best primers for aluminum is zinc chromate primer but its hard to find cuz its a little nasty chemically. The next best is etching primer, and then worst is normal primer and it won't last long.
I bought some rustoleum aluminum specific primer for my ski locker trim... I've never used it before so we'll see how it works out... I used self-etching primer on my outdrive and had good luck with it...
 

emoney

Commander
Joined
Jul 19, 2010
Messages
2,551
Hopefully I get to try the etching primer this weekend. I plan to paint the bracket I just picked up before switching it out. I was still holding on to a little hope that I could get the one that's attached working, but when I was bleeding it, some of the thickest gunk ever started pouring out. Not sure if that means the seals went bad and water got it, or someone used the wrong type oil. It's pouring out straight ATF now, and there's no air, but the main cylinder still isn't moving. I'm going to try one last thing and switch out the trim sensory thingie since I now have two, but it seems hard to imagine that's the issue.
 

emoney

Commander
Joined
Jul 19, 2010
Messages
2,551
I got the carb covers in and the new primer solenoid. Hooked it up and she choked just like designed and fired right up. It wouldn’t idle for long but I didn’t push the issue because I haven’t checked the water pump to make sure it’s cooling and also I have a loose fuel line that I can’t figure out where it attaches. If you get a chance and have any ideas, please stop by the new thread I started asking for help over in the Evinrude outboard forum. Thanks!
 

emoney

Commander
Joined
Jul 19, 2010
Messages
2,551
Problem solved thanks to this forum. There’s a nipple on the air box I just got in the perfect spot, what do you know lol. Just had her running on the muffs long enough to make sure she’s peeing ok. After about 16-18 seconds it finally started to flow. It was not always steady but only for a second. I figure some of that is from sitting because I think she just ran for the first time in a good while. Now I’ll order the impeller at the very least but she’s running!!! Woot woot. Of course now the hard work comes in making her presentable. More to come.
 

emoney

Commander
Joined
Jul 19, 2010
Messages
2,551
Water pump is ordered and should be here tomorrow. I’ll probably hold off on replacing it until I get this tilt bracket squared away just to make it easier when I can lift the motor by button, lol. I ordered the whole pump btw. Might as well do it all if I’m dropping the leg.

I got my new “mom” switch installed and working on the dash. It just doesn’t seem like it’s worth it to spend $120 on the OEM switch for the control handle. I’m sure it’s that much because there aren’t many left since it’s obsolete. The dash switch works just fine.

Got the faring started today. Trying to fill every little nick and cranny that I can find before paint. The gelcoat on this thing is so thin on the cap that getting the spider cracks ground out has been pretty simple. Still over 90 down here so I’m hoping the weather breaks soon because I’m almost ready for paint. Oh, I’ve ordered three round access panels because I can’t really get to the two thru-hulls on each side that are to drain the two fish/ice/storage boxes. Who knows what kinda shape the drain hoses are in. The third one is for in between the seats. There’s a large void there where the factory got cheap on the foam and I don’t like it. So I plan to pour my own. Kinda looking forward to that part, lol. Not a great pic day but here’s a couple proof in the pudding pics.
 

Attachments

  • photo321645.jpg
    photo321645.jpg
    75.9 KB · Views: 0
  • photo321646.jpg
    photo321646.jpg
    74.4 KB · Views: 0

emoney

Commander
Joined
Jul 19, 2010
Messages
2,551
So I’ve got a stuck pin on this 2nd sea drive so I’m thinking I’m definitely going to need to switch brackets. Now I need to figure out how to do that. I’ve got a cherry picker to lift and hold the outboard but the select trim on that half of the bracket weighs a ton and I needs to turn sideways for the pump to be able to slide in the transom portion of the bracket. Ugh. I may at least try to find a machine shop that wants to tackle getting that pin unstuck because that would save 1/3 of the weight I’m sure. The bracket on my boat is a newer design so OMC obviously knew they had a problem. The swivel pin was a piece of cake to get out but the one holding the tilt cylinder is a different story. Unless anyone has any ideas?

Hey I did cut a piece of foam to fit the top of the cabin for the cuddy seat so there’s that. Celebrate all the little things I always say.
 

emoney

Commander
Joined
Jul 19, 2010
Messages
2,551
Spent all day yesterday on the select trim that’s on the boat and while I did get it working in the down position, wouldn’t go up. I also noticed the trailer bracket is broke so at the end of that frustration realized i have no choice but to switch brackets. Cleaned up some of the rats nest wiring and got in my OEM red tilt switch for the lever so now I’ll have both that and the dash toggle i have already wired. This morning was spent sanding the hull, since the motor now fires up first turn. I’m starting with 120, will finish with 220 next weekend and hopefully start getting the primer on. I set a goal that she will splash the week of Thanksgiving. I figure I’ll get my sons over next weekend as well to help me get the new bracket on. Oh I did get it painted to match at least so there’s that and I added the pic of foam for the front cushion. Baby steps folks, baby steps
 

Attachments

  • photo321885.jpg
    photo321885.jpg
    66.2 KB · Views: 1
  • photo321886.jpg
    photo321886.jpg
    58.5 KB · Views: 1
  • photo321887.jpg
    photo321887.jpg
    61.1 KB · Views: 1
Last edited:

emoney

Commander
Joined
Jul 19, 2010
Messages
2,551
Well, I thought I was done. Then the sun set and it started to cool off so I decided to drop the leg. I’m glad I ordered the entire water pump because this one looks original. Exhaust housing decided to come down too. Looks awful oily in there but the guy before me fogged it and did the Seafoam he said in his attempt to get it running. If he would’ve found that primer solenoid problem I probably wouldn’t have got it, so bully for me. Try to overlook the messy shop but I’ve got so many projects on this one that I’m leaving everything in the middle as motivation lol. Hopefully this will lighten the load a little for the bracket swap next weekend.
 

Attachments

  • photo321889.jpg
    photo321889.jpg
    71.7 KB · Views: 1
  • photo321890.jpg
    photo321890.jpg
    72.2 KB · Views: 1

emoney

Commander
Joined
Jul 19, 2010
Messages
2,551
Yeah...it’s been on a little bit long. Lots of rust on the driveshaft too.
 

Attachments

  • photo321891.jpg
    photo321891.jpg
    69.5 KB · Views: 1

emoney

Commander
Joined
Jul 19, 2010
Messages
2,551
Finally got the rusted on impeller off!! Had to cut it in two places before it would come, but it’s off and the new one is back on. Sanded off the rust as much as I could on the driveshaft and put some waterproof grease in it. The impeller didn’t look horrible so someone changed it not too long ago but the gasket was pretty tired.

i can’t find anything in the service manual that mentions an O-ring on the top of the shaft so I’m assuming it doesn’t get one? I did order the exhaust housing gaskets because looks like what was left of it was original, 23 years old lol. Getting some stormy weather down here so not sure I’ll get the bracket switched this weekend anyway so waiting for them to get here is no big deal I spose. Slow and steady is going to win this race for sure.
 

Attachments

  • photo322017.jpg
    photo322017.jpg
    53.6 KB · Views: 1
  • photo322018.jpg
    photo322018.jpg
    57.4 KB · Views: 1
  • photo322019.jpg
    photo322019.jpg
    39.4 KB · Views: 1

emoney

Commander
Joined
Jul 19, 2010
Messages
2,551
I didn’t take a pic but I also repaired my Ritchie compass with used EBay found parts. The original dome was busted and the fluid was all gone so I found an H73 that somebody was selling with no bracket and swapped it out. Yes, the boat will have GPS but on the Gulf you still need a backup plan to electronics I think. Plus a boat isn’t a boat without a compass, lol. $20 is a lot better than $165 for sure
 

emoney

Commander
Joined
Jul 19, 2010
Messages
2,551
I got the final parts in for this restore/remodel project. Now there's nothing left but the labor to get done. Ordered 3 inspection plates that came all the way from China. Actually pretty good quality I must admit. I'm installing one of them in the bow since there's no real access to the navigation lights up there, plus the factory didn't put an anchor locker in place either. This way I'll be able to drop the rode down there when it's not in use for the anchor and be able to check the wiring/bulbs on the lights. The other two, I'm not 100% sure where they're going yet. I have a void under the sole in the cockpit where said manufacturer got cheap on the foam and left a large void. I don't like spongy movement at all, so I have the 2 part to put in there, just not sure if I should go between the chairs or directly under them. I've also got a through hull on each side of the boat for the storage/wet boxes they put in right as the walkaround begins. I haven't tested them to make sure water flows well, but if it doesn't, there's definitely no way to gain access without cutting a hole, so that's why I ordered 3. We'll see.

The real "project" left, outside of the pretty stuff, is I need to make a new insert for the port side transom storage boxes. There's not one there. I'm guessing someone removed it to gain access to the battery. There's one on the starboard side, so I can use that as a pattern. I may need to learn how to make something out of fiberglass using a "mold", since this seems to be the perfect scenario?

All the primer and paint, along with painting supplies is here...foam for cushions (still need about 5 yards of vinyl)....headliner material for the cabin....replacement sea drive bracket...vinyl/pvc to replace all the wood (plan to rebuild the cabin door using pvc in place of the teak that's there now as it's on it's last leg), wiring/lighting updates I want to make...basically all the parts are spread out across my garage floor, to the dismay of the Co-Captain. So really, the only thing left to buy will come when it's time for the trailer to get all my attention. Now I just need time. The weather just turned perfect for working outside down here. Mid 80s during the day, 60s at night. I sure wish I wasn't going out of town this weekend, but my Niece is getting married in Kentucky, so there's no way around that. I'm still hoping to splash this sucker the week of Thanksgiving, but that may be wishful thinking unless I get really busy. Wish me luck!
 

emoney

Commander
Joined
Jul 19, 2010
Messages
2,551
Sooo I finally got a free weekend so I pulled the motor and swapped the tilt bracket. And, it works!! $50 cherry picker from FB marketplace worked well!
 

Attachments

  • photo322383.jpg
    photo322383.jpg
    82.6 KB · Views: 0
  • photo322384.jpg
    photo322384.jpg
    86.6 KB · Views: 0
  • photo322385.jpg
    photo322385.jpg
    76.8 KB · Views: 0

emoney

Commander
Joined
Jul 19, 2010
Messages
2,551
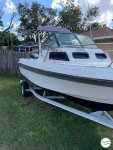
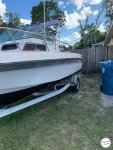
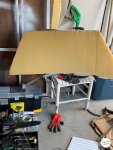
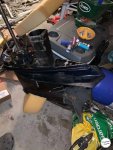
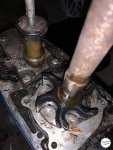
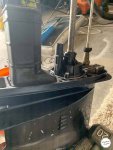
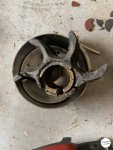
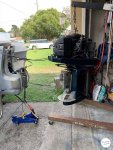
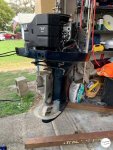
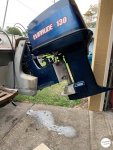
Thanks. You know each task I undertake, when you see me sharing those steps, is something I've never really done before or was concerned about doing. Like most people, I had no clue what these SeaDrive's where all about, but now that I've tackled one, they are pretty basic systems, just a few extra moving parts. I've pulled a motor before using a hoist, but never a cherry picker, so I shared that as well, lol. Actually, this was quite easier to take off than it was to put on when you're by yourself, but I eventually maneuvered it into place.

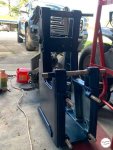
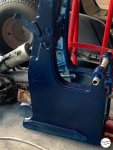
Something a lot of people don't take into consideration when taking on a project, and things all of you that have already know, is the cost of tools that you don't already own. Yes, the 2nd/3rd/4th one get a little less expensive, but even though I had a lot of stuff, this one is costing me in the tool department just as well. I had to buy a new grinder, didn't own the cherry picker, and had to spend $12.00 for a deep 15/16th socket that I also, didn't own, plus a 1/2-3/8 adapter that cost $7.00. Those little things add up pretty quickly, so if you're debating one of those jobs, make sure you're ready for the added expenses.

Having said that, I do things like this because it's therapy for me. I suffer from some PTSD and acute anxiety, but when I'm working on the boat, all of that is forgotten, time flies, and I can escape those pangs. In the end, it kinda makes it all worthwhile. Some people drink/smoke/do drugs/whatever....I like to scrape skin off my knuckles. To each his own, lol.
 
Top