Working under the back deck/splashwell

Watermann

Starmada Splash of the Year 2014
Joined
Jan 12, 2013
Messages
13,827
Guys mainly think of 5200 as a sealer but it's a powerful adhesive as well. Repair looks good and strong from here.
 

theoldwizard1

Petty Officer 1st Class
Joined
Feb 25, 2014
Messages
341
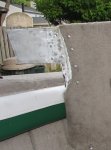
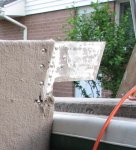
Thanks Waterman ! I actually knocked the back off of a few of those pop rivets now that the 5200 is set.

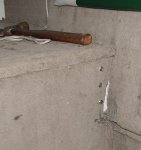
I have been fighting with the port side "wing" that I cut off. It was still stuck behind the side interior panel. So while staring at that area in frustration. I noticed 2 screws imbibed in the side panel carpeting. What the heck, let see what happens when I take them out !

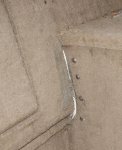
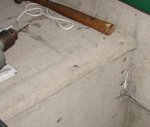
Low and behold, the little aft panel inside the rod locker pops off and you can now get your hand on the cut off wing ! Pulled it out, peeled the carpet off, scraped as much carpet glue as I could off, sand (60, 120, 180), clean (Brakleen), 5200, and more pop rivets. Now wait somewhere between 48 and 72 hours.

Maybe taking those side interior panels off is not as hard as it looks ! Just got to find all of the screws.
 
Last edited:

theoldwizard1

Petty Officer 1st Class
Joined
Feb 25, 2014
Messages
341
No Title

It's D O N E !!!

Seat base on casting deck was reinstalled with new SS machine screws, now that I can easily reach the under side

These first to pictures show the "wings" (minus their carpeting) that I have been taking about and how far they have slip under the interior sides of the boat.

fetch


fetch


The next 2 show the panel in place (yes I had to dis- assemble the wings from the panel and fit the in first), That is bare metal you see in the corners.

fetch


fetch


The last 2 pictures are the same as the previous 2 picture but from a higher angle to show that it was re-assembled using #10 oval head screws and trim/finish washer. Easy to find the screws tor removal !

fetch


fetch
 

Attachments

  • photo246380.JPG
    photo246380.JPG
    92.4 KB · Views: 2
  • photo246381.JPG
    photo246381.JPG
    109 KB · Views: 2
  • photo246382.JPG
    photo246382.JPG
    137.4 KB · Views: 2
  • photo246383.JPG
    photo246383.JPG
    125.9 KB · Views: 2
  • photo246384.JPG
    photo246384.JPG
    172.2 KB · Views: 2
  • photo246385.JPG
    photo246385.JPG
    183.1 KB · Views: 2
Last edited:

theoldwizard1

Petty Officer 1st Class
Joined
Feb 25, 2014
Messages
341
The connections LOOKED CLEAN but the amount of current going to the gas gauge is so small (milliamps) that the least amount of corrosion would make it not function, I just separated the connection and re-connected them about a dozen time and it started working ! I saturated the little plastic shield with fluid film.

Grrr ! Splashed her in at the lake where we are staying and the fuel gauge is pegged a FULL (meaning it is not working). When I get home, I will remove the panel and SOLDER that damn connection !
 
Top