1969 Johnson 9.5 Rebuild

Calcasieu

Seaman
Joined
Aug 27, 2015
Messages
54
​I am in the process of rebuilding at 1969 9.5. I wanted to gather your thoughts on the condition of the cylinders and what I should do to them if anything. Compression in both cylinders was 65 cold before tear down. Good compression for these is between 65 and 75, so we are good there. There is some very light superficial rust towards the tops of the bores. Would ya'll hone them or leave them be?

http://postimg.org/image/y4wnhc07h/
 

F_R

Supreme Mariner
Joined
Jul 7, 2006
Messages
28,226
What are your plans? Does your rebuild include new rings? If so, hone (deglaze) it so the new rings will seat.
 

Calcasieu

Seaman
Joined
Aug 27, 2015
Messages
54
My plan for this motor is simply to make it run, and give me a long life of good use. By no means am I trying to make it perfect. Just a good reliable motor. I would like to use the same rings I currently have.

I have taken the entire thing apart and cleaned everything. Next I will be replacing all gaskets, seals, hoses and wires.

I guess my question is do the cylinder walls look to be in good enough shape to slap it all back together without worrying about honing? I can post more pictures if that would help.
 
Last edited:

gm280

Supreme Mariner
Joined
Jun 26, 2011
Messages
14,605
I guess I missed something. If the compression was in range (according to your assessment), why did you disassembly the engine? If it wasn't running, you should have started with the carb and ignition system in my opinion. I guess I don't understand... :noidea:
 

Calcasieu

Seaman
Joined
Aug 27, 2015
Messages
54
It's a long story here it goes.

I bought it 99% complete non running. I initially took the lower unit apart to inspect mechanical integrity. All checked out. I then checked spark. Sprayed both plugs with fuel mix and pulled the rope and it turned over for a split second. I though cool, Ill keep moving forward. I then moved on to compression. I got 45 out of both cylinders cold after soaking the bores and pistons in PB Blaster. Not good. I figured I should pull the head off and inspect the cylinders. All 8 head bolts were seized....I was able to get all but two out with heat. The other two broke off in the head. I tried soaking what was left of the bolts and vice gripping them out to no avail.

I then found a used powerhead for 35 bucks which I jumped on (the pictures of the cylinders is this new powerhead). This powerhead had compression of 65 in both cylinders. Since I have to tear down the OB to swap powerheads I wanted to inspect everything thoroughly before putting it all back together again. I started with the exhaust ports and they were filthy. REALLY FILTHY. I cleaned them up and then moved on to the intake manifold. There was some grime in some of the screens. Now I am checking out the cylinders and wanted your opinions on their condition and if they needed attention.

I am hoping this clears things up a bit.
 

F_R

Supreme Mariner
Joined
Jul 7, 2006
Messages
28,226
If you are putting the rings back in their original positions, honing should not be necessary. Result should be like it was before you took it apart. But 65psi isn't too impressive. Were all the rings free in their grooves? Have you checked the end gaps in the cylinders? If you don't get them back in their original positions, the outcome is unpredictable. In that case, a light glaze busting should help them reseat in their new homes. If they are not otherwise too worn. If they are, hone it and install new rings.
 

Calcasieu

Seaman
Joined
Aug 27, 2015
Messages
54
That is great advice. I have yet to take the pistons out to check the condition of the rings. I also don't own a micrometer but there appears to be no uneven wear, and there is no "lip" formed at the top of the cylinders. They seem to be in great shape from the small view of them I had through the exhaust and intake manifolds looking through the ports.

I think I will end up just leaving the rings where they are and clean everything else as long as none of them are stuck.

Below is the compression section of leeroysramblings on these motors found at http://www.leeroysramblings.com/OMC_9.5.htm. Even though 65psi is low for basically every other motor it is fine for these.

Compression : Compression on these motors may seem lower than some of the others. Displacement of the these 9.5 hp motors is 15.2 Cubic Inches with a Wide Open Throttle of 4500 RPMs. Where the later 9.9/15 HP motors utilized 13.2 CI at 5000/6000 RPM, where higher RPM increases the HP. A normal compression reading of 65# to 75# appears to be fine for this motor.

Thanks so much for the replies. I hate when rebuild posts are left unfinished. I will keep this updated until cruising down the river.
 

gm280

Supreme Mariner
Joined
Jun 26, 2011
Messages
14,605
It sound good that there is no lip on the top section of the bores. However, Until you can check the ring end gaps, you have no idea if they are good or need to be replaced. And you don't have to have a micrometer to check end gap. A simple feeler gauge sold in most every auto parts store cheaply is all you'll need. Remove the piston with rings, remove the rings and install the ring back in the cylinder about a 1/2" to 1" below the top edge. Try to get it level all the way around. Then take a feeler gauge and start inserting increasing sizes until you can't fit the next size up. That last feeler gauge you could fit in will be the end gap. If that number is within the limits, then you are good. However, I would even do a light hone to break up glaze and allow the rings to reseat if I were doing this. If you need new rings, then you really should hone for them and reassembly again... JMHO!
 

Calcasieu

Seaman
Joined
Aug 27, 2015
Messages
54
Am I inserting the feeler gauge in the space where the two ends of the piston ring meet? That sounds easy enough, and the exact sort of advice I was looking for. I will hopefully be able to do this Sunday. There is a harbor freight right down the road where I can get a feeler gauge.

Thank you!
 

geoffwga1

Petty Officer 1st Class
Joined
Aug 8, 2010
Messages
395
When you're done and start puting it back together let me know how you go about reinstalling that cowling will you.LOL I have two of these little monsters to rebuild.
 

Tim Frank

Vice Admiral
Joined
Jul 29, 2008
Messages
5,346
If you still have the old powerhead, I'd take it to a machine shop and have them remove the broken bolts.
 

mirrocraft16

Seaman Apprentice
Joined
Oct 1, 2014
Messages
38
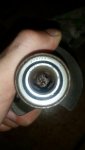
I'd take a closer look at those linear marks, especially those at the bottom of the bore in the pic, down near the piston, if you can catch a finger nail in those grooves, your going to have to consider at the very least new rings and honing.
The light rust at the very top of the bore is minor, I'd just clean it up with some scotchbrite or fine steel wool. Pay attention to the piston skirts too, make sure there's no scuffing. If it were mine, if your to the point of removing the pistons and rings, it wouldn't make much sense to at least hone the cylinders and replace the rings.
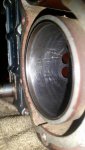
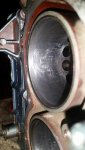
The cylinder still shows the original crosshatch pattern from the original bore job, so the block itself has minimal wear but run any motor just once with a bad water pump impeller or out of the water and get it hot, its not uncommon to see damage to the rings or pistons from heat.

Keep in mind too that piston rings do lose some tension with age and heating and cooling cycles, and that motor is 40+ years old.
65 psi is OK for a compression reading but I've got two of those motors here, one is a super mint condition survivor I bought from an old guy I fished with for years that gives me 95 psi on both cylinders every time I pull the rope. I did a complete rebuild on my 1972 9.5hp Evinrude back in March, it had low hours but sat for 20 years. It wasn't seized but it was pretty tight, so I pulled it completely apart and went through it. The motor looked new but I opted for new rings, all new seals and gaskets, new coils, points, and condensers. That one gives me 124 psi on both cylinders after about 20 hours or run time now.
The increase in compression is noticeable, it definitely takes a firmer grip to pull start that one but it runs great.
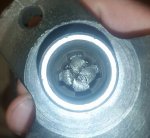
The old rings were in spec gap wise but had lost tension, and no doubt had some carbon build up in the ring lands. The pistons cleaned up like new, and I reused all the bearings.
I think I put about $400 in parts into that motor, but that included paint and decals as well. (Cost me $60 to get a paint store to match the original paint properly since I couldn't find a suitable rattle can to match). The rings and OEM carb kit, OEM water pump kit, and gasket set weren't cheap but the end result was well worth it.
The only problem is now I have to be too conscious of not scratching the paint now. I still often take my old well worn 9.9hp just so I don't have to worry about cosmetics.

When these little motors are fresh and running right their not a bad little motor, their lighter weight makes them a good option for a smaller aluminum boat. The low profile also makes them easier to fish around or shoot around.
 

Calcasieu

Seaman
Joined
Aug 27, 2015
Messages
54
geofwga1: I will try and articulate how I put it all back together when I get there. It will be about a month before I get there.

Tim Frank: I will keep the old powerhead around for spare parts. But the cylinder walls are in pretty poor shape and would most likely need to be bored. Oversized rings and pistons are hard to find and expensive unfortunately...

mirrocraft16: I will definitely keep all of that in mind when I take it apart. Thanks for all the great advice. The compression readings you have on yours is insane! I will hopefully be able to get it apart and get some measurements this week. The general consensus seems to be new rings. I will look into that. Might as well while I have this 45 year old thing apart.

Q1: As far as honing should I use a three pronged stone hone? Or a flex hone? I only plan on doing a few passes in each cylinder. As little honing as possible.

Q2: I will also be resurfacing all of the gasket meeting surfaces to make sure it's all squeaky clean before I put it all back together. Should I use Emery Cloth or Sandpaper? Any grit recommendations?

Q3: Some of the old gasket material is going to give me trouble upon removal. Is there any sort of solvent ya'll recommend? The service manual says Trichloroethylene solvent to remove gasket material. Trichloroethylene is now super expensive and regulated. Any good alternatives to gasket remove that isn't a pain in the ass?

Thank You All!
 
Last edited:

Calcasieu

Seaman
Joined
Aug 27, 2015
Messages
54
Took the crankcase off today, and got the pistons out. I took the rings off and measured the ring gap. Sure enough they were just in spec or just out of spec. I ordered all new rings. Got all 6 for 50 bucks which I thought was a pretty good deal. It wasn't as scary as I thought pulling the pistons out, bagged all 90 roller pins and labeled everything. (first motor rebuild of any type)

Upon removal of the pistons, the wrist pin bearings were making a lot of noise and hammering that wrist pin out was a pain in the ass. Got it out cleaned everything and put a light coat of engine assembly lube. Everything feels much better now. That was my only hangup.

After that I cleaned all the ring grooves and tops of the pistons.

Along with the piston rings I ordered all new gaskets.

I ended up getting a standard stone hone. I got 150, 220, and 320 grit emery cloth to resurface the gasket surfaces.

I am well on my way!
 

Calcasieu

Seaman
Joined
Aug 27, 2015
Messages
54
Just finished deglazing the cylinders and they came out wonderfully (see picture). I had to replace the crankshaft on my new powerhead with my old one due to severe pitting on the bottom where the driveshaft inserts (see picture). The old one is in much better shape.

I am waiting on piston rings and 3M 847 in the mail. Until then I am going to clean up the gasket faces and clean the egone to prep for the powerhead rebuild. It's all downhill from there!

Will post back soon with more updates.
 

Attachments

  • 2015-09-07 21.04.57.jpg
    2015-09-07 21.04.57.jpg
    40.8 KB · Views: 0
  • 2015-09-07 21.06.25.jpg
    2015-09-07 21.06.25.jpg
    39.2 KB · Views: 0
  • 2015-09-07 21.07.45.jpg
    2015-09-07 21.07.45.jpg
    36.9 KB · Views: 0

Tim Frank

Vice Admiral
Joined
Jul 29, 2008
Messages
5,346
Not sure that the old crankshaft is a problem, but if you have a better one, I guess no harm in using it.
 

Calcasieu

Seaman
Joined
Aug 27, 2015
Messages
54
No Title

Yea I was on the fence about it as well. Two of the splines were in great shape, while the other two had no form. I was using a gun bore brush to get the rust off and it runs really deep. The splines on my old crankshaft are perfect.
 

Attachments

  • photo229786.jpg
    photo229786.jpg
    280.8 KB · Views: 0

nabiul

Petty Officer 2nd Class
Joined
Jul 18, 2015
Messages
131
Please post the compression results after you get it back together, I am really curious if deglazing is actually beneficial or harmful to an old motor. Logic says that it should do more harm than good, but only results can tell.
 

racerone

Supreme Mariner
Joined
Dec 28, 2013
Messages
38,881
More than 40 years of doing this kind of work.----Would never put a motor together without deglazing and establishing a nice crosshatch pattern on the cylinder walls !!!!
 

nabiul

Petty Officer 2nd Class
Joined
Jul 18, 2015
Messages
131
More than 40 years of doing this kind of work.----Would never put a motor together without deglazing and establishing a nice crosshatch pattern on the cylinder walls !!!!

Even when re-using the old rings?
 
Top