Cracked and soaked fiberglass motor mounts on Sea Ray 200cc

ripazka

Petty Officer 1st Class
Joined
Jul 30, 2016
Messages
246
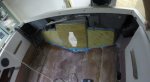
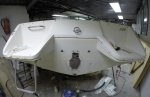
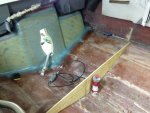
That sucker stays there rock solid. I started to loosen the nuts few hours ago. Will do the rest in the evening. Today I will grind a bit near the drain hole and finalize that section. My goal is to be ready with the transom before Saturday, then I'll have a week off.

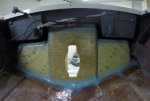
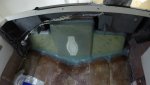
Then its time to start to build bulkheads and stringers. I think waterproofing and glassing them will take more than I have planned so Im already starting to prepare myself for a marathon.
 

ripazka

Petty Officer 1st Class
Joined
Jul 30, 2016
Messages
246
No Title

Almost ready for tabbing. Tomorrow I will do last PB fixes near the drain hole.
 

Attachments

  • photo258063.JPG
    photo258063.JPG
    312.5 KB · Views: 0
  • photo258064.JPG
    photo258064.JPG
    368.1 KB · Views: 0

ripazka

Petty Officer 1st Class
Joined
Jul 30, 2016
Messages
246
Ok today I figured out my PB swelling problem. I stirred the epoxy well and added the cabosil until it was like vaseline. I kept stirring for a minute and then I could add alot more cabosil. After that it was very heavy PB and the heat formation was a lot milder so I could handle it a lot easier. No swelling at all. So the difference to previous session was that I added the cabosil a lot slower and stirred more. This epoxy must be a bit lower visco and it is more exothermic than my previous epoxy batch. Nevertheless it works now! Pics coming!
 
Last edited:

ripazka

Petty Officer 1st Class
Joined
Jul 30, 2016
Messages
246
No Title

Transom tabbed in. Im very pleased how it turned out.
 

Attachments

  • photo258177.jpg
    photo258177.jpg
    76.9 KB · Views: 0

ripazka

Petty Officer 1st Class
Joined
Jul 30, 2016
Messages
246
Thanks guys!

Transom is now partly skinned. I have to put two more layers to get the correct thickness and to cover the whole area. It was pretty straight forward job I just ran out of time. Now a week off part 1 starts. Ill get back with some transom pics after that, see you!
 

ripazka

Petty Officer 1st Class
Joined
Jul 30, 2016
Messages
246
I'm back in biz for one week. After that I have another trip so I will be away for another week. I think I need to make some room to calendar in March to be ready before June.
 

ripazka

Petty Officer 1st Class
Joined
Jul 30, 2016
Messages
246
No Title

Allright, the skin is done now. It took 5 layers of 17oz woven because I had to get correct thickness. I test installed the transom to know where it stands so I knew where to start the first layer of skin. The smallest part of skin is 2 inches bigger than the transom shield. Now the transom thickness is just same as from factory EXCEPT the bottom and the top thickness is exactly the same. Not 1/4" off like from the factory... Sorry for bad pic quality, there was not enough light in the garage though.

I try to get my bulkheads ready this week and hopefully the drain pipe too, which I bought today. Im not going to make sweep holes, the drain pipe is just to get the water out from the cabin's floor (it is lower than the deck itself). It is going to be just the same than from factory. But of course, I try to do it a bit better but the idea is the same.
 

Attachments

  • photo258788.jpg
    photo258788.jpg
    143.7 KB · Views: 0

ripazka

Petty Officer 1st Class
Joined
Jul 30, 2016
Messages
246
Today I made the measurements for the bulkheads. I will have 4 of them and add some additional side supports to make my frame rigid. Sea Ray had bulkheads that were the same width than the stringers were away from each other. These side supports will stiffen up the hull as well as the deck from bending. PO cut the rear bulkhead for some reason so I think I will see major difference now.
 
Last edited:

ripazka

Petty Officer 1st Class
Joined
Jul 30, 2016
Messages
246
No Title

The first bulkhead is ready now. The rest are pre-cut too. There are still some cleaning ahead and I still need to glue the drain pipe in. I hope Im pretty much done cutting the stringers and bulkheads after this weekend. We'll see...
 

Attachments

  • photo258898.JPG
    photo258898.JPG
    386.9 KB · Views: 0

bjf66

Chief Petty Officer
Joined
Dec 6, 2016
Messages
406
good job looking good
hope I can get my rebuild looking as pretty as yours
 

bjf66

Chief Petty Officer
Joined
Dec 6, 2016
Messages
406
Ripaska

Did you end up using Poly or Epoxy?
as was interested whether you layered up transom skin with 2oz CSM/17 Oz, or used the 17oz on top of each other, without layers of CSM in between the 17oz
 

ripazka

Petty Officer 1st Class
Joined
Jul 30, 2016
Messages
246
Ripaska

Did you end up using Poly or Epoxy?
as was interested whether you layered up transom skin with 2oz CSM/17 Oz, or used the 17oz on top of each other, without layers of CSM in between the 17oz

I actually ended up to use the epoxy. The biggest reason was to keep my house liveable and not mind about the smell inside. My garage is attached to my house and it was pretty much impossible to keep that smell out. CSM is for poly. I used only 17oz layers on top of each other. One layer including the woven is about 0.7mm each. With poly I would use 1708 as many pros here, which Im not.
 

bjf66

Chief Petty Officer
Joined
Dec 6, 2016
Messages
406
Im using VE and garage is attached to house, I havent found the fumes to bad, although temperature this summer in Melbourne has been rather mild
cheers
 

ripazka

Petty Officer 1st Class
Joined
Jul 30, 2016
Messages
246
Im using VE and garage is attached to house, I havent found the fumes to bad, although temperature this summer in Melbourne has been rather mild
cheers

Im a bit jelly for your location lol. Its way below zero here and my house basically sucks everything inside when that happens. Draft because of air density difference (my garage is underneath my house).

Enjoy your project. Hope to see a project thread with pics from your boat!

Friscoboaters youtube channel is ace, check it out.
 

Baylinerchuck

Commander
Joined
Jul 29, 2016
Messages
2,740
The key I have found is negative pressure in the garage. Keep the air pressure lower in the garage so the air is pulled from the house and not the opposite. Believe it or not, I've done all my layups in the closed garage which is below my house. I'm using polyester resin so I have plenty of stink. I vent from a window in my garage so the makeup air is pulled from the house. Trust me, you can't smell anything in the house. Works quite well. 👍🏼
 
Top