40EL75 Rebirth

oldboat1

Fleet Admiral
Joined
Apr 3, 2002
Messages
9,612
Yup. always easy enough to check the temp on the top of the head to make sure it runs at proper temp. Look for a good flow of water out of the port on the rear of the leg within seconds of start up (actually, during cranking if it’s a little slow to fire up).

Pumps are pretty simple, as mentioned. I like to at least turn the shaft by hand after the impeller is installed (can hear and feel the impeller turning in the housing). Different strokes….

Hope you post back after test running.
 

oldrem

Commander
Joined
Nov 7, 2013
Messages
2,002
Put the gear case back on this afternoon. Missed the hole for the shift lever my first try, but got it the second time lol

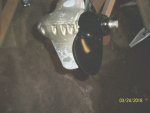
I hadn't realized until I slipped the prop on last night that about 1-1/2 - 2" of the skeg is missing causing the blades to stick out unprotected. I did some research today but couldn't find a guard for anything this old. I may have to buy a cast one and have it welded unless someone has a better solution.

Click image for larger version  Name:	skeg.jpg Views:	1 Size:	39.7 KB ID:	10549936

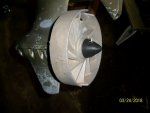
For now I just installed the test wheel so it's ready for a full barrel test when the weather decides to cooperate. - Eric

Click image for larger version  Name:	test wheel.jpg Views:	1 Size:	42.6 KB ID:	10549937
 

oldrem

Commander
Joined
Nov 7, 2013
Messages
2,002
Wellll What kind of trouble am I in now!

Finally had a nice enough day to finally fire it up - and it did as soon as I applied a little gas on the throttle. I though I was going to be able to fine tune it, when it started spitting. Once I realized what was happening I shut it down.

I did fire it back up briefly to add a closeup to the end of the video.

:( I have water coming out of the new head gasket :( WHAT COULD BE HAPPENING? I'm kind of frantic right now. Thought I finally had it.

https://www.youtube.com/watch?v=QeFkNVEKw3k&feature=youtu.be
 

oldboat1

Fleet Admiral
Joined
Apr 3, 2002
Messages
9,612
Nah. Not a big issue. The head is sandwiched between the head gasket and a cover gasket. It looks like your head gasket is leaking, as you say.

If the outer gasket wasn’t removed, I would leave it alone. But chances are your head is slightly warped and/or the head bolts were not replaced in the usual circular pattern and/or were not torqued down to specs.

I don’t have the torque spec in front of me, but the pattern is to work from the inner bolts in a circular pattern to the outer ones. Two or three passes with the last one to full torque.

Unless the head is wildly warped, you can resurface it yourself using 400 grit wet/dry paper on a perfectly flat surface. Some guys use a piece of glass. Wet the paper on both sides, and move the head around in a figure 8 pattern until all mating surfaces are equally shiny.

The lean sneeze may go away once you get the head cover sealed in place.

For the skeg, you might check Ebay or post an ad on the AOMCI site. Check the outboard boneyards if you have some available in the area.
 

oldrem

Commander
Joined
Nov 7, 2013
Messages
2,002
Nah. Not a big issue. The head is sandwiched between the head gasket and a cover gasket. It looks like your head gasket is leaking, as you say.

If the outer gasket wasn’t removed, I would leave it alone. But chances are your head is slightly warped and/or the head bolts were not replaced in the usual circular pattern and/or were not torqued down to specs.

I don’t have the torque spec in front of me, but the pattern is to work from the inner bolts in a circular pattern to the outer ones. Two or three passes with the last one to full torque.

Unless the head is wildly warped, you can resurface it yourself using 400 grit wet/dry paper on a perfectly flat surface. Some guys use a piece of glass. Wet the paper on both sides, and move the head around in a figure 8 pattern until all mating surfaces are equally shiny.

The lean sneeze may go away once you get the head cover sealed in place.

For the skeg, you might check Ebay or post an ad on the AOMCI site. Check the outboard boneyards if you have some available in the area.

Thanks oldboat, I'll try the resurfacing. I did replace both gaskets, and used the pattern and torque specs per the Johnson service manual. Will I need to buy another new head gasket?
 

oldboat1

Fleet Admiral
Joined
Apr 3, 2002
Messages
9,612
might be able to reuse the current head gasket -- they are pretty sturdy.
 

oldrem

Commander
Joined
Nov 7, 2013
Messages
2,002
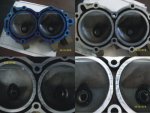
oldboat, you nailed a warp. I measured a .0060 drop across the center. After bluing it and 3 sheets of 400 grit wet I'm at .0025. Not sure if my old arms can do anymore today, but want to continue to .0015. I have 2 sheets left, so can hopefully achieve that. I've been re bluing the low areas between sheets.

from 006 to 0025.jpg
 

oldrem

Commander
Joined
Nov 7, 2013
Messages
2,002
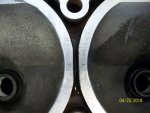
Thank you oldboat. I got it down today where I cannot get a .0015 gauge to start under the straight edge in any direction. Do I need to continue until those final little marks are gone?

less than 0015 b.jpg
 

oldrem

Commander
Joined
Nov 7, 2013
Messages
2,002
Although I'm tempted, the gasket clearly states : "DO NOT USE SEALANT" I didn't the first time, so unless there are wiser words I won't this time either.
 

oldboat1

Fleet Admiral
Joined
Apr 3, 2002
Messages
9,612
At the risk of starting a skirmish, I would call it a toss up. I've used a THIN coat of MarineTex on one or two heads that were pitted -- would say worse than yours. Applied with a razor blade, and then finished with wet/dry paper as in the resurfacing you did. OR use a finger tip thin coat of OMC gasket sealer in that center area. OR go ahead to put the self sealing gasket back on as is -- check it for seepage.

Be sure to retorque after test running.
 

oldboat1

Fleet Admiral
Joined
Apr 3, 2002
Messages
9,612
can't hurt. light coat.

looks like a nice job on the resurfacing -- little bit of work involved there.
 

oldrem

Commander
Joined
Nov 7, 2013
Messages
2,002
can't hurt. light coat.

looks like a nice job on the resurfacing -- little bit of work involved there.

Thank you. I use a fine modelers brush when I apply it. Should I do the whole surface or just the rings around the cylinders? (both halves of course)
 

oldboat1

Fleet Admiral
Joined
Apr 3, 2002
Messages
9,612
would do the full mating surfaces. I've found the brush can leave too heavy an application (depends on the temp of the sealer, I think) -- finger tips to follow up (heats and thins a little too).
 

oldrem

Commander
Joined
Nov 7, 2013
Messages
2,002
Well this is getting me down a bit. Tried again today. Started right up, but with the torque setting near the minimum (calls for 168 to 192 inch lbs) I was still getting water leaking out the head gasket. I calibrated my wrench with my digital meter to where I was at 15.9 foot lbs (192 ip = 16 fp) and re torqued. That pretty much stopped any visible water leakage.

With the test wheel, idle RPM in gear is 650-700. It sounds good to me just idling, BUT the chuffing sound is still there after revving the engine up and letting it come back down. The short video shows what I'm talking about. What can I do next please?

https://youtu.be/T-kvO61Neqw
 

oldboat1

Fleet Admiral
Joined
Apr 3, 2002
Messages
9,612
Need a little more water in the tub -- three or four inches above the pump (i.e., above the l.u. joint). Let it run at idle for a while and check the temp on the top of the head (130-140F, or so). Then shut it down and retorque the head bolts to spec.

A backfire (puff) back through the carb can mean an issue with the reed valves behind the carb -- think I would work on the air fuel mix a little first. You may be a little on the lean side, but I would do the counterintuitive thing first and lean it out just slightly. If you get a clear lean sneeze or stall, back it out 1/4 turn richer and try again (should be close for the mix).
 
Top