40EL75 Rebirth

oldrem

Commander
Joined
Nov 7, 2013
Messages
2,002
Finally had time yesterday to pull the carb for a rebuild. Found what I was afraid of - the old original cork float rather gasoline soaked, so I ordered a new float. Didn't look too bad other than that, but will do the laquer thinner soak and clean it up all pretty while I wait.

Also discovered I must have had a senior moment when I ordered the rebuild kit, I ordered a 7042 when it should have been a 7024. Oh well, had to reorder the right one. Inside Carb.gif
 

oldrem

Commander
Joined
Nov 7, 2013
Messages
2,002
How long should I soak carburetor body in lacquer thinner?

Edit: Gave it a little over an hour. Everything seemed to clean up nicely. Used my needle brushes to go through every tiny hole, flushed with carb cleaner and blew it all with a compressor. After I let the parts sit in front of a heater awhile I bagged all the cleaned parts to keep them until the rebuild parts arrive
 
Last edited:

oldboat1

Fleet Admiral
Joined
Apr 3, 2002
Messages
9,612
An hour in the lacquer thinner is good -- kind of whatever it takes, depending on how dirty the carb is. Mainly, need to get out any varnish from old fuel. Nice to get it the first time, but not awful to pull it apart again if you missed something.
 

oldrem

Commander
Joined
Nov 7, 2013
Messages
2,002
Hopefully, this will keep me from ordering wrong parts in the future: Click image for larger version  Name:	johnson 1975 parts catalog.jpg Views:	1 Size:	5.6 KB ID:	10532333

Do you guys recommend pulling the intake manifold assembly apart while the carb is out? (more gaskets to buy) Or is it usually not necessary?
 
Last edited:

oldrem

Commander
Joined
Nov 7, 2013
Messages
2,002
Health is keeping me from doing much this weekend, though I do plan on installing the new welch plugs and low speed needle etc today. I put 2 coats of clear dope on the old cork float and will drop it in some E10 gas in the morning to let it sit for 5 or 6 days to see how it holds up.

Could PLEASE use some advice on whether you guys think it's necessary to pull the intake manifold assembly apart while the carb is out?
 

lmuss53

Lieutenant Junior Grade
Joined
Sep 9, 2008
Messages
1,227
I would not pull the manifold off. Take a good light and look in there to see if you have an obvious crack or chip out of a reed and if that all looks ok, leave that alone.

The parts ordering web sights like iboats are the best place to find the correct part numbers for your motor.

I will re read the entire thread here in a minute, but if you don't have the factory service manual for your motor, you should get it now if you want to work on it yourself. The original OMC manual is the best, anything else is second best.
 

oldboat1

Fleet Admiral
Joined
Apr 3, 2002
Messages
9,612
to get at the reeds, you mean? I wouldn't do that unless there was a specific problem to be solved. (backfiring through the carb, absolutely unable to get it to idle, etc.)
 

oldrem

Commander
Joined
Nov 7, 2013
Messages
2,002
Thanks guys. Imuss53, I do have an original factory manual and just picked up an original parts list as well. I'll stick a barrel scope in there before reinstalling the carb. Hadn't thought of that before now. oldboat1 , I won't know that until spring when I can get it in a tub or at least on muffs. Too much freezing here for awhile. High temps mostly in the 20's for the next few weeks.
 

oldrem

Commander
Joined
Nov 7, 2013
Messages
2,002
Had some time today, so I inspected the inside of the manifold with a bore scope. Everything looks shiny and new.

My attempt to use dope to coat the old float began failing after 2 days, so I will be coating it with Por 15 Fuel Tank Sealer.

Ran some more electrical tests. Alternator tests passed, but 2 legs of the rectifier diode failed so will be replacing that as well.

I got to thinking about all the failed electric components I've found. I know the PO tried to get the motor going and I found some wires on the wrong posts on the old ignition switch. Could that have caused some of these issues? Guess it's a good thing I have time to check this out now before spring when I'm going to want to be working on the boats.
 

oldrem

Commander
Joined
Nov 7, 2013
Messages
2,002
Two coats of Por-15 on the float. Now I just have to wait 4 days for a full cure before putting the carb back together.

Por 15.jpg
 

lmuss53

Lieutenant Junior Grade
Joined
Sep 9, 2008
Messages
1,227
I'm not so sure about that float, maybe it works perfectly, maybe it never floats. Why don't you get a new one if you don't trust that one? .PN 0375792 around $12 probably right here at iboats.
 

oldrem

Commander
Joined
Nov 7, 2013
Messages
2,002
I'm not so sure about that float, maybe it works perfectly, maybe it never floats. Why don't you get a new one if you don't trust that one? .PN 0375792 around $12 probably right here at iboats.

I got the idea from an aircraft restoration site, where many are switching over to Por-15 as the supplies of the old Butyrate Dope are dwindling. I figured if it's good enough for aircraft carb floats it should be fine for an outboard. If it doesn't work well I can always order a new 0375792 as long as it's not old stock with the lacquer coating.
 

oldrem

Commander
Joined
Nov 7, 2013
Messages
2,002
I decided to quit for the weekend while I was ahead (plus couldn't stand on my bad foot anymore).

Installed the rebuilt carb yesterday, put the starter back on and the new rectifier diode. Didn't bother bolting the fuel pump back on since I have a new one en route. Got all my tools put away shortly before the Admiral got home so she could have her garage back and get her car out of the snow.

When she left to visit one of her daughters I started back in. Re ran compression tests with a tester I got on loan from O'Reilly which matched the readings exactly to my son-in-laws good one. I know for sure where I stand on that now.

Then came the spark jump test. Got a disappointing 1/4" on the lower and even worse 3/16 on the top (both new coils). Needless to say I pulled the flywheel again. This time I installed the new points and condensers I held off on last time.

After torquing the flywheel I retested. Nice 7/16" on the lower coil, but down to 1/8" on the top one grrrrrrrrr. I switched the wire around on the lower one and still had 7/16". Put some Noalox on the connectors and put the wires back where they belong and bingo, was getting 7/16" from both. I tested back and forth 3 times with good results. That's when I decided I'd had enough for the weekend. Time to clean up and relax.
Most nights are still below freezing here for awhile so not about to try any starting in water. I still need to replace the water pump before I do that anyway.
 

oldrem

Commander
Joined
Nov 7, 2013
Messages
2,002
Rather than trust the old fuel pump, I picked up a new one. Waiting for new A1 fuel lines to arrive before I install it.

Pulled the prop a few nights ago and planning on trying hammer out 1 small dent in it and dress it a bit. In all it looks pretty decent. Any advice there would be helpful.
 

oldrem

Commander
Joined
Nov 7, 2013
Messages
2,002
Took a better look at my prop and decided it needs more than I'd feel comfortable doing. Contacted a nearby prop shop and they won't work on one that old. Waiting to hear back from Prop MD in Minnesota.

dent.jpgchip.jpgprop 1.jpg
 

oldboat1

Fleet Admiral
Joined
Apr 3, 2002
Messages
9,612
Local outboard shop (old fashioned variety) should be able to give you a lead or supply a used prop in decent shape. Personally, don't think your prop looks too bad -- would work on it myself. JMO.
 

oldrem

Commander
Joined
Nov 7, 2013
Messages
2,002
Local outboard shop (old fashioned variety) should be able to give you a lead or supply a used prop in decent shape. Personally, don't think your prop looks too bad -- would work on it myself. JMO.

Unfortunately, the closest one is a 45 minute ride from here. Other than garage mechanics, all the shops around here want to work on are inboards or I/Os. For $48 including return freight I sent it off to Minnesota.
 

racerone

Supreme Mariner
Joined
Dec 28, 2013
Messages
38,484
?---I would warm that edge up with a wee torch and straighten it with a hammer.
 

oldrem

Commander
Joined
Nov 7, 2013
Messages
2,002
Accomplished a lot more today than I thought I might in the 3 hour window I had. I realized a few days ago that the stand I made according to the plans provided here would not allow for running the motor in a 55 gal drum. Before work this morning I cut new cross members for it 8" wider to allow a 2" clearance for my drum.

As soon as I got home, I lifted the motor off the stand and rebuilt it. I also added a 3rd cross member in the front to make a better platform for the fuel tank.

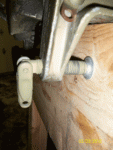
While I had the motor in the air, I decided it would be a good time to replace the broken clamp screw with a new one.

After getting the motor back on the stand I started installing the new fuel pump with the new lines. That was a total PITA! I hadn't paid attention to the fact that the new A1 lines were 1/8" larger in diameter (OD) than the old ones and it would not fit through the hole in the motor cover. Oh joy! It was time for the Dremel. One broken grinding wheel, two sanding drums and a ball wheel later I had the hole enlarged and smoothed out for the new lines. A few bad words were heard around the neighborhood, but mission accomplished.

About all I have left before I can trust the weather enough to give it a proper test run is to replace the gear oil and install the new water pump.

fuel pump and lines.gif
 

Attachments

  • screw clamp.gif
    screw clamp.gif
    42.1 KB · Views: 0
Top