Oh Crap, my transom

Joined
Jul 31, 2009
Messages
21
You can do it man, get on it. Most men do their honey-dos. Few men build boats.

Man, your firing me up! I love that motivation, I’m going to knock this little crap off the list and build a dang boat. I got to get my time line together and do some planning.
 
Joined
Jul 31, 2009
Messages
21
It never just the transom

Remove cap, cut out floor and take a good look at the stringers and foam

Using a screw driver wont cut it, you need to have a 5/16" drill and make a hole, then unspact the shavings, if the wood shavings are dry, light colored and smell like fresh cut wood, then epoxy the hole and move on to the next issue

If the shavings come out dark, wet and smell of rotten mulch......... Then fire up the saws and get busy.

60% of the job is the transom, another 20% for stringers and the remainder 20% is putting it all back

Is it correct that I take the rub rail off and under it is where I remove the cap? Watched a guy on you tube that put 2x4’s between the cap and the hull then cut out the wood areas in the floor, is that the process or is there a better one?

thanks in advance Scott
 

Scott Danforth

Grumpy Vintage Moderator still playing with boats
Staff member
Joined
Jul 23, 2011
Messages
50,944
Is it correct that I take the rub rail off and under it is where I remove the cap? Watched a guy on you tube that put 2x4’s between the cap and the hull then cut out the wood areas in the floor, is that the process or is there a better one?

thanks in advance Scott

you realize there is more DIY boat repair information in the stickies at the top of the forums than on youtube.

yes, pull the rub rail. you may also have screws down from the top. I did on my avanti

Here is a pic of me putting the cap back on after doing the transom, floor, etc

Click image for larger version  Name:	100_0435.JPG Views:	1 Size:	1.01 MB ID:	10872654
 

GSX455

Petty Officer 2nd Class
Joined
Aug 21, 2016
Messages
165
When you inspect the transom, don't go by a thumping sounds. Mine has a dull thud and I thought I might be okay. Cut a 1" hole on the inner skin and dig a little. If it's good use a patch kit over the hole. If it looks dark like this one did, you need to re-do the transom. My transom came out in chunks.

.
 

Attachments

  • photo331208.jpg
    photo331208.jpg
    15.4 KB · Views: 2
  • photo331209.jpg
    photo331209.jpg
    91.3 KB · Views: 2
Joined
Jul 31, 2009
Messages
21
you realize there is more DIY boat repair information in the stickies at the top of the forums than on youtube.

yes, pull the rub rail. you may also have screws down from the top. I did on my avanti

Here is a pic of me putting the cap back on after doing the transom, floor, etc


Scott thanks for the stickie insight, looks like great info.

Anyone know where on the forum to look for PPE recommendations? I have a respirator and need to know what cartridges to buy or I’m looking one of the masks that have the shield build in, I added a pic. Trying to kill multiple birds here as I do a little wood work, epoxy, and other grinding and fume related projects. Seems that would give some eye and lung protection.
 

Attachments

  • photo331306.png
    photo331306.png
    1.2 MB · Views: 0

gm280

Supreme Mariner
Joined
Jun 26, 2011
Messages
14,605
On the PPE issue. If you are grinding fiberglass and such, then that shield you posted the picture of, is a good setup and merely dust particle cartridges will certainly work. Most also suit up in a Tyvek type suit to keep the fiberglass dust away from your body. Gloves are also needed. When you start rebuilding, you can use VOC cartridges instead of the dust type filter to keep the fumes controlled. Hope that helps some...
 

88 Capri (2022 SOTY)

Master Chief Petty Officer
Joined
Aug 25, 2019
Messages
846
I got my boat non-running with rotted floors etc. It took me a couple of weeks to get her running which I then knew she deserved a new life :bump2:

I never have attempted rebuilding a boat before but after reading threads, getting expert advice and watching videos I knew it was something I wanted to do!
Since it was nearing the end of summer I knew there wouldn't be any rebuilding at that time so I took lots of pictures and started the dismantling process. In doing so I had a good idea what she needed and used the downtime over the winter to research wood, materials, and techniques for what needed to be done.
The biggest thing i found is dont rush and try to plan each step the best you can. This week will be too cool to fiberglass so I plan on making my rear seat, engine cover assemblies to keep the process rolling.
I have approximately 1.7k in my rebuild not including engine/sterndrive but the satisfaction i will have when she hits the water will be priceless!
 

kcassells

Fleet Admiral
Joined
Oct 16, 2012
Messages
8,739
You go BOYYY! Now you got it. Do you own the boat or is the boat owning you? hahaha.
It's a fun challenge. The results will be all yours and better than factory!
 
Joined
Jul 31, 2009
Messages
21
Long time since I last posted. Got a few questions for the elders about this project.

I heard horrible stories about removing the cap and not getting it back on right, is that real? Do I need a jig?

Working a full time, how long will this take me at 4-8 hours a weekend? Maybe more sometimes.

thanks in advance
 

kcassells

Fleet Admiral
Joined
Oct 16, 2012
Messages
8,739
You can just run straps across the boat with the cap off. It just makes working on it harder.
It does flex so don't let that happen.
other guys make it so its not in the way with studs and some ply.
 

kcassells

Fleet Admiral
Joined
Oct 16, 2012
Messages
8,739
Primarily out is what I understand.
Anyone on the forum have any pics for their boat cradles?
 
Joined
Jul 31, 2009
Messages
21
So looking at my transom pics, it looks like the plywood is on the outside and the fiberglass on the inside. Do you guys agree? If so, does that mean it needs to be rebuilt from the outside or inside? I still have to pull the cap to check stringers.
 

Attachments

  • photo334608.jpg
    photo334608.jpg
    297.7 KB · Views: 1

kcassells

Fleet Admiral
Joined
Oct 16, 2012
Messages
8,739
Looks like ply is sandbitched between hull and liner. Stand further back a little for pics.
 

TBigLug

Cadet
Joined
Jul 8, 2020
Messages
18
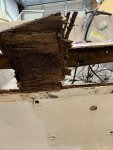
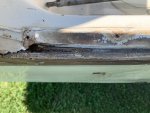
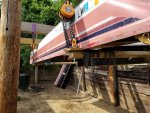
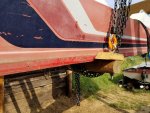
I'm not a boat mechanic but this is how I split my 1986 Smoker-Craft Avanti Deck boat. Unhooked EVERYTHING that connects from top of boat to bottom, pulled rubber out of the bump guard, pulled all the screws out of the trim, pulled about as many screws out that were under the trim (I have a feeling someone's split that boat before and never fixed anything), started with a wedge of 3/4 plywood to hold it apart at the corners, worked in two landscape timbers as cradles (it's what I had laying around), put blocks next to the upper hull to keep it from spreading out, hooked a HF chainfall to each corner and lifted slow. It's not as scary as it looks. If manufacturers made large plugs where you could jist unplug your electrics like the forewall plug in a truck the whole provess wouldn't take but an hour. If I had it to do over again I would put a board on the oitside of the landscape timbers connecting front to back. Would make for a more secure cradle since my lifting points aren't moveable so they aren't right where I wanted them.
 

Attachments

  • photo334661.jpg
    photo334661.jpg
    162.9 KB · Views: 1
  • photo334662.jpg
    photo334662.jpg
    120.8 KB · Views: 1
  • photo334663.jpg
    photo334663.jpg
    103.5 KB · Views: 1
Joined
Jul 31, 2009
Messages
21
So you took the rub rail off, take all screws and wiring loose, popped cap off and pushed a 3/4 sheet between the cap and hull, put blocks to hold from spreading then worked to timers underneath?
 

TBigLug

Cadet
Joined
Jul 8, 2020
Messages
18
Yup, that's basically it. Also unhooked the steering, throttle/shift control and fuel filler neck. I actually cut my wiring harness and am hooking it back up with Deutsch DTP & DTHD connectors so I can unhook it faster next time. Will simplify things when I go to replace the transom, rear deck, motor, etc.
 
Top