1978 Mercury 700 Won't Start After Much Updating

pdeal

Cadet
Joined
Aug 29, 2020
Messages
16
Lurked some over time but first post.

We got a "free" boat with a Mercury 700 outboard, Serial Number 4830257, 3 cyl, USA made in 1978 I think.

My son and I have been enjoying the project of trying to restore the thing. I picked up a service manual on ebay so have been using that.

The outboard seems to have good compression although I did not measure it. Generally it was in rough shape though. I have done the following things so far:

- New CDI stator, the insulation was really crumbling all the way up to the molded housing on the original
- New CDI rectifier- old was badly rusted and could not get wires off.
- Took carbs off and cleaned. I did not take the welch plugs out but tried to clean the jets as best I could. I think everything is clear and clean. I put new gaskets on. Also had to install a new throttle coupler since the original broke when I took it apart.
- Rebuilt fuel pump
- New fuel lines all the way to the tank and new tank.
- New wiring harness. The old was in bad shape so I bought a bunch of high temp rated primary wire from DelCity.
- New water pump
- Drained gear oil and replaced

With it put back together I checked each spark plug for spark and it seemed to have good spark.

I did not do anything with the timing. We did also install new control cables. These may need some adjusting. With them set so that at full low throttle they are at the throttle and spark stops, the cam only engages the carb throttle lever a little with the control at full throttle.

We tried today to start the engine. The choke seems to work. All we can get it to do is to pop over here and there. It won't really start. I have the idle needle valves set at 1-3/4 turns open as the service manual says.

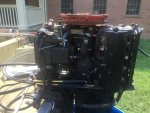
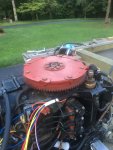
I will add a few photos later. I need to reduce them in size.
 

flyingscott

Fleet Admiral
Joined
Apr 8, 2014
Messages
8,168
Before you go any further CHECK compression. Should have been the first thing you did. Is your manual a factory or seloc/clymer manual.
 

pdeal

Cadet
Joined
Aug 29, 2020
Messages
16
Ok I checked the compression and it is about 130 or 135 in each cylinder. The service manual is a Mercury manual. It covers a range of engines but it's pretty good.

Another thing I did was to install an inline fuel filter. The OEM filter had a crack in the housing. Replacements are available but I figured I would just try an inline filter instead.

We tried starting with the air box cover off at first, then put it on. I thought maybe that would affect carb performance but it did not seem to change much.

I need to do a little more work on the wiring but figured would try to get it running first.

A few pics-
 

Attachments

  • photo338783.jpg
    photo338783.jpg
    427.7 KB · Views: 0
  • photo338784.jpg
    photo338784.jpg
    343.5 KB · Views: 0

Chris1956

Supreme Mariner
Joined
Mar 25, 2004
Messages
28,163
You really need to set the timing before it will start. Remove spark plugs 2-4, and install them into their wires, and ground their bases. Remove prop.

Put motor in gear and install timing light on #1 spark plug wire. Crank motor and advance throttle until timing shows 0-9* ATDC. Adjust primary pickup set screw, to set carbs closed, but ready to open.

Next advance throttle full and set max spark advance set screw to 21*BTDC. Make sure carbs are all the way open.

Carbs should be set 1-1/2 turns open.

All these specs should be in your service manual.

What happened to the lower cowling? The powerhead needs to be off to install that. No?
 

pdeal

Cadet
Joined
Aug 29, 2020
Messages
16
Thank you all for the responses!

I need to read the manual some more. I did read it some this afternoon on timing. The thing is on this engine the timing pointer is "adjustable" I think was the words in the manual. It's a little plastic arm held by a single screw and it can be easily moved quite a bit. I saw where they talked about adjusting the pointer by inserting a dial indicator into the spark plug hole and finding top dead center etc. I may need to do this first. I have a machine shop so all this should be doable. I was hoping not to mess with the timing right off the bat but I will start down that road.

Lower cowl? Not sure? I do have the main cowling and I thought that was all of it. It wraps around the bottom pretty well but I will look again. I did not remove the power head.
 

racerone

Supreme Mariner
Joined
Dec 28, 2013
Messages
38,606
???----Why the question about a lower cowling ?------There is no lower cowl on this 3 cylinder motor !!
 

pdeal

Cadet
Joined
Aug 29, 2020
Messages
16
Ok now another puzzler...

I read some more on the "adjustable" timing pointer. I see how that works now. Then I took the spark plugs out and rotated the flywheel around until the top piston, which the manual says is #1, is by eye at top dead center (closest to the spark plug hole), and when it is the flywheel tdc marker on the flywheel is about 180 degrees from the pointer.

I took the flywheel off to install the new stator and it was keyed so I figured I didn't mess any timing up there. I took the flywheel back off thinking maybe there are two keys (it's really a notched spline so two notches 180 deg apart) but not so it can only go on one way. I posted a photo of the flywheel below. Could it have spun on the hub? Looks like the hub has bolts that can be loosened to move it? Ideas?
 

Attachments

  • photo338791.jpg
    photo338791.jpg
    346.2 KB · Views: 0

racerone

Supreme Mariner
Joined
Dec 28, 2013
Messages
38,606
Somebody removed those 8 bolts out and put it back together wrong.---Easy to correct.
 

pdeal

Cadet
Joined
Aug 29, 2020
Messages
16
Ok I was thinking that. After posting above I checked it with the timing light as is, just to generally see where it's firing. It is indeed firing at about bottom dead center. The timing light hits the TDC label near the pointer.

What exactly triggers the firing? It looks like there is some sort of magnet ring on the center hub and then there are magnets on the outer hub of the flywheel.
 

Tassie 1

Chief Petty Officer
Joined
Apr 13, 2018
Messages
584
It's not the correct per manual thing to do but l always like to spray fuel mix into the carbs of a really stubborn motor,

It always makes me feel better knowing the rotten pig headed thing will run, even if only for a few seconds.

Sorry, that's all l got re your problem.
 
Last edited:

racerone

Supreme Mariner
Joined
Dec 28, 2013
Messages
38,606
Look into the firing order.----Is the firing order in your manual?-----Is it marked on the water jacket cover?
 

pdeal

Cadet
Joined
Aug 29, 2020
Messages
16
I didn't look on the water jacket cover but in the manual it says it's 1-2-3. I guess I could just rotate the flywheel and watch the pistons rise in the cylinders (plugs out) and verify?

Thank you all again for all the advise. I really appreciate it.
 

pdeal

Cadet
Joined
Aug 29, 2020
Messages
16
Update!

We flipped the flywheel 180 degrees, set the timing pointer with an indicator, and still it was 120 degrees off by the timing light. My perceptive son who is working with me on this noticed that the spark plug coils are also numbered 321 (starting from the top) the cylinders are numbered 123 starting from the top. They had #3 sparkplug wire on #1 cylinder and #1 sparkplug wire on #3 cylinder. We corrected this and it started right up. I need to wait till the sun goes down a little to fine tune the timing. It runs pretty good right now though.

Also had to pull the lower unit back off and hook a water hose to the copper tube. Seems there was an ant colony living in the engine. After that cooling water flows fine.

Thanks for all the pointers!
 

pdeal

Cadet
Joined
Aug 29, 2020
Messages
16
Something else I noticed on this engine. It seems like the trigger advance assembly is a little sticky. I think I will dig into this a little. Should the trigger assembly up under the flywheel be greased? Or should I just clean it up real well?
 

The Force power

Commander
Joined
Feb 3, 2019
Messages
2,350
Something else I noticed on this engine. It seems like the trigger advance assembly is a little sticky. I think I will dig into this a little. Should the trigger assembly up under the flywheel be greased? Or should I just clean it up real well?

First off....congrats it's like reading a little success story

I don't know how dirty it is? but clean it and apply a light coating of lithium grease.
You should really inspect the wiring on your controls also they may need repair/replacement.
Bad wiring have lead to a lot of miss diagnosed issues
 
Last edited:

pdeal

Cadet
Joined
Aug 29, 2020
Messages
16
Thanks The Force Power. I'm pretty excited. It really idles down nicely. I really like the simplicity of these older two strokes. I never had a 4 stroke so don't know about them.

I still can't figure out how to get the spark plug wires out of the coils. I pulled the boots back and pulled on them but they don't come out. Are they screwed in or something? I'd like to replace them while i'm in there.

Also, still need to do the timing over the full range. I like Chris1956's procedure much better than the manual's. The manual says run the engine at 5500 rpm, in gear, to set the open throttle timing. That sounds fun!

I did take the flywheel back off, removed the stator, and cleaned up and lubed the flange of the trigger. It is much smoother now. The trigger wires look pretty decent.
 

The Force power

Commander
Joined
Feb 3, 2019
Messages
2,350
I still can't figure out how to get the spark plug wires out of the coils. I pulled the boots back and pulled on them but they don't come out. Are they screwed in or something? I'd like to replace them while i'm in there.

Also, still need to do the timing over the full range. I like Chris1956's procedure much better than the manual's. The manual says run the engine at 5500 rpm, in gear, to set the open throttle timing. That sounds fun!

Coil-wires - I'm not a 100% sure if they came out on your type?? roll back the boot on the coil side and check how they are fasten

Timing at running WOT in gear- very dangerous procedure & not really necessary if you follow Chris's instruction
("Next advance throttle full and set max spark advance set screw to 21*BTDC.(while cranking) Make sure carbs are all the way open")
 
Last edited:
Top