achris
More fish than mountain goat
- Joined
- May 19, 2004
- Messages
- 27,468
The black wire is ground, not one of the screws.which screw is used for GND or its not in this new sensor model with three wires(one wire being GND)


The black wire is ground, not one of the screws.which screw is used for GND or its not in this new sensor model with three wires(one wire being GND)
Is there by chance a nut fastened to the screw on the bottom of the distributor housing?that screw is not coming out
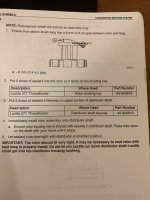
Read attached page from manual 31 specs loctite 271 threadlocker on dist shaft and keyRotor is not loctited to the shaft, its just a press fit and is nasty for removal due to rust on the shaft from lack of routine tune up/maintenance.
I use the hooked jaw of a suitable sized channel lock to pry the rotor off. Clean all rust and other gunk with emery cloth. New rotor slides on great
Interesting, never seen loctite remnants on the shaft nor have I ever heard of anyone applying itRead attached page from manual 31 specs loctite 271 threadlocker on dist shaft and key
Yeah makes no sense to me but u have to destroy the rotor to get it off . I changed my cap and rotor last season after six years -there was a little green corrosion on the brass contacts in the cap. what should’ve been a 10 minute job took a half an hour and required chisel …stupidInteresting, never seen loctite remnants on the shaft nor have I ever heard of anyone applying it
haha, just found the root of my issue...there's a nut holding a BLACK wire to that screw...on the bottom of the housing....arggggg!!!!!Is there by chance a nut fastened to the screw on the bottom of the distributor housing?
No put the new sensor in and move onhaha, just found the root of my issue...there's a nut holding a BLACK wire to that screw...on the bottom of the housing....arggggg!!!!!
removed that and with a vise, was able to remove the exposed screw....only took all day to remove this....two trips to shop to buy tools to remove stripped screw, none worked
I had to chisel the sensor our to expose the screw...do you think the hammering would do any damage to the distributor.....hope not????
agreed....first thing tomorrow morning...then wait for rotorNo put the new sensor in and move on
Mercruiser tried several different methods of grounding various components of the thunderbolt system over the years. One was using the distributor housing/sensor screw as a ground, still had issues. When you install your (hopefully) oem, fully potted three wire sensor be sure to run the ground to the same stud as the main battery cable ground on the flywheel cover.haha, just found the root of my issue...there's a nut holding a BLACK wire to that screw...on the bottom of the housing....arggggg!!!!!
...do you think the hammering would do any damage to the distributor.....hope not????
of course I didn't...that would be no challengeWhen you install your (hopefully) oem, fully potted three wire sensor be sure to run the ground to the same stud as the main battery cable ground on the flywheel cover.
") ....arggg, the aftermarket sensor screw holes dont align up to the housing....I only bought it cause it was one day shipping....will order the OEM today
....arggg, the aftermarket sensor screw holes dont align up to the housing....I only bought it cause it was one day shipping....will order the OEM today