2005 Mercruiser 5.0 thunderbolt V ignition has no sparks

lost_boys

Seaman Apprentice
Joined
Dec 7, 2010
Messages
48
sorry to complicate my issue with a bench test...anyhoo, followed yalls recommendation to put back into boat and follow flowchart

got 12V coming out of the module, then rapidly strike the GRN/White wire from module to GND, got sparks out of the ignition coil...YEAAAAAA

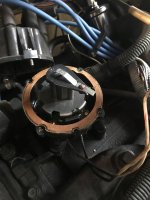
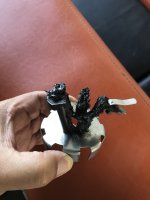
Looks like the issue is with the sensor, reconnect the GRN/white wire and turn the engine on, no sparks
if I can manually cause a spark, does that mean all the wiring is OK....the kill switch and wiring is OK ????

I'm just curious, where does the kill switch wiring go to, tried to trace it on the boat but too many wires and long :)
 

Scott06

Admiral
Joined
Apr 20, 2014
Messages
7,098
if I can manually cause a spark, does that mean all the wiring is OK....the kill switch and wiring is OK ????

I'm just curious, where does the kill switch wiring go to, tried to trace it on the boat but too many wires and long :)
Yes you need the sensor based off your tests. The kill switch interrupts the 12v supply to positive side of coil (purple wire). That was in the beginning of the troubleshooting guide.

You may want to look at the distributor I think to remove the sensor the rotor and trigger wheel needs to come out ... My factory rotor was loctitied in and had to be chiseled out... if yours is the same you may not be able to remove the rotor without damaging it
 

nola mike

Vice Admiral
Joined
Apr 22, 2009
Messages
5,664
if I can manually cause a spark, does that mean all the wiring is OK....the kill switch and wiring is OK ????

I'm just curious, where does the kill switch wiring go to, tried to trace it on the boat but too many wires and long :)
Yes (at least it isn't stuck closed). The switch is located on a plate next to the shifter. You can see one side of it hooked to the green and white wire.
 

nola mike

Vice Admiral
Joined
Apr 22, 2009
Messages
5,664
Yes you need the sensor based off your tests. The kill switch interrupts the 12v supply to positive side of coil (purple wire). That was in the beginning of the troubleshooting guide.
Depends on which kill switch we're talking about. I had assumed he was talking about the shift interrupt switch. The Man overboard switch is the one you're referring to...
 

lost_boys

Seaman Apprentice
Joined
Dec 7, 2010
Messages
48
Yes you need the sensor based off your tests. The kill switch interrupts the 12v supply to positive side of coil (purple wire). That was in the beginning of the troubleshooting guide.

You may want to look at the distributor I think to remove the sensor the rotor and trigger wheel needs to come out ... My factory rotor was loctitied in and had to be chiseled out... if yours is the same you may not be able to remove the rotor without damaging it
"The kill switch interrupts the 12v supply to positive side of coil (purple wire)."

Thats what I thought but it seems no matter what position the kill "man overboard" switch was on, I was getting 12V to the coil...I did this 2 wks ago so maybe I did it wrong...clueless back then...will test again

YIKES to ur other comment about loctitied
 

Scott06

Admiral
Joined
Apr 20, 2014
Messages
7,098
"The kill switch interrupts the 12v supply to positive side of coil (purple wire)."

Thats what I thought but it seems no matter what position the kill "man overboard" switch was on, I was getting 12V to the coil...I did this 2 wks ago so maybe I did it wrong...clueless back then...will test again

YIKES to ur other comment about loctitied
Yes with key in run position and kill switch on you should have 12v to purple wire on positive side of the coil. Tripping the kill switch should interrupt 12v to positive side of coil. If it doesn't kill switch is bad or someone jumpered around it because it was bad...
 

achris

More fish than mountain goat
Joined
May 19, 2004
Messages
27,468
Hey guys, let's all start taking the same language... And let's not make any reference to any 'kill switch'...

Inside the control box is the 'neutral safety switch'. That stops the engine from being cranked if the gear selector isn't in neutral.

Next we have the 'Deadman switch'. That could be located anywhere around the helm area, but it's usually on the outside of the control box (for MerCruiser) and should have a lanyard connected to the helmsman. If the helmsman moves away (or is thrown away) from the helm position the lanyard pulls out of the switch and power is cut to the ignition, stopping the engine.

The last switch is the 'shift interrupt switch'. Located on the shift plate, it will momentarily cut power to the ignition system as the drive is being shifted out of gear.

So, @lost_boys which switch are you referring to?

Chris....
 

achris

More fish than mountain goat
Joined
May 19, 2004
Messages
27,468
"The kill switch interrupts the 12v supply to positive side of coil (purple wire)."

Thats what I thought but it seems no matter what position the kill "man overboard" switch was on, I was getting 12V to the coil...I did this 2 wks ago so maybe I did it wrong...clueless back then...will test again

YIKES to ur other comment about loctitied
It's quite possible that a previous owner has jumped the Deadman switch out, rendering it inoperative. (Seen it too many times) They may have got fed up with losing the lanyard and (thinking) they can't use the boat....

Chris...
 

dubs283

Vice Admiral
Joined
Jul 27, 2005
Messages
5,343
if I can manually cause a spark, does that mean all the wiring is OK....the kill switch and wiring is OK ????

I'm just curious, where does the kill switch wiring go to, tried to trace it on the boat but too many wires and long :)
Everything you are asking and all replies are in the troubleshooting guide referenced earlier in this thread. Suggest you go through step by step the guide. All your questions will be answered that way

If, by chance there is a step/information in the guide you don't understand, ask a question pertaining to/referencing said procedure in the guide. Thread is getting very cluttered with random info
 

lost_boys

Seaman Apprentice
Joined
Dec 7, 2010
Messages
48
Everything you are asking and all replies are in the troubleshooting guide referenced earlier in this thread. Suggest you go through step by step the guide. All your questions will be answered that way

If, by chance there is a step/information in the guide you don't understand, ask a question pertaining to/referencing said procedure in the guide. Thread is getting very cluttered with random info
understand, I was just curious and asking random questions...

I was referencing the "deadman" switch. achris and scott have answered my question...thanks....
 

Scott06

Admiral
Joined
Apr 20, 2014
Messages
7,098
understand, I was just curious and asking random questions...

I was referencing the "deadman" switch. achris and scott have answered my question...thanks....
Its your thread ask what you want, whole idea is to learn. At least I'm not the only one who calls it a kill switch ...
 

achris

More fish than mountain goat
Joined
May 19, 2004
Messages
27,468
Its your thread ask what you want, whole idea is to learn. At least I'm not the only one who calls it a kill switch ...
Don't worry, plenty of people call all sorts of things by a multitude of different names. It's just that in an environment like this (a forum) using correct names (as the manufacturer nominates) is quite critical to accurate communications. I've heard both the Deadman switch and the shift interrupt switch called 'kill switch'. That's very confusing, so I like to avoid using that term altogether. Stops confusion (hopefully)...

Chris...
 

lost_boys

Seaman Apprentice
Joined
Dec 7, 2010
Messages
48
feeling better today so back at it this morning...removed the disti cap, pic below

the sensor is below the rotor...do you have to remove the rotor to install the new sensor...the rotor feels stuck and probable wont come off without some brute force....

Before I apply brute force, just want to make sure there isnt an easier way to remove the rotor...I dont see any screws I have to remove to remove the rotor....
 

Attachments

  • rotor.jpg
    rotor.jpg
    1.5 MB · Views: 4

Scott06

Admiral
Joined
Apr 20, 2014
Messages
7,098
feeling better today so back at it this morning...removed the disti cap, pic below

the sensor is below the rotor...do you have to remove the rotor to install the new sensor...the rotor feels stuck and probable wont come off without some brute force....

Before I apply brute force, just want to make sure there isnt an easier way to remove the rotor...I dont see any screws I have to remove to remove the rotor....
That is what I mentioned earlier in the thread. I could not get my original rotor off without destroying it with a chisel... no screws it is put on with Loctite.
 

lost_boys

Seaman Apprentice
Joined
Dec 7, 2010
Messages
48
That is what I mentioned earlier in the thread. I could not get my original rotor off without destroying it with a chisel... no screws it is put on with Loctite.
gotcha, I misread....thought the cap was loctited and was so relived when I easily remove it :)....

OK, saw on youtube, someone cut the rotor open with a hot knife, less messy and less likily to damage anything...will try that...
 

Scott06

Admiral
Joined
Apr 20, 2014
Messages
7,098
gotcha, I misread....thought the cap was loctited and was so relived when I easily remove it :)....

OK, saw on youtube, someone cut the rotor open with a hot knife, less messy and less likily to damage anything...will try that...
No cap came right off. Not sure whey they do it but rotor is nailed on. I didn't use loctite on the new rotor.
 

lost_boys

Seaman Apprentice
Joined
Dec 7, 2010
Messages
48
it was pretty easy melting the plastic with a soldering iron. came right out

so close but yet so far, the two screws for the sensor is locked tight...using PB blaster, was able to remove one but stripped the other, yikes...

its OK to spray BP blaster in that area correct???
 

Attachments

  • roto-cutr.jpg
    roto-cutr.jpg
    1.2 MB · Views: 3

dubs283

Vice Admiral
Joined
Jul 27, 2005
Messages
5,343
Rotor is not loctited to the shaft, its just a press fit and is nasty for removal due to rust on the shaft from lack of routine tune up/maintenance.

I use the hooked jaw of a suitable sized channel lock to pry the rotor off. Clean all rust and other gunk with emery cloth. New rotor slides on great
 

lost_boys

Seaman Apprentice
Joined
Dec 7, 2010
Messages
48
I screwed up royally....I stripped the sensor screw and bent it....I broke the sensor to expose the screw but still cant remove with a vise...I used a dremel to cut a groove for a flat head screw driver and now its really messed up :)
 

lost_boys

Seaman Apprentice
Joined
Dec 7, 2010
Messages
48
that screw is not coming out, looks like it will break...

can I break it and drill right thru it...this would be OK correct since theres nothing on the other side....the screw looks like it goes right thru to the other side of the bottom plate

which screw is used for GND or its not in this new sensor model with three wires(one wire being GND)
 
Top