1988 Glastron X19-S rebuild

snowman246

Petty Officer 2nd Class
Joined
Oct 13, 2015
Messages
193
No Title

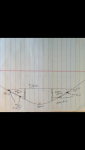
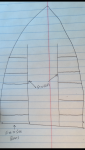
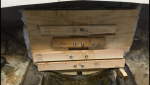
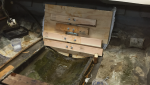
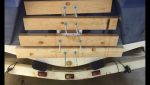
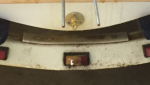
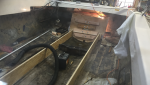
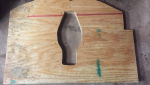
Last night I went to my dads shop and cut out two pieces of 3/4" exterior plywood for my transom. Once I get the two sandwiched together with resin and cloth, I will continue to glass the entire piece prior to installation. When that is complete, I will install the outdrive back on the boat and make the proper cuts for the steering arm travel.

I will prep both surfaces and install onto boat. I ordered 3 gallons of resin for the job so I will have more than enough. I will use CSM between the two surfaces for a strong and thick bond.

I plan on drilling the 6 bolt holes before I install and using 3/8" bolts, I will use the current bolt holes to help provide pressure and a permanent position during the installation...aka-I will bolt the new transom in place onto the boat. I also plan on using a couple of 2x4's on the inside of the new plywood to put even pressure across the new transom for a good solid bond of resin.
 

Attachments

  • photo233317.PNG
    photo233317.PNG
    1 MB · Views: 0
Last edited:

Woodonglass

Supreme Mariner
Joined
Dec 29, 2009
Messages
25,929
Uhmm, You can do the transom build that way if you want but it's not needed.
You might take a look at this and find it informative...Fabricating Decks, Stringers, and Transoms
Most of the iBoats members just use Titebond III wood glue and deck screws to laminate the plywood together.
Makes it plenty strong.;)
 
Last edited:

Willyclay

Captain
Joined
Sep 8, 2006
Messages
3,264
Last edited:

snowman246

Petty Officer 2nd Class
Joined
Oct 13, 2015
Messages
193
Willyclay...

That is exactly why I post what I am working on here. I thought the transom had swelled and made it bigger. I will cut out a piece of 1/2" and place it in the middle of the two 3/4" pieces to get the 2" minimum thickness. THANK YOU FOR THE LINK.

Also, when you use the Titebond III wood glue, do you use in between the sheets and then resin and cloth over the outside? I like the idea of using the wood glue and deck screws just making sure I understand correctly.
 

Woodonglass

Supreme Mariner
Joined
Dec 29, 2009
Messages
25,929
Yup, read and study the link I posted and you should be able to understand the installation process.;)
 

snowman246

Petty Officer 2nd Class
Joined
Oct 13, 2015
Messages
193
Great Link, Thank You again. Do either of you guys have any tricks on cutting out the top of the transom hole for the steering arm travel? I was thinking of using a router but I was hoping you guys would have a better and easier way. Thanks in advance.
 

Willyclay

Captain
Joined
Sep 8, 2006
Messages
3,264
I will cut out a piece of 1/2" and place it in the middle of the two 3/4" pieces to get the 2" minimum thickness.

Glad to help with the link from the legacy of Don S., may he R.I.P. Be careful with your combinations of different thicknesses of plywood due to the "metric effect". I have run into it more than once finding out too late that what I thought was 1/2" plywood was actually 12mm which is slightly smaller. I do not have any recommendations for you about the cut-outs in the opening but many members have done it and someone should post in shortly. Good luck!
 

snowman246

Petty Officer 2nd Class
Joined
Oct 13, 2015
Messages
193
Well, I decided to take your advice guys. I glued the transom pieces together using Titebond III, lots of $$$ and time saved. I stacked them up using a full bottle of glue between each board set. I'd rather have more than enough than wish later I had used more. Once glued and put together, I stacked approx 600 lbs of weights all across the surface area to ensure a good bond with pressure. I'll leave this alone for 48 hrs to ensure a good setup.

I also measured the thickness prior to gluing and found the three pieces together are exactly 2 1/8" thick, dead on in the middle of the Mercruiser spec sheet. Thanks for that link again.

Ince I clean up the glue and do a final sand of the edges I will install into the boat and post photos.
 

snowman246

Petty Officer 2nd Class
Joined
Oct 13, 2015
Messages
193
So, the wood is ready to go. I got lucky enough that I work tomorrow morning then I took off the rest of the week to get stuff done before the cold front moves in on Thursday night. I also have a shop to use for the rest of the week. I am hoping to get the transom installed along with a new brass drain plug assembly tomorrow afternoon. If all goes well, I will start replacing the stingers on Wednesday and Thursday.

I would like to pick your brains regarding foam if I may. I am going with the 2 part pour foam from US Composites. I plan on installing approx 5 cu. ft. on each side of the engine as it was originally located. However, since I want an open deck between the driver/pass seats and engine bay, I am considering pouring some under the deck. I am also raising the center of the deck to be even (approximately 3-4"). The original deck was slanted. I will cut my stingers to fit this rise in height as well so the deck can mount to the stingers without issue.

My plan is to install side-to-side boards between the stingers and the sides of boat hull (cut to proper angles of course.) These will be glassed in to the hull as well. I was thinking 1/2" plywood? I figure this will help support the deck and allow me make seperate compartments to pour foam under the deck. My thought (and brain picking starts here) would it be wise to install some sort of material approximately 1" off of the hull to allow for water flow below the foam and help extend the life of the foam and prevent the foam from soaking up the water. I was thinking about using some sort of plastic (visqueen painters sheeting or plastic tarp material maybe) and stapling/gluing to the stingers and side to side boards and pour the foam into this. Has anyone tried this? Thoughts?

I tried to explain my plan as well as I could, but I have issues putting the images and thoughts in my head into words lol. I know the foam will bond to the wood and the hull where it touches it I was just thinking of raising it from the floor.

I am not ready to this obviously but I will be in the next couple of weeks.
 

snowman246

Petty Officer 2nd Class
Joined
Oct 13, 2015
Messages
193
No Title

These are quick drawing for the idea. The side to side boards will have 2 mounting points to the hull. Open bottom and off the bottom of the hull to allow water to free flow. Side to side boards will be glassed to the hull and the stingers approx 1" from hull. The reason i thought of using plastic material is less chance of rotting/absorbing water and if it comes apart from the foam (I doubt it will) it is easy to pick up from the engine bay.

Thoughts? Anyone ever tried this type of setup?
 

Attachments

  • photo233484.png
    photo233484.png
    675.9 KB · Views: 1
  • photo233485.png
    photo233485.png
    1.2 MB · Views: 1
Last edited:

snowman246

Petty Officer 2nd Class
Joined
Oct 13, 2015
Messages
193
No Title

Transom installed!!!! Stinger work begins tomorrow. I decided to use two bolts per clamp to put even pressure on the whole board. I did not want to create a more pressure in the middle situation. Did it work, I dont know lol. Do I think it did, Yes. I felt better about doing it this way.
 

Attachments

  • photo233592.png
    photo233592.png
    1.4 MB · Views: 1
  • photo233593.png
    photo233593.png
    1.5 MB · Views: 1
  • photo233594.png
    photo233594.png
    1.4 MB · Views: 6
Last edited:

sprintst

Commander
Joined
Apr 18, 2009
Messages
2,066
It's nice to see you giving the boat a second life after all that neglect...
 

Woodonglass

Supreme Mariner
Joined
Dec 29, 2009
Messages
25,929
Did you use thickened resin to glue the transom to the outer skin? I don't see much squeeze out around the edges???
 

snowman246

Petty Officer 2nd Class
Joined
Oct 13, 2015
Messages
193
Thanks sprintst.

Wood...the transom is about 3" wider than the surface of the boat transom and is not angled ...see pics before wood was installed. Also I had about 1/2 quart of resin squeeze out from all directions. If you look close, you will see the puddle of resin that is in the hull of the boat. That was runoff from the install.

I researched this with multiple boat repair shops and found they install this set up using three layers of cloth between the wood transom piece and the boat hull. I did it exact. Now I am removing the stingers and cutting new. More pics to come.
 

Woodonglass

Supreme Mariner
Joined
Dec 29, 2009
Messages
25,929
Poly or Epoxy? CSM or Cloth Fabric? What weight? Did you pre-coat the wood,outer skin and the fabric prior to clamping it in place? How much resin did it actually take to wet out all the wood and cloth? Since this is not the installation method we typically see here on the forum I'm just curious about all the details as I'm sure other will be too.
 

snowman246

Petty Officer 2nd Class
Joined
Oct 13, 2015
Messages
193
Good point Wood. I am working with Epoxy Resin that is 2:1. The resin I purchased is equipped with a UV inhibitor and is marine grade and is completely clear when cured-no yellow cured color. I am working with 6.5 oz cloth. The installation process went like this.

1. Clean the hull of the boat with Acetone and let air dry while prepping wood.

2. The plywood transom was already cut to fit and sanded. I cut three pieces of cloth to fit the transom. Using Epoxy, I rolled the epoxy directly onto the wood transom. USE MORE THAN YOU THINK IS ENOUGH. There should be a shiny look to the wood prior to laying first piece of cloth. With the epoxy on the wood, i fit the first piece of cloth on top and rolled more resin on top of the cloth. Each piece of cloth was covered in its own layer of resin.

3. The hull was ready and a coat of resin went directly onto it. I then sandwiched the transom to the hull and installed the clamps.

I used approximately 4 quarts to wet everything down and ended up squeezing out about a quart once done clamping. I have absolutely no issue with wasting a quart of resin to ensure I have plenty to secure the transom. I had resin squirting out from top, bottom, sides, and even dripping out the back of the boat and running down. This was all cleaned off to prevent any bonding to the gel coat.

I realize there are hundreds of different ways of mounting the transom, but my mechanic who will rebuild my outdrive in Shawnee told me, "it came from the factory this way, why do it any other way". That is what made me decide on this method. These were the step by step instructions given to me by him.

The transom was installed last night at about 9:00 and I will leave the clamps in place until Saturday morning. The weather here in OKC is below 75 degrees so the resin could take 48-72 hrs to fully cure. I am in no rush on a critical piece like this.

This morning the resin was "tacky" but hard and is showing signs of a good setup. I removed my old rotten "sawdust mixed with water is more like it" stingers this morning. I cut two new ones at the new deck height and set in place. This evening I will cut the mid and front stinger pieces this evening and glass all of them in tonight. I decided to just replace every piece of wood on this boat since I am in it this far. I will post photos of tonights work later tonight or in the morning.

The boat will sit inside the shop until Saturday morning, undisturbed, to allow the resin to fully setup and become permanent.

*****Oh yea, I forgot to mention I installed a new SeaSense drain plug prior to installing the transom. It is a brass housing and brass plug. 1/2" pipe thread plug setup. This one is really unique as it has a check ball inside that is supposed to only allow water out and not in. I will not test this on purpose but I figure any type of setup like this if I do the accidental "oops I forgot the drain plug" when I launch the boat is worth a try. I got really lucky because the new plug fit perfect inside the existing hole from the old plug. Three screws and some LocTite Marine Resin gives me a new plug that will not allow any unwanted water leaking in on my new transom/stingers. Best part, plug kit was only $10.00.
 
Last edited:

snowman246

Petty Officer 2nd Class
Joined
Oct 13, 2015
Messages
193
No Title
 

Attachments

  • photo233613.PNG
    photo233613.PNG
    1 MB · Views: 2
  • photo233614.PNG
    photo233614.PNG
    1.5 MB · Views: 2

Woodonglass

Supreme Mariner
Joined
Dec 29, 2009
Messages
25,929
Now THAT'S more like it!!! Thanks for the detailed description. With the epoxy and 6.5oz cloth you now have a Tank for a transom!!!:eek: As I said, not typical for this forum but very well done. You will be following up with an overcoating of the several layers of the 6.5 oz fabric and resin on the outside and tabbing to the hull as well or will you use a heavier fabric like a 17oz biax???
 
Last edited:
Top