1989 Starcraft FM 160 Restoration

SHSU

Lieutenant Junior+Starmada Splash Of The Year 2019
Joined
Mar 8, 2017
Messages
1,758
I Checked the transom carefully. On one side there is some rot, but it is only about an inch from the starboard side. Every other inch is in real good shape.

Probably should look to replace it and get it done with now. Even thought it is only a small portion, once its there it will continue to get worse.

I am looking at the electrical....I got the bilge pump to turn off and on, and the navigation lights only make the fuel gage light up but the nighttime navigation lights will not work. I traced all the wires down and just cant seem to get them to operate. I have not been able to get the livewell pumps to work either. I have traces all the wires and did periodic voltage checks and there is voltage, but just wont turn on. I am not sure what is going on. Do you think it would be best to rewire all the lights and pumps from scratch?

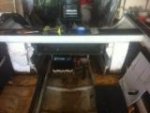
Also this is very strange. I notice that there was a electric connector under the dash that was unplugged, and (in the close up) another connector unplugged near the throttle control. The color wire it was connected to was purple which made me think it was the navigation lights because there is purple wire connected to the lights. So I jumped them with the green wire and the throttle body started beeping. A continuous buzz.... what is that? Any ideas?

Electrical... LOL its always fun

On your lights, I would take a battery and got test them directly at the source. That way you know at least the lights work and you have a wiring issue, same with your pump. Otherwise you will be chasing issues that might not be the real culprit. Personally I would rewire everything so you know exactly where everything goes and you won't have a bunch of wires that you have no idea what they do.

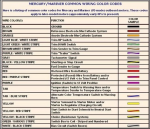
As for the buzzing, that is probably the warning horn for overheating on your engine. Sounds like their must be a short somewhere and it is causing your alarm to go off. If you look at below chart it outlines what colors mean what for Mercury. Purple looks like ignition so it may buzz at you telling you your key is in a start position. Unless of course it is shorted somewhere

(Tried to upload better picture but it won't work... Will try back later)
 
Last edited:

SHSU

Lieutenant Junior+Starmada Splash Of The Year 2019
Joined
Mar 8, 2017
Messages
1,758
Ok. see that connector hanging there? I can not find the male end to connect it to... Any ideas on what it controls?
{Edit** I think it is the accessory wires for the running light and such... Correct? This is a mercury 40hp.1989 starcraft btw....

Not sure. Do you know what color those wires are? On the Evinrudes that usually is for the Tachometer. Might not be what you want to do, but would be worth cracking open your control box to regrease everything. That will also allow you the chance to see what wire is where and determine what they are for.


ALSO - I need to replace all the live well hoses. They are rubber heater hoses I think (rats chewed them up) Can I use flexible PVC/clear vinyl tubing/ regular pvc or do I need to use the same rubber hose?
Thanks.


Livewell hoses can be almost anything you want. Straight PVC won't give and thus can/will crack over time. Use smooth bore hose that is flexible. Ribs reduce the flow rate and is harder on your pump (Or so I have been told)
 

SHSU

Lieutenant Junior+Starmada Splash Of The Year 2019
Joined
Mar 8, 2017
Messages
1,758
Ok, for some reason having issues editing my post. Here is the color chart for the Merc wires

Mercury Wire Color.png
 

Sammy19

Cadet
Joined
Jul 1, 2017
Messages
21
Well....I was removing the last bit of the bow deck and ALL the hoses were chewed through by a rat.....wires chewed on, gas hoses......Snakes skins.... So I decided that I am just going to replace all hoses, wires, everything....I am going to get new livewell pumps, bilge pump, ect... It seems easier just to get all new.

Transom....Can i do that after the decking is done on my 1989 starcraft FM160


I found this for replacing a 1972 starcraft is it about the same?

1) remove outboard
2) remove corner caps (picture #1 with four rivets, just cut them off?)
3) remove long aluminum transom top strip (picture #2 and 3 with some sort of through-wood aluminum nails, cut them off also?)
4) remove four screws (picture #4)
5) under splashwell, remove all through-wood screws and nuts and bolts (picture #5 and 6)
6) remove transom wood if possible (probably will not come out in one piece)
7) create shape of transom out of cardboard
8) cut two sheets of marine plywood to shape, gorilla glue together, and drill holes for splashwell
9) make sure it fits and epoxy (what kind of epoxy is best, how many coats, etc?)
10) put transom in, work backwards from steps 5-1 (how should I reattach strip and corner caps that were removed in steps 2-3? what fittings would i need to do so?)1) remove outboard
2) remove corner caps (picture #1 with four rivets, just cut them off?)
3) remove long aluminum transom top strip (picture #2 and 3 with some sort of through-wood aluminum nails, cut them off also?)
4) remove four screws (picture #4)
5) under splashwell, remove all through-wood screws and nuts and bolts (picture #5 and 6)
6) remove transom wood if possible (probably will not come out in one piece)
7) create shape of transom out of cardboard
8) cut two sheets of marine plywood to shape, gorilla glue together, and drill holes for splashwell
9) make sure it fits and epoxy (what kind of epoxy is best, how many coats, etc?)
10) put transom in, work backwards from steps 5-1 (how should I reattach strip and corner caps that were removed in steps 2-3? what fittings would i need to do so?)
 

SHSU

Lieutenant Junior+Starmada Splash Of The Year 2019
Joined
Mar 8, 2017
Messages
1,758
Well....I was removing the last bit of the bow deck and ALL the hoses were chewed through by a rat.....wires chewed on, gas hoses......Snakes skins.... So I decided that I am just going to replace all hoses, wires, everything....I am going to get new livewell pumps, bilge pump, ect... It seems easier just to get all new.

I would agree that doing all new is the better way to go. Make sure to use marine grade wire if you plan on going into saltwater. Some say no matter what, its up to you to decide

Transom....Can i do that after the decking is done on my 1989 starcraft FM160

Can you, yes. But why wait? If you are getting the CDX already, one more piece shouldn't be an issue


I found this for replacing a 1972 starcraft is it about the same?

1) remove outboard
2) remove corner caps (picture #1 with four rivets, just cut them off?)
3) remove long aluminum transom top strip (picture #2 and 3 with some sort of through-wood aluminum nails, cut them off also?)
4) remove four screws (picture #4)
5) under splashwell, remove all through-wood screws and nuts and bolts (picture #5 and 6)
6) remove transom wood if possible (probably will not come out in one piece)
7) create shape of transom out of cardboard
8) cut two sheets of marine plywood to shape, gorilla glue together, and drill holes for splashwell
9) make sure it fits and epoxy (what kind of epoxy is best, how many coats, etc?)
10) put transom in, work backwards from steps 5-1 (how should I reattach strip and corner caps that were removed in steps 2-3? what fittings would i need to do so?)


2. Be careful with those corners. They are expensive to replace. Their will be some overhang of the gunwale over the transom Some have cut that piece off, others have just bent it back. Its up to you.
3. Be extra careful when taking off this cap. It next to impossible to find replacements. Take your time and go very slow. Don't force it.
7. You are ahead that your transom is still in one piece. If you think it will make a good pattern use it
8. You can use marine grade or exterior grade plywood. Most would say why pay more. You can use gorilla glue or Tightbond III. I am using Tightbond, but that is because I have used it for other applications and know what it can do. When putting the two pieces together you have a couple options:
One: when putting the two pieces together don't cut them in the pattern first. Rip your sheet in two and then glue them together. After it has dried then cut it into its final shape. You will find where others didn't do this and had some alignment issues they had to overcome.
​Two: You will find that people needed a good way to secure the two sheets together. One option is to put a lot of weight on them, the other is to uses screws. Once it has dried you can take all the screws out and back fill with epoxy and such. Just be careful not to drill where you might need to drill holes later.
9. Pretty much any epoxy will work. As for coats, I see some people who have done a lot and others that only did one. Its up to you on what you think is sufficient, but I think most would agree that two is enough
10. I don't know about the corner caps as mine were broken off, but should be able to replace with similar fasteners. Just make sure they are stainless steel or aluminum
 
Last edited by a moderator:

Sammy19

Cadet
Joined
Jul 1, 2017
Messages
21
I had to put the boat Restoration on hold dues to LIFE..But Am starting to work on it again.

Question: I want to restructure the inside stern of the boat. In both back corners between the floor and top of the hull were areas filled with foam. I want to put a storage area and Ice chest area in that space. Would it be ok to not replace all that Styrofoam? (FYI all the foam in the bottom of the hull with be intact)

In the picture it is the white areas in the corner are where I want to remove some of the foam. Thoughts?
 

Attachments

  • IMG_2222.JPG
    IMG_2222.JPG
    11.8 KB · Views: 2

Watermann

Starmada Splash of the Year 2014
Joined
Jan 12, 2013
Messages
13,826
Some of us with SS Starcrafts have converted them to straight up fishing boats and built deck framing in the back. Take a look at my SS build in my below sig link and see what I did, it may give you some ideas. I put in in an in deck cooler and livewell using Tempress hatches and liners.
 

ziguan

Seaman Apprentice
Joined
Jul 11, 2012
Messages
41
Ok. see that connector hanging there? I can not find the male end to connect it to... Any ideas on what it controls?
{Edit** I think it is the accessory wires for the running light and such... Correct? This is a mercury 40hp.1989 starcraft btw....

ALSO - I need to replace all the live well hoses. They are rubber heater hoses I think (rats chewed them up) Can I use flexible PVC/clear vinyl tubing/ regular pvc or do I need to use the same rubber hose?
Thanks.


I believe that's for the speedmeter, but you will have to buy another cable to connect them together.
[h=3][/h]
 

Sammy19

Cadet
Joined
Jul 1, 2017
Messages
21
Thanks for the reply's Been very helpful. Do you think I could get rid of some of that white foam in the stern on each side?
 

Watermann

Starmada Splash of the Year 2014
Joined
Jan 12, 2013
Messages
13,826
I would get rid of all the white styrofoam junk and replace it with closed cell foam board.
 
Top