1996 Regal 17.6 Avanti restoration using composite materials

kpiazzisi

Petty Officer 2nd Class
Joined
Jun 19, 2005
Messages
164
Re: Where is the hull leaking from PICs attached

Re: Where is the hull leaking from PICs attached

Does anyone know of a tool that can be used to trace contours? I was thinking of bending a wire along the bottom of the hull from port to starboard just so I can get the correct shape of the bottom of the hull. I thought that there was actually a tool made for doing this. Does anyone know the the name of it, or a good way to trace the contour on the hull?
 

Woodonglass

Supreme Mariner
Joined
Dec 29, 2009
Messages
25,929
Re: Where is the hull leaking from PICs attached

Re: Where is the hull leaking from PICs attached

You can put your stringer in the boat and then use a drafting compass (The thing you draw circles with) set it so it's wide enough to contact the stinger at the widest separation in the hull and then drag the point along the hull and the pencil on the stringer will trace the exact ouline of the hull onto your stringer. Easy as Pie.

attachment.php


I'm just sayin...:D
 

Attachments

  • Scribing a Stringer.JPG
    Scribing a Stringer.JPG
    11.8 KB · Views: 0

kpiazzisi

Petty Officer 2nd Class
Joined
Jun 19, 2005
Messages
164
Re: Where is the hull leaking from PICs attached

Re: Where is the hull leaking from PICs attached

Thanks. That is a great idea. The composite material I am using is almost $60.00 for 4x8 sheet. I figure while I am waiting for the composit to get here I could make some templets using poster board or something similiar. That way if I mess up, it won't be a costly mistake. Do you have any sugestions on what I can use to make templets? I have seen someone else on here use sheet foam that's sold at homedepot for $9.00 a sheet. That seems a little messy and hard to work with. Any other suggestions, or a common store to find poster board at a low cost?
 

Isaacm1986

Lieutenant Junior Grade
Joined
May 20, 2009
Messages
1,086
Re: Where is the hull leaking from PICs attached

Re: Where is the hull leaking from PICs attached

So you think I should rip all the stringers out? I have gone back and forth so many times on how to do this project. After struggling with trying to core out the dead wood, I think just taking everything out is the way to go? The only concern I have is getting the new stringers back together. It is so much work and the payoff just isn't there financially. When I am done I will have a boat that is worth 3 - 4K. I have asked earlier if it made since to do this, and so far nobody has said no. Here is what I have seen advertised on E-bay. Vortec bolt in 4.3 (bolt in and go) $1900.00. Mercruiser Alpha Gen II $1,000. Inca fuel tank $200.00. Captains Chair with slider ($200.00). Trailer ($300.00). All that adds up to $3600.00. Unless I want to keep it forever and make a youtube video of how emotionally attached I am to this boat, it simply doesn't make sense. Maybe a forum on how to fix a boat is not the right place to find encouragement on making a practical decision. I can appreciate that.

If anyone is reading this, can you send me a link to a thread that talks about older boats that were constructed completely out of fiberglass. I have searched google and forums and have not come up with anything. I would like to find on older center console in the 22-24 foot range where no wood was used during construction. Thank you Kiwifisher for listening and responding.

KP

Most of us who restore these boats spend way more money than the boat is work. There is NOTHING cheap about restoring these things. We will spend 2k-4k and we end up with a boat that is work 2k-4k. On the other hand, having a boat that you put all the work into, you KNOW what has been done. There is peace of mind in that.
 

sschefer

Rear Admiral
Joined
Nov 13, 2008
Messages
4,530
Re: Where is the hull leaking from PICs attached

Re: Where is the hull leaking from PICs attached

Does anyone know of a tool that can be used to trace contours? I was thinking of bending a wire along the bottom of the hull from port to starboard just so I can get the correct shape of the bottom of the hull. I thought that there was actually a tool made for doing this. Does anyone know the the name of it, or a good way to trace the contour on the hull?

I use either cardboard or 3/16 Luan doorskin and scribe the bottom to it . Just take the board and lay it in on edge. Tape a pencil to a 1" or so block and run the block along the bottom with the pencil tip against the wood.

You usually need to make a couple of passes and if the curve is sharp you can just guess for the first cut and then scribe it in from there.
 

kpiazzisi

Petty Officer 2nd Class
Joined
Jun 19, 2005
Messages
164
Re: Where is the hull leaking from PICs attached

Re: Where is the hull leaking from PICs attached

OK. I think I have the idea. I was wondering if I should try to make an initial rough cut just to get the piece down into the hull and then use either the compass or stick and pencil idea to get an exact match. The other option would be to lay the entire 4x8 sheet on the top edge of the hull and then trace? I would probably need two people for that one. One person to stabalize the sheet and the other to make the tracing. The stick probably needs to be as perpendicular as possible while making the tracing...correct?
 

Attachments

  • stringers.jpg
    stringers.jpg
    4.3 KB · Views: 0

sschefer

Rear Admiral
Joined
Nov 13, 2008
Messages
4,530
Re: Where is the hull leaking from PICs attached

Re: Where is the hull leaking from PICs attached

OK. I think I have the idea. I was wondering if I should try to make an initial rough cut just to get the piece down into the hull and then use either the compass or stick and pencil idea to get an exact match. The other option would be to lay the entire 4x8 sheet on the top edge of the hull and then trace? I would probably need two people for that one. One person to stabalize the sheet and the other to make the tracing. The stick probably needs to be as perpendicular as possible while making the tracing...correct?

You've got it.. Cut it close and then scribe it in. If you use a carpenters pencil you'll quickly find that they're flat for more than just to keep them from rolling off the wood. Look at one really close and you'll find it's like having a mini tape measure. 1/8" thick, 1/2" wide, 45 deg bevels on the edge, Point is 1/4" when on edge and 1/16" when on the flat. Lay it on the 45 and it's 1/8".. Pretty cool huh. Best tool ever invented for scribing.
 

kpiazzisi

Petty Officer 2nd Class
Joined
Jun 19, 2005
Messages
164
Re: Where is the hull leaking from PICs attached

Re: Where is the hull leaking from PICs attached

Carpeters pencil...I can handle that. Probably the cheapest tool I'll have to buy...lol. Thanks. I think I got a pretty good handle on it now. I am looking forward to hopefully less itchiness. I actually filled my entire wet/dry vac with fiberglass powder. It looked liked it snowed inside my garage. I found a great tool for sanding. I used a concrete grinding disk that I had left over from coating my garage floor. It has real heavy grit embeded in a hard disk. It worked better then just a regular 36 grit flexible disk and it never wore out throughout the entire job. I spent almost as much time cleaning up the fiberglass powder as I did grinding the stringers completely out. I was pretty good about always wearing a high quality paper mask, so hopefully not too much of that SHI*** went into my lungs? I love the fact that I removed so much weight in the form of heavy foam and wet plywood. I know my boat will probably be at least 5 MPH faster when it's back together.

Now that I have a couple more pros looking at this thread today, can you guys give me some advise on weather or not to use epoxy or poly? I think the deck is about 45 Sq ft. (eye ball method). I read that if I use a heavy biax (24 oz ) it will take about 1 gallon to wet out 4 sq yards (36 Sq ft). I am looking at 1 1/2 gallons for each side of the deck and then maybe a couple of gallons for the stringers. This amounts to about $300 in epoxy ( 6 gallon kit) or about $150 or less in poly. I thought about using Gelcoat on the floor and I know I can not do this if I go with epoxy. I would have to use paint instead. I heard the epoxy bonds better however. I don't know, what do you guys think?

Also is does it make a difference if I do the bulk heads first and then go to the stringers. Does the order matter?

Thanks!
 

sschefer

Rear Admiral
Joined
Nov 13, 2008
Messages
4,530
Re: Where is the hull leaking from PICs attached

Re: Where is the hull leaking from PICs attached

You've described all the reasons I only have aluminum boats. One glass boat a few years ago was enough for me. I'm not qualified to help you with your glass questions.
 

kpiazzisi

Petty Officer 2nd Class
Joined
Jun 19, 2005
Messages
164
Re: Where is the hull leaking from PICs attached

Re: Where is the hull leaking from PICs attached

I like the aluminum boats, but I think the salt water here would pretty much eat away at the hull. I grew up in San Jose, not too far from Santa Rosa. There are some beautiful lakes in Northern California. Growing up we spent many of summers at Burny Falls, Lake Almanor, Shasta, and of course Lake Tahoe. It would be nice to go water skiing again and not have to worry about the bull sharks or alligators. It is a pretty cool feeling however being out on the open Ocean, so I guess it's a trade off. In my 18 foot boat I rarely venture out past the inercostal, but on calm days it's very cool.
 

Woodonglass

Supreme Mariner
Joined
Dec 29, 2009
Messages
25,929
Re: Where is the hull leaking from PICs attached

Re: Where is the hull leaking from PICs attached

Hey KP

This guy did a GREAT job using Sea Cast on his Stringers. You can Learn a lot from his methods. I would recommend you look into Nida Bond Lots less expensive and basically the same stuff.

http://forums.iboats.com/showthread.php?t=365820&page=11

I'm just saying...:D
 

kpiazzisi

Petty Officer 2nd Class
Joined
Jun 19, 2005
Messages
164
Boat humor + a serious question - slow day at work today

Boat humor + a serious question - slow day at work today

I am planning on driving to Nida to get my supplies, so I will probably pick up the nida stuff for the transom, but was planning on using the Nida HP8 for the stringers, but I will definetly check out the nida bond and the link....thanks.

I was thinking about changing the style of my back seats from two individual seats on each side of the engine lid, to one large bench seat. I got the idea from looking at this photo. I think they call it "Sport Seating". Does anyone know if the wall in front of the engine would be glassed into place or would it be removable. I guess if you had to change a water pump or do any other type of maintance it would have to be removable or at least have enough clearance?
 

Attachments

  • boat.jpg
    boat.jpg
    53.7 KB · Views: 0

kpiazzisi

Petty Officer 2nd Class
Joined
Jun 19, 2005
Messages
164
Re: Where is the hull leaking from PICs attached

Re: Where is the hull leaking from PICs attached

Today I have a couple of hours to work. Progress has been slow due to other things around the house and kids activities. Today I am making rough bulkhead templets and hopefully stringers (time permitting) out of a roll of painters masking paper. It is not exact by any means, but it is moving fairly quickly and make it easy to cut out the final templets out of Luann. I would have gone straight to the Luann as recommended by others, but at HD they only have it in exterior thicker sheets (1/4 or 3/8 not sure). That's a little too thick to cut with a razor blade. They said that they no longer carry the luan door skin stuff and when they did it was twice the price. The thicker sheets will make nice templets, just a little extra work.

One issue I am having is finding exactly where the floor should be. You can see where the old floor was tabbed in, but it's not exact. Somehow I think I am going to have to find some reference points to put the boat at a level position, and once that is done use a Lazar level to mark the stringers at the exact height. That is the only method I can think of for making the floor exactly level.
 

Attachments

  • stringers paper.jpg
    stringers paper.jpg
    63.3 KB · Views: 0
  • stringers paper 2.jpg
    stringers paper 2.jpg
    49.6 KB · Views: 0
Last edited:

sschefer

Rear Admiral
Joined
Nov 13, 2008
Messages
4,530
Re: Where is the hull leaking from PICs attached

Re: Where is the hull leaking from PICs attached

Today I have a couple of hours to work. Progress has been slow due to other things around the house and kids activities. Today I am making rough bulkhead templets and hopefully stringers (time permitting) out of a roll of painters masking paper. It is not exact by any means, but it is moving fairly quickly and make it easy to cut out the final templets out of Luann. I would have gone straight to the Luann as recommended by others, but at HD they only have it in exterior thicker sheets (1/4 or 3/8 not sure). That's a little too thick to cut with a razor blade. They said that they no longer carry the luan door skin stuff and when they did it was twice the price. The thicker sheets will make nice templets, just a little extra work.

One issue I am having is finding exactly where the floor should be. You can see where the old floor was tabbed in, but it's not exact. Somehow I think I am going to have to find some reference points to put the boat at a level position, and once that is done use a Lazar level to mark the stringers at the exact height. That is the only method I can think of for making the floor exactly level.

The deck should be crowned and also slopping back to the transom. I don't have the exact amount of crown in my memory bank at the moment but it's probably on the internet.

It's a standard amount based on a fairly basic calculation. I have it on one of my Naval Architecture books, I'll see if I can find it and post it for you. It's barely enough to feel when you're walking on it but enough to move the water off of it and into the bilge where it can be pumped out.

Anwyay, that's why it's not looking right to you.
 

kpiazzisi

Petty Officer 2nd Class
Joined
Jun 19, 2005
Messages
164
Re: Where is the hull leaking from PICs attached

Re: Where is the hull leaking from PICs attached

OK, I am glad you told me this before I got too far. It must be very slight, I have never noticed the crown before. As far as slooping towards the back of the boat, I guess this would also depend on the weight distribution as well...correct. If you had a couple of heavy people sitting in the bow, wouldn't that change that angle anyway...right? I can match the old floor for the front to back but the crown thing will be a little more difficult. That would be greatly appreciated if you happen to come by the correct figure for me.

Thanks
 

kpiazzisi

Petty Officer 2nd Class
Joined
Jun 19, 2005
Messages
164
Re: Where is the hull leaking from PICs attached

Re: Where is the hull leaking from PICs attached

I stopped by a marina and asked about the crowning in the floor, and they had no idea. I then took a bow section of the deck that actually came out in one piece, and it didn't appear to have any crowning to it. Maybe because my boats so small, it's not required? Anyway I bought a rotating laser level at Harbor Freight. It is working great helping me find where the old floor used to be. Just find a couple of reference points for the old floor and adjust the laser level. My new bulk head were slightly taller on purpose, once I have them tacked in, I will simply rotate the laser level, mark, and cut. It should be close to perfect.
 

Attachments

  • lasor level.jpg
    lasor level.jpg
    75.3 KB · Views: 0

sschefer

Rear Admiral
Joined
Nov 13, 2008
Messages
4,530
Re: Where is the hull leaking from PICs attached

Re: Where is the hull leaking from PICs attached

There's certainly nothing that say's you have to crown it. If you like standing in puddles that's up to you. I'd crown it if it were mine. Doesn't need much, just enough so the water goes to edges and then back. 1/8in is probably enough.
 

kpiazzisi

Petty Officer 2nd Class
Joined
Jun 19, 2005
Messages
164
Re: Where is the hull leaking from PICs attached

Re: Where is the hull leaking from PICs attached

No problem. I am just a little cautious since this is the first time I have done this. I'm a little more comfortable keeping dimensions the same as from the factory. I may try to put a little crown in the floor (not sure yet). I do have experience painting cars as a hobbyist years ago, and I think if I guide coat and block sand the deck this will eliminate the possibility of puddles.
 

kpiazzisi

Petty Officer 2nd Class
Joined
Jun 19, 2005
Messages
164
Re: Where is the hull leaking from PICs attached

Re: Where is the hull leaking from PICs attached

Finally started doing some work again. To be honest, I wasn't sure I was going to move forward. I spent almost $500.00 in materials yesturday and that is probably about half of what it's going to take to finish. I ended up getting Fiber Glass Services to price match Nida Core's price on the 4x8 sheets, whiche saved me $20.00 a sheet.

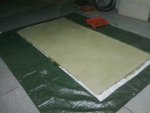
I laminated the sheets on both sides with CSM and Poly Resin. It was really easy to do. I just used a paint roller to apply the resin. I put a coat on the 4x8 sheet (layed out flat), then applied the mat, and finally rolled more resin on the top. It took 1 gallon exactly to wet out one side of the 4 x8 sheet with CSM. I had more then enough working time, and had no issue with air bubbles or excessive resin. If you can paint, you can wet out CSM on a flat surface (no problem).

One layer of CSM on both sides is the minimum amount recomended. I am somewhat pleased with the result. There is still a little flex to the 4x8 sheet. If I am carefull, I can stand on the board if it's supported between two saw horses.

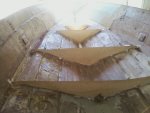
I have cut out some of the bulkheads (PIC attached), and working with the material is a cinch. It cuts easily with a jig saw, and there is no problem making tight radius cuts. The product is also some what light. I can carry the 4 x8 laminated sheet by myself, and it feels comparable to a 1/4 to 3/8 sheet of plywood.

Next step is to cut out all strigers and the rest of the bulkheads and glass them into the hull. I will run the glass well into the stringers & Bulkheads, which should increase the stiffiness.

I used a poly resin without the wax additive, so the surface remains slightly tacky. This is supposedly so you can laminate without sanding. I am not sure how long you have before you can laminate another layer without having to sand? For me it's going to be a couple of days before I glass them into place. Will I need to sand them first?
 

Attachments

  • 4x8 sheet plascore laminated.jpg
    4x8 sheet plascore laminated.jpg
    51.8 KB · Views: 0
  • boat stringer csm.JPG
    boat stringer csm.JPG
    134.8 KB · Views: 0
Last edited:

kpiazzisi

Petty Officer 2nd Class
Joined
Jun 19, 2005
Messages
164
Just incase anyone is following this.

Just incase anyone is following this.

Here is where I am at now. I am getting ready to glue in the stringers/bulkheads.
 

Attachments

  • aft to forward angle stringer tapped no gas tank.jpg
    aft to forward angle stringer tapped no gas tank.jpg
    66.5 KB · Views: 0
Top