@Pmt133 did a great job. I spent about $10k - $11k on mine, but it was now several years ago. Another in-depth documentation thread if you want to read:
 forums.iboats.com
1987 Power Play XLT-185 - floors, stringers, and upholstery
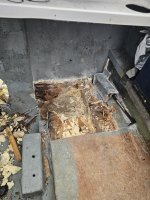
Well, here I am making my first post in a boat forum, and this post is in the resto/repair section, haha. Two weeks ago, my wife and I decided to start looking at boats with the hope of picking one up by next season. Naturally, I asked my brother (who is a boat guy) to be on the lookout for...
forums.iboats.com