88 sea ray floor from hell

nateo

Petty Officer 1st Class
Joined
Apr 13, 2014
Messages
352
Another thing interesting about friscoboaters videos is that in the last one he reveals divorce was his most recent adventure. If you watch them all you'll notice he spends A LOT of time working on those old boats. He finishes the sea ray but never finishes the carlson.
 

Chadomosis

Petty Officer 3rd Class
Joined
Aug 3, 2016
Messages
85
That sucks. That "D" word sure seems to suck the life out of some people especially when kids are involved. He's a talent at what he does so I hope he gets back to it.
 

gm280

Supreme Mariner
Joined
Jun 26, 2011
Messages
14,605
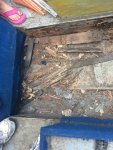
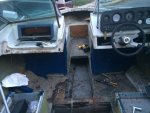
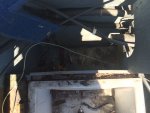
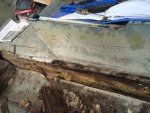
Chadomosis, it isn't odd or unusual for you to want to try something new and "out side the box" to make your boat last forever. Seems every person that comes on these forums has that exact same idea. I know I did. I wanted to remove the wood from the equation and replace it with something that would never ever have to be replaced ever again. Then reality sets in and our minds change. We want better then anything else and some new great idea to solve all the rot. But it is what it is. I will say this, there are a lot of seriously great folks on these forums with expert knowledge about how to fix and repair/rebuild anything you could want to know about boats. Once you relinquish your "better then any other material" ideas and come to reality, listen to what advice they offer you. It is the best around. And also know this is an extremely dirty, smelly, filthy, itchy, sweaty, long intense labored effort. It is not for a person that just doesn't like to work, because you will put more hours into this then you ever imagined. However, once you accomplish that work and see what YOU built, there is no better self satisfaction then enjoying your new boat. JMHO
 

Chadomosis

Petty Officer 3rd Class
Joined
Aug 3, 2016
Messages
85
Thanks gm280, I have decided to stick with original materials because of some points brought up earlier in the thread. The only places I'll be using anything different will be in the decorative gingerbread stuff. Trim, backing of the upholstered parts ect. Maybe shave a few lbs. here and there, and have less areas to babysit. I know it's not a huge deal, but I get a lot of these materials at a good wholesale price and I have the machinery to do it right. Hey Nateo, friscoboater looks as if he's getting along just fine. Starting a marine restoration business and everything. Good for him! He seems to be somewhat of a celebrity for his detailed vids.
 

Woodonglass

Supreme Mariner
Joined
Dec 29, 2009
Messages
25,929
Upon further inspection, the damage isn't nearly as bad as I thought it was. Stringers are mostly clean and the transom is just fine. It's pretty much only spoiled around the fuel tank.
If you're going strictly by "LOOKS" then you may not actually KNOW that the stringers and Transom are A-OK. The fiberglass encasement often times hides the rotten wood cores. Only by drill into them can you be certain.;)
 

Chadomosis

Petty Officer 3rd Class
Joined
Aug 3, 2016
Messages
85
I'm on it. One would think I'm a miner in that thing. Core samples all over the place. For the most part, it's pretty sound. The area around the fuel tank is shot however. I'll be pulling some more stuff apart this weekend to be certain and hopefully I can get some sawzall time in. I'd really like to get a good chunk handled before snow starts to fly around here.
 

Pusher

Lieutenant
Joined
Sep 2, 2014
Messages
1,273
Sounds like you're in the blue with the stringers. I thought you could maybe double up the layers on the fiberglass and increase the number of stringers so you could remove the pvc tubes after each stringer is formed... but honestly using wood is the way to do it.... or get a boat and get lucky like you :)

You could even fill the PVC with something after formed to the Hull (XXtransomXX), but then again..... wood.

Anyway, when you lay new boards down, even if you have a ton of stringer support (like in my bellboy) make sure you reinforce between the stringers and under the floor boards by screwing in a 2x4 to attach both sheets. My floor's solid, but there's an ever so quiet creak by the captain's seat.... GGGRRRRRRRR!

Like GM 280 said, it's a freak-ton of work, and expensive if done right. I used Polyresin instead of Epoxy and have mixed emotions about that choice.
 
Last edited:

Chadomosis

Petty Officer 3rd Class
Joined
Aug 3, 2016
Messages
85
Weekend Score! Found an exact boat with super clean interior, gauge cluster, seats and all of the upholstered gingerbread. Stripped it on Saturday and put it all in the shed. Picked it all up for $75. Can't beat a deal like that! I've already got the marine grade plywood, so I just need to acquire the fiberglass supplies. Guess I'll go visit the guys at plasticraft and see what they can do for me.
 

Chadomosis

Petty Officer 3rd Class
Joined
Aug 3, 2016
Messages
85
So, with the motor running and all the mechanical stuff in order, I'm ready to start deconstructing this thing and start fixing the bad stuff. I know a lot of guys have done this repair and I'm wondering if someone on here has exact dimensions of the stringers or what they used in their repair. I doubt I'll be able to get the old ones out in good enough shape to copy. Just curious.
 

gm280

Supreme Mariner
Joined
Jun 26, 2011
Messages
14,605
So, with the motor running and all the mechanical stuff in order, I'm ready to start deconstructing this thing and start fixing the bad stuff. I know a lot of guys have done this repair and I'm wondering if someone on here has exact dimensions of the stringers or what they used in their repair. I doubt I'll be able to get the old ones out in good enough shape to copy. Just curious.

Chad, when you start demolition, you have to take lots of pictures and measurements so you know how to rebuild it back. Rarely does anybody have perfect copies of their stringers to rebuild new one and replace. So start measuring as you rip apart things. It really isn't as hard as you may think. :thumb:
 

Chadomosis

Petty Officer 3rd Class
Joined
Aug 3, 2016
Messages
85
Thanks gm280 for the vote of confidence! I'm exited to get started!
 

Chadomosis

Petty Officer 3rd Class
Joined
Aug 3, 2016
Messages
85
No Title
 

Attachments

  • photo250894.jpeg
    photo250894.jpeg
    100 KB · Views: 0
  • photo250895.jpeg
    photo250895.jpeg
    179.4 KB · Views: 0
  • photo250896.jpeg
    photo250896.jpeg
    210.4 KB · Views: 0

Chadomosis

Petty Officer 3rd Class
Joined
Aug 3, 2016
Messages
85
Lots of demo today! I'll tell you what, That's a lot of work for a demo job! No hap hazard smashing away at it. You gotta take your time and make sure your not cutting though something you shouldn't. And itchy! You could be shrink wrapped in a rubber suit and still have flaming fiber dust in every crack! Feeling accomplished though, no doubt!
 

Chadomosis

Petty Officer 3rd Class
Joined
Aug 3, 2016
Messages
85
So, I've got a question. How did sea ray put the seat boxes in this thing? I've cut out all the joints as far as I can tell and this thing is still solid. It's gotta come out but I don't want to tackle this like any other demo.
 

DeepBlue2010

Lieutenant
Joined
Aug 19, 2010
Messages
1,305
They are glassed in from the outside and from inside before installing the top cover and the seat rails. If you are removing this section of the deck, get a sawzall with long, sharp wood blade and cut as parallel to the deck as you can. The length of the blade will help you to bend it under the seat base without changing the cutting angle so you are not cutting into the box. That is of course if you are planning on keeping it and reuse it.
 
Top