can plywood deck be patched?

Rbryan94

Petty Officer 3rd Class
Joined
May 24, 2013
Messages
96
Gonna head back down to the marina today and continue to remove things in the way. I have a bunch of questions I need help with. What do I set the stringers with? What's the process of applying the glass, what products do I use? Do I have to get the tops of the stringers? This boat is 27 years old and there is currently no rot on these stringers. Like I said the screws ripped through the plywood and stayed on top of the stringers when I removed a section of plywood. Can I sand the sides and glass to the top on areas I can't get to without ripping out closets ? The tops of these stringers currently have nothing on them. The entire underside of the plywood is bare and solid as a rock after 27 years. I have used a hammer to check these stringers and they are solid. I do want to do this right but I don't want to waste time and money.I need guidance.The only reason I'm into this is because a section of plywood , where someone had patched (don't know why) was not tabbed right to the hull and became loose. When I was in rough seas I saw my galley cabinets and counter top shaking. It was because it was attached to the floor that was not tabbed correctly to the hull. I imagine that's why I have the issues I have now. Thanks again fellas for any help. I'm gonna try like hell to get her in by the end of May. I have lots of vacation time on the books, I'm going to use it!
 

zool

Captain
Joined
Aug 19, 2012
Messages
3,432
RB, I cant really tell from the pics how far the delam goes, only you can tell that. You can repair as much of it as you like cuz its your boat, but I would try to get everything or as much as possible. It doesn't look like it all delaminated, but there will be areas that you cant see, without removing some cabinetry. Its up to you how far you want to go.

I have to run to work, so I cant answer all the questions now, but will over the weekend. Just a side note, but stringers rot from the bottom up, so the nails in the top doesn't mean they are good on the bottom, also, tapping isn't a reliable way to check, drilling a small hole near the bottom of the darker areas is a better method..but the wood doesn't look too bad overall.

Its typical for there to be no glass over the tops, when a deck lays on top of the stringers....you can sandwich in some thickened resin between the stringer tops and the decking after its repaired to stiffen it up some.

I don't know what tools and equipment you have, but we can go over that too, including personal protection equipment (PPE).

Take some pics of the whole cabin from the entrance so I can see the layout...

If you can live with a partial repair, and a few months downtime, you can probably get here seaworthy again...but its still gonna be a big, messy job.

And no, you cant just cut the deck above the stringers and patch it back, it wont have integrity, and its easier to remove the exposed cabin deck (sole) areas at the hull side tabs, and replace with new glassed over ply pieces cut on center of the stringers, and just cleat the clear spans between.
 

Rbryan94

Petty Officer 3rd Class
Joined
May 24, 2013
Messages
96
Thanks Zool. I'm down here now just taking a lunch break. I will post pics u asked for later today. Thanks for the reply. Just a note that the starboard side is tight everywhere, no delam. It's only on the port side. BTW the hole I cut is big enough so I can reach the end of the stringer. There is another access where the shower sump is. If I cut a few more holes I could reach both sides of the stringer , bed them and glass too. Maybe? Anyways I really appreciate your feedback and I get that u have to work so I'm just happy u got back to me , don't sweat the time frame
 

Rbryan94

Petty Officer 3rd Class
Joined
May 24, 2013
Messages
96


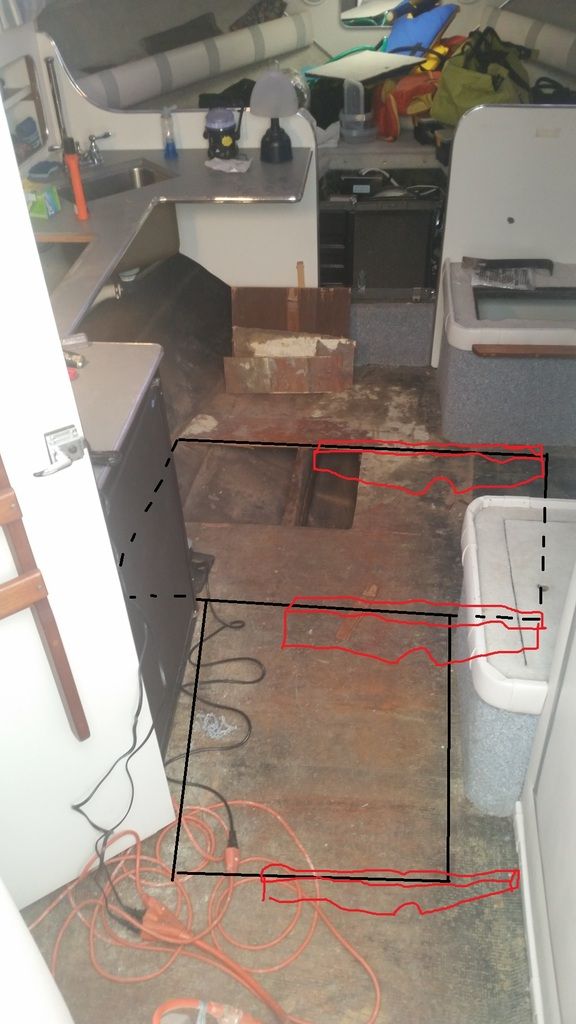
The cabinets are removed but would be on the left. You can see where the table was, there is a round circle on the plywood. The v-birth is forward , I took the pics from the helm looking down. The best news is that everything on the starboard side is good. No rot , no delam, Thanks for the info on the camera KC I'll def keep that in mind.
 

Rbryan94

Petty Officer 3rd Class
Joined
May 24, 2013
Messages
96
I believe I know why this happened. I also think it happened before but was not correctly repaired. I you remember, I said the reason for getting into this is because the cabinets and counter top were shaking when in choppy seas. The plywood is not tabbed to the hull. The outside stringer is not secured to the hull, it wobbles around in between the skin that has delaminated. The plywood is not attached anywhere to that outside stringer.(bottom pic in post #32 shows this) I think that if I bed the outside stringer then glass it to the hull along with doing the same to the inside stringer the problem will be fixed. Am I on the right track?
 

sphelps

Supreme Mariner
Joined
Nov 16, 2011
Messages
11,475
Yep at this point you can see whats bad and in need of replacement. Gunna have to remove everything you can to gain as much access as possible .. Cut the old delam stuff out grind down to good glass /clean wood . bed in the stringers adding some filets and new glass .. Don't forget to clean the area very good with acetone before glassing . I would imagine that most would recommend using epoxy resin for the added strength , longer work time, and lower fumes ...
 

Rbryan94

Petty Officer 3rd Class
Joined
May 24, 2013
Messages
96
Awesome Sphelps ! I appreciate the info, I'll post some pics of the progress.
 

sphelps

Supreme Mariner
Joined
Nov 16, 2011
Messages
11,475
Don't forget your PPE .. A good respirator with the proper filters .. :painkiller:
 

zool

Captain
Joined
Aug 19, 2012
Messages
3,432
RB, looking at the design, it appears CC not only replicated the old classic look, the may have incorporated the old cruiser stringers :Shrug:. Those look like 16' runs without any bulkheading....that's not nearly typical of 80 builds. And, mid to late 80's were not the era of reinventing the wheel...not that theres anything wrong with vintage replicas, but the results of the long inner stringers, is the lateral strength is in the decking. Since you mentioned that the previous patch was not nailed down to the stringer, and not tabbed well to the hull side, its easy to see what you have, pressure forced the delam.

Sphelps is right, remove what you can and use epoxy, it will allow for less than perfect grinding in tight areas, and give better adhering. I came up with a plan, that will repair the delaminated stringer, and deter it from happening again.

Ill post a paintshop pic of what im proposing, it will be crude at best, so bear with me ;)
 

Rbryan94

Petty Officer 3rd Class
Joined
May 24, 2013
Messages
96
I feel like a kid on Christmas Eve! Don't know what a paintshop pic is but I can't wait to see it! I'm heading back down there now to remove the fridge and some other stuff. Any advice on cutting up this floor. Should I try to cut it back to the middle of the other stringer. Should I try to cut my access areas on 45s so when I fill them it will be stronger? I would love to be able to take up half the floor (port side ) and take it to the middle of the inner starboard stringer. Anyways I'm looking forward to paintshop
 

Mikeopsycho

Senior Chief Petty Officer
Joined
Feb 6, 2014
Messages
738
I also had delamination issues on my stringers. I confirmed the wood was solid by drilling 3/8" holes low on the stringers. I did have to replace some wood around the leaking water tank area. I cut off all the delam areas with a diamond tipped grinder wheel, sanded and cleaned up with acetone, bedded and fileted with PB then tabbed and re-glassed everything. I used poly resin because I needed to replace all the plywood deck and I wanted to finish with gelcoat, but like a couple guys pointed out epoxy would be more forgiving and could provide better adhesion. In my situation I had to gut the entire interior of my boat because my gas tank was leaking also and everything smelled gassy. Now I know everything is up to par bellow deck on my 36 year old boat Good luck to you on the repair, you've got some real knowledgeable guys offering advise here so I'm sure you'll have her fixed up and back together in no time.
 

zool

Captain
Joined
Aug 19, 2012
Messages
3,432
I feel like a kid on Christmas Eve! Don't know what a paintshop pic is but I can't wait to see it! I'm heading back down there now to remove the fridge and some other stuff. Any advice on cutting up this floor. Should I try to cut it back to the middle of the other stringer. Should I try to cut my access areas on 45s so when I fill them it will be stronger? I would love to be able to take up half the floor (port side ) and take it to the middle of the inner starboard stringer. Anyways I'm looking forward to paintshop

ha, don't break out the xmas tree just yet, I meant MSpaint ;)

Heres the general idea what you want. yes, you should enlarge the original cut to extend to the starboard stringer, and rest on center, and to the hull side . Preferably a 4'x8' full sheet size. you can add other full cuts from the fridge area back towards the cabin entry as needed. What you need to do is build pre-glassed bulkheads with center limber holes at around 4' spacing, or at any seam. This is a traffic area, so cleats alone wont cut it, imo. Cleats can be used at the other seams along cabinetry, ext.. You can also cut out the small section up by the vberth, if needed, this area can be cleated back in, as well as the other seams.

The bulkheads not only support the deck seams, adequately, but will stiffen up the long stringers, so they don't flex and delam again..like a ladder effect.

This will give full access to the port inner stringer and the port side of the starboard inner. You will tarp off all the other interior area for grinding, whith plastic painters drop sheets, and tape....make a bubble around the repair perimeter and ceiling, leave the cabin door open and maybe use a box fan to pull out the dust/fumes from the ground poly glass.

You would likely need a 2 gallon thin epoxy laminating resin kit, a few sheets of 23/32 exterior ply, ACX or BCX, or marine ply. Maybe 10 or 15 yards of 17 oz biaxial cloth, Thickening agents, and some lighter cloth for preglassing the bulkheads. You also need the consumables to go with it, (chip brushes, mixing cups, rollers, grinding discs, ext)

You would want to glass the stringers 1st, then add the bulkheads, so you don't have any unglassed areas between.


Last edited:

sphelps

Supreme Mariner
Joined
Nov 16, 2011
Messages
11,475
The bulkheads are a really good idea ... It will make the structure much stronger ....
 

kcassells

Fleet Admiral
Joined
Oct 16, 2012
Messages
8,738
Too Cool! Another guy would have dumped the boat or just let it rot till end of days. Kinda like Xmas but let the games begin cause their is a little nasty work to to and the PPE very imp.Good for you. Most biouts don't allow us to see a repair to bring her back to snuff. Typically they are a Full overdo.
KC
 

Rbryan94

Petty Officer 3rd Class
Joined
May 24, 2013
Messages
96
Very impressive! Thanks Zool for your ideas and cool drawing. I'm going to start this tomorrow, Only question I have now is what material to I use for the bulkheads ? I'm assuming the plywood would cut it. Then glass them to the stringers. Maybe make a pattern on cardboard for the bulkhead, then use a jigsaw. Should I bed the bulkheads like they were stringers? Thanks again guys especially Zool no way I could do this without you. I'll keep ya posted with pics as this job progresses .
 

zool

Captain
Joined
Aug 19, 2012
Messages
3,432
If the distance from the stringer top, and center keel is less that 1 foot, then a single 2x12 would be fine, if its larger, then 2 or 3 pieces of ply laminated together.

Yes, cardboard templates are easiest. You need to make them 1/4 to 1/2 inch smaller on the sides and bottom, to allow for bedding. The NEED to be glass encapsulated before install, because the 2 outer bulkheads, where the deck cuts terminate, will only allow of one side of tabbing, which is fine for this but you want glass on the un-tabbed side. Basically, you can butter the sides and bottom with thickened resin, I prefer WEST 403 thickening agent for glueing/bedding. Also round the edges with a belt sander or router, to allow the glass to wrap. Don't forget the weep holes at the keel, to allow for hose routing and drainage.
 

zool

Captain
Joined
Aug 19, 2012
Messages
3,432
Also, be sure to leave at least a 2" lip of existing deck around any wall/cabinet cut, to adhere the cleats, except the hull side, which will be tabbed..

Have fun! :couch2:
 

Rbryan94

Petty Officer 3rd Class
Joined
May 24, 2013
Messages
96
Was down the marina all day today removing the fridge counter top , and everything else on the left side. I'm going to be cutting up the rest of the floor tomorrow and grinding off the existing skins. I love your idea about making up the bulkheads. Should I make a few from the outside stringer to the 2x10 too or is that overkill. I just don't want to be in here again. I am going to be able to remove enough of the floor to bed and glass the entire inside and outside stringer. As I said before the right side is tight so I'm not touching it. Thanks so much for taking the time to help me.
 
Top