Cracked and soaked fiberglass motor mounts on Sea Ray 200cc

ripazka

Petty Officer 1st Class
Joined
Jul 30, 2016
Messages
246
No Title

Seat bases done. Yes the seat bases are not equal. Right one can be turned to sleep mode and it has special rails for that purpose. Side panels are coming off because I want to get the rear section 100% waterproofed. Ive also requested pricelist from few companies if I want to get new leather interior.
 

Attachments

  • photo265808.JPG
    photo265808.JPG
    233.6 KB · Views: 0
Last edited:

ripazka

Petty Officer 1st Class
Joined
Jul 30, 2016
Messages
246
No Title

Last but not least: motor mounts are under construction. And of course some extra thickness to get it tough!
 

Attachments

  • photo265878.JPG
    photo265878.JPG
    350.4 KB · Views: 0

ripazka

Petty Officer 1st Class
Joined
Jul 30, 2016
Messages
246
No Title

Cabin 99% glassed. Benches bedded. Motor mounts are ready to be bedded. Thats about it. Next week some detailing and start of painting. One exhausted boat project manager here!
 

Attachments

  • photo266060.JPG
    photo266060.JPG
    257 KB · Views: 0

ripazka

Petty Officer 1st Class
Joined
Jul 30, 2016
Messages
246
No Title

Motor mounts bedded and fillets placed in. Leg rests bedded and screwed in. Cabin floor and front triangle foamed, caps back and fillets in. I was too tired to tab the benches in. Im going to tab only inside I think, just to get the floor look good. It was like that earlier too and they were in perfect shape.
 

Attachments

  • photo266201.JPG
    photo266201.JPG
    250.4 KB · Views: 0
  • photo266202.JPG
    photo266202.JPG
    324.1 KB · Views: 0

ripazka

Petty Officer 1st Class
Joined
Jul 30, 2016
Messages
246
No Title

I took the left side panel out. Bottom part is pretty much toast. I smeared the panel with epoxy to keep it together. I hope the refabricator is able to replace the bottom part...
 

Attachments

  • photo266266.JPG
    photo266266.JPG
    355 KB · Views: 0
  • photo266267.jpg
    photo266267.jpg
    173.2 KB · Views: 0

Baylinerchuck

Commander
Joined
Jul 29, 2016
Messages
2,740
That's exactly how my port side panel looked. Well I should say, looks. I'm going to use the existing vinyl and just replace the backers for now.
 

ripazka

Petty Officer 1st Class
Joined
Jul 30, 2016
Messages
246
No Title

Slowly but surely this project starts to be close to a finish line. This part is always the hardest for me. I would like to be at lake but I still have few weeks ahead. Im getting some help from my friend with the engine hoisting which is nice. Epoxy is nearly out. 10lbs left (of 200lbs)for the motor mounts and some make over before painting. Interior left from my house today and it should arrive back around 3 weeks with new color and material. Cant wait to see them. I try to get some pics in a few days when the boat is ready for painting!
 

Attachments

  • photo266556.JPG
    photo266556.JPG
    207.9 KB · Views: 0

ripazka

Petty Officer 1st Class
Joined
Jul 30, 2016
Messages
246
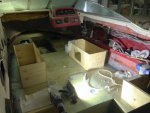
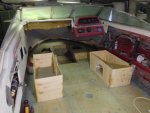
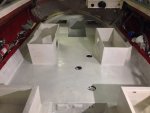
Today I glassed in the foot rests for the driver, cabins floor and several plywood sheets for the trim pump, battery, bilge pump etc. I also glassed in the motor mounts just a bit more the get that extra strenght that I wanted.

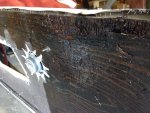
I still have to glass the transom wood (cut through) and do the side cuts for steering arm. Then glassing is DONE!

Next I need to sand the boat, clean the garage and start to paint. I also need to fair out the outside of transom because my center is 1/16" off from the tolerance. It doesnt matter because I had some gelcoat work there anyways. Now I get best result I think. Pics coming asap!
 

ripazka

Petty Officer 1st Class
Joined
Jul 30, 2016
Messages
246
No Title

First paint layer. What a task!! Took A LOT time and effort. Phew! 3 or 4 layers to go. Next one will be easier.
 

Attachments

  • photo267148.JPG
    photo267148.JPG
    229.3 KB · Views: 0
  • photo267158.JPG
    photo267158.JPG
    261.8 KB · Views: 0

ripazka

Petty Officer 1st Class
Joined
Jul 30, 2016
Messages
246
No Title

Correction started. I hope it turns out well. I didnt have any other choice because it was nearly 1/8" off (1/16" out of tolerance). Im heading for zero difference now and I also get better looking (thats the plan at least) hull so what the hell. I also sanded the boat. It was easy to sand after first paint layer. Easy to see all the minor things that needs to be sanded down.
 

Attachments

  • photo267220.JPG
    photo267220.JPG
    214.9 KB · Views: 0
Last edited:

ripazka

Petty Officer 1st Class
Joined
Jul 30, 2016
Messages
246
Correction failed. The compound peeled right off and it was pretty much flour like substance. I guess I was too enthusiastic with the cabosil. Good thing is that it was easy to remove. The surface was sanded and wiped with acetone. Tomorrow I prep the surface and try again.
 

ripazka

Petty Officer 1st Class
Joined
Jul 30, 2016
Messages
246
Problem solved. I added less cabosil and I found resin with styrene.
 

ripazka

Petty Officer 1st Class
Joined
Jul 30, 2016
Messages
246
No Title

2nd paint layer done. It was so much easier than the first one.

Fairing of the transom was also good. Sanding was easy and it was well glued
 

Attachments

  • photo267336.JPG
    photo267336.JPG
    211.3 KB · Views: 0
Top