Failed hull repair...need advice/1981 Ranger 320-V Commanche

RDJuhl

Petty Officer 2nd Class
Joined
Jun 5, 2010
Messages
121
Hi everyone,
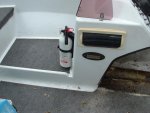
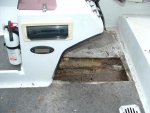
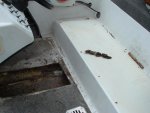
I have a 1981 Ranger 320-V Comanche that I purchased as my 1st boat a year ago. When we purchased the boat, we noticed a prior hull repair...but it appeared to be solid...and the price for the boat met our expectations...so we took a chance on it.

I have observed a small amount of water coming into the boat each time we take it out. Today, I was out about 90 minutes, and when I pulled the drain plug, I had about 3-4 gal drain out.

I took another look at the old repair, and now see a definite failure in the general location of the original repair. It appears that the original repair extends 3 feet or so along the keel. The spot that is failing is about 3 inches long.

I am pretty good with DIY projects, and hope to take care of this repair myself, even though I have never worked with fiberglass.

OK - what advice would you give me?
Take it to a shop, and pay the price to get it done right? If this is your advice, what would a rough price range be?

Or...should I take a cut off/angle grinder to it and do it myself?

If the latter, what are the steps? Being a novice...I would probably do the following:
1. Use the angle grinder and open up the defect "a little"...no more than necessary to get new fiberglass repair to bond.
2. Use a putty knife to force the fiberglass repair compound into the repair cavity
3. Perhaps lay a thin sheet of fiberglass repair cloth over the repair
4. apply more fiberglass repair compound over the cloth
5. Let cure
6. Paint/gel coat

Ok - blast away...how much do I not know?
What are the names and brands of recommended products I should use?
Boat 002.jpgGeneralAreaOfRepair.jpgFailedRepair.jpgPriorRepair.jpg
Thanks for any advice.
 

Woodonglass

Supreme Mariner
Joined
Dec 29, 2009
Messages
25,929
Re: Failed hull repair...need advice/1981 Ranger 320-V Commanche

Based on your pics it appears there is a Crack that extends farther than just the indicated damaged area. Is this the case??
 

BWT

Petty Officer 1st Class
Joined
Apr 30, 2011
Messages
363
Re: Failed hull repair...need advice/1981 Ranger 320-V Commanche

Do you have access to that area from inside the bilge? IMO it looks like a poor repair. If you have access, please post these pics. Is this something that you can fix yourself? ABSOLUTELY! And there will be no shortage of help from this forum. Looking forward to your followup...
 

RDJuhl

Petty Officer 2nd Class
Joined
Jun 5, 2010
Messages
121
Re: Failed hull repair...need advice/1981 Ranger 320-V Commanche

Woodonglass...What you think might be a longer crack is actually the "rough edge" from the original repair. I guess they did not get it done "right"

BWT - I do not have access from the top side...everything is covered..probably plywood, and carpeted.

If water is coming in...which I suspect it is...would the foam absorb water? Would the foam be waterlogged?
 

BWT

Petty Officer 1st Class
Joined
Apr 30, 2011
Messages
363
Re: Failed hull repair...need advice/1981 Ranger 320-V Commanche

there shouldn't be any foam there (at least typically; I'm not familiar with Commanche's). More than likely it's solid molded fiberglass. If you don't have access to the interior it's not the end of the world. It can be tackled from the exterior (not ideal). For starters I would do a little "exploratory" work and sand the area with 80 grit (power sander and dust mask) to see what it looks like just under the surface. Post some of these pics and we'll really know what's going on....
 

oops!

Supreme Mariner
Joined
Oct 18, 2007
Messages
12,932
Re: Failed hull repair...need advice/1981 Ranger 320-V Commanche

ill sit back and watch this one.......BWT has you covered......follow what he says and it will come out right
 

RDJuhl

Petty Officer 2nd Class
Joined
Jun 5, 2010
Messages
121
Re: Failed hull repair...need advice/1981 Ranger 320-V Commanche

I started sanding the failed area...then quickly realized that Woodonglass saw a lot more in my photos than I did. The failed area does indeed extend much further than I thought. The newly attached photo shows a crack which extends a total of 2-3 feet along the prior repair (the latest photo only shows about a foot). If I gently push on this crack, a little water seeps out along the crack. I am not sure if water is actually entering the bottom of the boat along this entire crack, or if it is just getting beneath the gel coat or whatever they used for the patching. (maybe Bondo)

So it appears my worst fears are being realized...and the entire prior patch job has failed and will need to be redone...which probably means removing the boat from the trailer, flipping it over, and doing job right.

We have a long weekend planned at a lake this weekend, so am doubtful that I will be able to do the fix myself, or for that matter, even get a repair shop to do it on short notice.

Any thoughts? Are there "temporary repairs" that would hold for 3 days on a shallow lake?
My guess is that flipping the boat over is quite an ordeal...would this be correct?
FailedRepair2.jpg
 

BWT

Petty Officer 1st Class
Joined
Apr 30, 2011
Messages
363
Re: Failed hull repair...need advice/1981 Ranger 320-V Commanche

the link for you photo didn't work; can you try re-posting?
 

BWT

Petty Officer 1st Class
Joined
Apr 30, 2011
Messages
363
Re: Failed hull repair...need advice/1981 Ranger 320-V Commanche

never mind, see it now.. I have to go home and eat / put my daughter down. I'll post later tonight..
 

RDJuhl

Petty Officer 2nd Class
Joined
Jun 5, 2010
Messages
121
Re: Failed hull repair...need advice/1981 Ranger 320-V Commanche

After thinking about this a while tonight, I think I will attempt the following:
1- Remove one of the bunks so I have room to sand
2 - Sand down the entire length of the cracked area to a depth that allows me to lay in some fiberglass and resin
3 - After drying, sand smooth
4 - Apply what they call fairing filler to smooth out any uneven areas
5 - Sand smooth
6 - Gel coat

Questions
Are these steps reasonably close to what I need to do?
How long will it take for the fiberglass repair to dry?
How long for the fairing filler to dry?
How long for the gel coat to dry?

Thanks for any additional advice.
I am planning to take a vacation day tomorrow and get this done.
 

oops!

Supreme Mariner
Joined
Oct 18, 2007
Messages
12,932
Re: Failed hull repair...need advice/1981 Ranger 320-V Commanche

since BWT is not on right now.....ill just chip in and say 30 mins to 45 mins each poly based application (gell, filler, and resin)
 

RDJuhl

Petty Officer 2nd Class
Joined
Jun 5, 2010
Messages
121
Re: Failed hull repair...need advice/1981 Ranger 320-V Commanche

Thanks oops!
One last question...are there any "tips" for getting the fiberglass and resin to stick "upside down"? The area I need to repair is pretty much on the very bottom of the boat along one of the strakes...if that is the correct word for it. I will not be able to flip this boat over...much too big for me.

Thanks
 

Woodonglass

Supreme Mariner
Joined
Dec 29, 2009
Messages
25,929
Re: Failed hull repair...need advice/1981 Ranger 320-V Commanche

It'll Stick. Just messy. If you can find some some cabosil you might mix some in to thicken the mix a bit. I'd just roll it on the area and then apply the mat dry and roll it in till it wets out then roll on some more resin and apply another layer of dry mat. It HAS to be DRY or it won't work!!!!! Any moisture and it will FAIL!!!! So if you're planning on doing it tomorrow you best get a heat gun or something to aid in the drying process. It's been wet for a while. And if there's foam behind there then you're pretty much NOT going to be able to get this done.
 

oops!

Supreme Mariner
Joined
Oct 18, 2007
Messages
12,932
Re: Failed hull repair...need advice/1981 Ranger 320-V Commanche

the larger the area the harder it is to glass up side down.....i do 3 yards of 1708 a time.....it is really a pita....small areas will stick no problem....

yd had a neat trick......wet it out on wax paper then tape the paper to the hull.....and roll it......but if you are just doing a 4 inch wide by 2 foot long csm .....you will have no problems....

one thing......if the csm falls off.....throw it away.....dont try to re use that peice.....the styrene in the resin will break down the binders and you will have a mess.
make sure you have some extra strips ready just in case
 

BWT

Petty Officer 1st Class
Joined
Apr 30, 2011
Messages
363
Re: Failed hull repair...need advice/1981 Ranger 320-V Commanche

I think you more or less have a good plan for a temp fix. Remove the bunk, if you don't have a grinder and will be using a sander try to use the heaviest grit paper you can find (40 would be ideal). Try to dish the center of the crack at least (minimum) 3/16" with the total width of the taper 3" or so. Run the sander on edge to get a little more bite. The more you can dish this without sanding through the better. Wipe with acetone until clean and dry (no moisture weeping out.

I would use 1.5oz csm and tear (not cut) the material by hand to the rough shape that you need (you want glass whisps around the edges). If there are any voids use a high density filler to fill these spots and pack it into the crack best you can, but do not use this for build up. Only looking to create a fare surface for laying the glass onto. I think Oops has a super duper resin recipe avail on the forum :)

Use a 3" roller and wet the surface with catalyzed poly resin, take the first layer of csm and put in place. Roll with resin to wet out (be generous with the resin; don't worry about runs and good idea to have a plastic tarp on the floor). The first layer should be roughly 3/4 of the width of the sanded taper. Repeat the process wet on wet with the next 2 - 3 layers of glass each piece being a little larger than the previous. ** One tip, do not lay directly underneath the area as you're laying the resin, you'll have it dripping onto you :) Stay off to the side and work the resin into the glass (with a roller you can be generous with the amount of resin, this method kinda has a way of limiting how much actually get absorbed into the glass preventing a high resin to glass ratio; excess typically runs off). Final layer should be full width of the sanded taper or even a little over. Hopefully you'll be able to get at least 3 layers up without it creating a high bulge/spot. When this tacks, brush on some plain white gelcoat catalyzed at roughly 10 - 12 drops per ounce (both the poly resin and gel get catalyzed at this ratio). When this tacks go over top with PVA to allow a full cure. Personally I would let this sit and do it's thing for at least 2 hours or so in 75+ degree temps. At this point, don't be too concerned on the appearance; shaping will come when you start sanding.

Wash off the pva with warm water and dry. Sand flush / shape with 60-80 grit and go over top with a poly based compound or thickened gelcoat to fare the surface (repeat process with pva if using gel) and let cure. Final step if there are any low spots or pits would be to brush a little more gelcoat (unthinned) to get a smooth surface. Sand again with 80 and either bottom paint or do not sand and enjoy the weekend with a white stripe on the hull.

Now, personally I would only consider this a temp fix. I suspect that there will be some glass work needed on the inside of the hull. When you can post some of these pics.. If you have Q's about getting access don't be shy about asking. I don't know exactly what you have to work with there, but this will get you through the weekend with the Fam... Typically I would like to see some heavier glass (1708 bi-ax) laid up with this, but being on the chine this might be easier to tackle when doing the inside work. If you have some on hand and can get a layer in from the bottom wouldn't be a bad idea, but not critical.

I would guess that actual working time (excluding waiting for cure) would be around 2hrs. Figuring in cure time it can be done in a day, but for the first time doing this may not be a bad idea to set aside a day and a half. It's really not that difficult, think things through and try not to over analyze things. There's nothing that can happen that can't easily be fixed. Wear a dust mask, gloves and tyvek suit please ;)

Materials list: 1 gal of poly resin (this will be more than you need), Mek-p, acetone, 1 yard 1.5 csm glass, heavy nap roller (I like the brand Glass-Koter; I would get 2-3), 2" chip brushes (probably 2-3), paper towel, laminating gelcoat (1 Pt should be enough), PVA, sandpaper (40-80 grit), plastic tarp, scissors for making super duper Oops filler, mixing sticks, plastic mix cups, paint tray liners. If there's something I am forgetting I'll edit this post in the morning. Time to eat some dinner and get some sleep :)

Good luck (not that you need it)

~BWT
 

oops!

Supreme Mariner
Joined
Oct 18, 2007
Messages
12,932
Re: Failed hull repair...need advice/1981 Ranger 320-V Commanche

see....told ya BWT had you covered.....you will be fine with that
 

RDJuhl

Petty Officer 2nd Class
Joined
Jun 5, 2010
Messages
121
Re: Failed hull repair...need advice/1981 Ranger 320-V Commanche

Thanks for all the great advice. I will be printing and following directions as close as possible. I do have an angle grinder, so that should help. I have also determined that I will open up the floor of the boat, and attempt to do some work from the top side of this. Is there anything I should do different from the top?
1 - Open up the floor...probably a strip 8 inches wide by at least two feet long
2 - Remove any foam
3 - Dry the area with a hair dryer if necessary
4 - Sand per instructions above
5 - ETC

Let me know if there is anything different to do from the top side.
Should I attempt to place some metal reinforcements?
 

BWT

Petty Officer 1st Class
Joined
Apr 30, 2011
Messages
363
Re: Failed hull repair...need advice/1981 Ranger 320-V Commanche

Should I attempt to place some metal reinforcements?

Not necessary. Pretty much follow the same procedure on both sides of the hull and you'll be good to go. Good luck!

~BWT
 

Outback Jack

Petty Officer 1st Class
Joined
Apr 23, 2010
Messages
267
Re: Failed hull repair...need advice/1981 Ranger 320-V Commanche

I would bet by looking at this failure..I bet it was never fixed from the inside at all and I believe for a permanent fix like BWT said it should be fixed from the inside too. I can't see why anyone would waist their time and money and do a temp fix. RD that was not intended towards you just a general statement as product is not cheap and it takes time :) take a look at my thread, I fixed a hole in a similar place that was fixed before from the outside and was only about 1x5 inches. After taking all the delamination off that I could see from the inside it turned into a bigger hole. Delamination has to go for sure, because that will cause failure. I will let the guru's guide you as I have read alot of their threads that guided me. I know I did this stuff years ago but I still had alot of questions ( I think it is I question my decisions because I was a young fellow then and knew it all hahahaha and was just learning now I like the pros to give me the ok :))I just wanted you to see a similiar hole

Jack
 

RDJuhl

Petty Officer 2nd Class
Joined
Jun 5, 2010
Messages
121
Re: Failed hull repair...need advice/1981 Ranger 320-V Commanche

I have "opened it up"...and find I have more to do.
Yes, it appears the fix "someone else" did was to simply force bondo type filler into the crack. I have pulled out saturated foam from the open area. However, the defect goes in front of the console...as well as under the seat.

So I believe I need now to open up both of those areas as well. When I pulled out the "bondo" repair, I have an opening approximately 1/2 inch wide. (some of the old repair compound is sitting on the seat area...looks kind of like...well, you know!)

BWT - are there any changes to your thorough instructions based on this latest information?

View attachment 109640View attachment 109641
 

Attachments

  • DSCF0153.jpg
    DSCF0153.jpg
    145.7 KB · Views: 0
  • DSCF0154.jpg
    DSCF0154.jpg
    146 KB · Views: 0
  • DSCF0155.jpg
    DSCF0155.jpg
    146.9 KB · Views: 0
Top