Gasket failure between outdrive and gimbal.

Searay205

Chief Petty Officer
Joined
May 27, 2018
Messages
468
Anybody have experience with the gasket between outdrive and gimbal housing coming out on side next to water inlet passage. My installation pictures I took when installing two years ago look perfect. I would say 3/4 width of gasket came out. I smeared some RTV in groove which turned out perfect but without removing outdrive how can i tell if any water permeated into area? All fasteners on outdrive still tight. I guess you do this stuff long enough you see everything...
 

Searay205

Chief Petty Officer
Joined
May 27, 2018
Messages
468
[No message]
 

Attachments

  • photo337884.jpg
    photo337884.jpg
    527.6 KB · Views: 5
  • photo337885.jpg
    photo337885.jpg
    1.7 MB · Views: 5

Rick Stephens

Admiral
Joined
Aug 13, 2013
Messages
6,118
I quit using the Merc gasket and went to the Tungsten Marine ones, back when I had an Alpha 1 that did that every time. The gasket is thicker there. Glue just makes it worse.
 

achris

More fish than mountain goat
Joined
May 19, 2004
Messages
27,468
How tight did you do up the nuts?

Chris...
 

Searay205

Chief Petty Officer
Joined
May 27, 2018
Messages
468
35ft-lbs. Only thing i can guess is the gasket protruded past the housing and the constant water flowing past it worked it out. Gasket is ripped along sealant line. I will check out the Tungsten gaskets. I hate to take it apart as its running perfect BUT i learned in the past what a tiny leak can cause. This resulted from a minute cut in my shift cable sheathing (so small I wasn't sure it actually caused what in the photo but it did. Incredible it was slow enough to allow just enough water in but not enough to flood anything. notice how only the shift cable cavity got the water as the water worked its way up the inner shift cable wire.
 

Attachments

  • photo337907.jpg
    photo337907.jpg
    1.5 MB · Views: 5

Rick Stephens

Admiral
Joined
Aug 13, 2013
Messages
6,118
A little water goes a long ways on the cable. I used to have that issue and would pull the core every day while on vacation, spray it down with electrical contact cleaner and blow same through the housing. Then use canned air to dry out the housing before reassembling. The water screwed up the shifting very quickly.
 

Searay205

Chief Petty Officer
Joined
May 27, 2018
Messages
468
POS quicksilver extruded while i torqued. what a cluster fk. amazing had to grind off paper it must react when tightened. maybe i will snug up just till it starts to extrude and stop. then final torque next day. tungsten marine gasket is 5 days away.
 

Searay205

Chief Petty Officer
Joined
May 27, 2018
Messages
468
is it necessary to paint every time? guess if i have to grind paper off it sealed
 

Searay205

Chief Petty Officer
Joined
May 27, 2018
Messages
468
i just going to snug up until gasket begins to come out. Gasket seals, i mean you have to scrape off the outdrive and mount. even at 5 minutes. must impregnated with glue or something. fked up design. old alpha 1 gen 1 never ever had this issue. i did torque to 50ft-lbs as that is what manual calls for but no way to tight. it even popped gasket out top of outdrive with that value. when i removed they had about 20lbs on them. oh and to add injury to insult bone dry. what gasket was left worked and my silicone just reinforced....

20 ft-lbs after two years, again it was sealed
 
Last edited:

Searay205

Chief Petty Officer
Joined
May 27, 2018
Messages
468
POS squirmed at about 10ft-lbs. I torqued to 35 and trimmed off what squired out. It will get me through the rest of the season. I should have let it squirm out cut off and put the RTV ultra black in the void. Obviously some has to be left or it would not pinch off. Real disappointment in mercruiser on this one.
 

Bondo

Moderator
Staff member
Joined
Apr 17, 2002
Messages
71,128
Hmmmmmmmmmmm ,..... I buy the Sierra, Alpha Gen.II gasket sets by the 1/2 dozen, 'n never have the problems yer havin',....

I use 'em on MC-1s, Alpha 1s, 'n the Gen.IIs without issues,.....

Are yer gasket sealin' surfaces clean, 'n flat,..??
 

Searay205

Chief Petty Officer
Joined
May 27, 2018
Messages
468
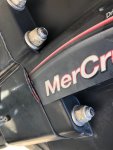
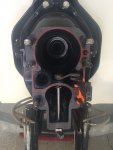
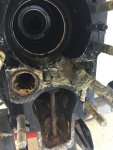
Every time I remove outdrive i have to scrape the gasket off the surfaces because gasket is bonded to surface. That being said i paint the mating surfaces with Quicksilver outdrive paint since the surface is bare when i get done cleaning. I not painting anymore. Even when i removed outdrive after 10 minutes of installation the gasket was bonded, it peals off in layers, real PIA to get off. Paint must be chemically bonding gasket to surface. Another thing to note was even though the gasket blew out there was gasket material across the width of the mating flange, no choice it was bonded to the surface lol. I may have been lied to in the second grade when the teacher said two materials can't occupy the same space at same time. Mercruiser says they can with this design. Gasket can't move in because of O-ring on water passage, gasket getting compressed, gasket has to go somewhere, so it extrudes. The orange bead in my opinion is the issue, the hardness of the gasket is the issue, the mating surface width is the issue. I see a lot more reasons why it doesn't work than does! Again my gasket started popping at 10 ft-lbs. Gasket also extruded at top of outdrive, no surprise cant move inward. My path forward is do nothing, I know there is gasket material across the width of the mating surfaces, I witnessed it durning disassembly, again the gasket on mine gets welded to the surface lol. I cut gasket flat with outdrive using excacto knife. If it starts to extrude I will respond with zero paint bare surface and cheap flat thin gasket. I found numerous post on internet with my same problem except it happens on the shift slide side (mine perfect over there, gasket probably extruding inward). I seen numerous failures where the orange sealing strip is cracked in middle. No ****, the strip material is to hard. Thats what happened on mine over last 18 months? strip split gasket and 1/2 popped out. I actually had a groove of partial material but material remained and prevented water in. Seams like there should be away to access that cavity via a plug to check vs taking off 90lb outdrive, requiring shift shaft lever alignment, propeller CCW, shift cable, spline alignment all to happen at the same time. JUNK DESIGN.

On a side note my alignment was perfect, not even two fingers to push in. gimbal bearing perfect. gasket not so much so.

For my own files. sealing surface .1875" wide, gasket thickness without sealant .032" with sealant .039" so .006" gets smashed into gasket plus parent gasket material deformation. sealant acts as a pintle instead of deforming it goes path of lease resistance and pushes.

Like crap ford 351 water pump design gasket alway squirm out on water passage side EXCEPT Cometic made gasket with steel liner. Solved that problem, they don't make a gasket for this application.
 
Last edited:

Bondo

Moderator
Staff member
Joined
Apr 17, 2002
Messages
71,128
That being said i paint the mating surfaces with Quicksilver outdrive paint since the surface is bare when i get done cleaning.

Ayuh,..... I never paint 'em,...... I finger on a layer of grease,......
 

Searay205

Chief Petty Officer
Joined
May 27, 2018
Messages
468
I am convinced the orange bead on the gasket is the issue. Maybe my gaskets were old, although just ordered off Amazon. I ordered some gaskets off eBay just gasket no orange sealing bead. I like the grease for corrosion mitigation but that may help it squirm more. The orange bead is way too hard, a sealant should deform before cracking and splitting. Painting the gasket sealing surface is a mistake even if you let the quicksilver outdrive paint dry for days next time you remove drive it die grinder and wire wheel. What a mess even if you stick paper towels to protect gimbal bearing and shift mechanism. DO NOT PAINT!! Great paint for outdrive touch ups etc. I watched youtube video after youtube video of guys just pulling gasket off in 10 seconds. My dumbasssss is out there grinding it off because paint bonds to it so well. not well enough to prevent squirm. If it weren't for cleanup and repaint I could change gasket it 30 minutes vs 3 hours and waiting for paint to dry.

i go out to my garage and get a pair of channel locks. squeeze fiber part of gasket it compresses. I squeeze orange strip like squeaking a ball bearing, they slip off with zero indention or deformity. i get better grip and it drives orange bar of steel through gasket no deformation. that why gasket squirms incredibly hard slippery line of goop down middle of gasket
 
Last edited:

TurboJet

Petty Officer 3rd Class
Joined
Jul 13, 2015
Messages
75
Hi there, I am having the same exact issue...

Not sure what I am doing wrong?

I have a (Pre) Alpha 1 (I believe) and hunted down the gasket that does not have the oil tank passage and it still is doing it...

Did you ever find a solution?

It's driving me nuts :smash:
 

Searay205

Chief Petty Officer
Joined
May 27, 2018
Messages
468
I am on strike 3. This time blew out the top yesterday. The top and side extruded a little but thought it would be ok. I got a Sierra gasket and was really happy with the gasket and sealant bead it was malleable vs the rock hard quicksilver. Problem is i test fit the Sierra on the OUTDRIVE and when the two side line up on the mating surfaces it bows the gasket in middle. In other words the fking gasket is already going to be half off one side because they cut it to wide. I took a straight edge and checked my entire sealing surface side to side, top to bottom diagonal and cant even get a .001" feeler gauge under anywhere. I convinced it the gasket design. I ordered one without a bead supposed to show up Thursday. Hopefully the chinese **** is cut right. I went by Marine max. Talked to a "mechanic" sees it all the time. He says only torque until gasket starts to come out side. I said.. "**** that may be only 10ft-lbs" he goes only torque to 10ft-lbs. lol. I think he right. Nylok nuts so the fasteners shouldn't come loose. I asked what mercury says, response replace or repair defective gasket surface. fKKKKK Them make a **** design to sale parts
 

Searay205

Chief Petty Officer
Joined
May 27, 2018
Messages
468
You have a couple options I get one without bead. torque until extrusion begins and stop if above 15ft-lbs. I also like the Goop glue idea, I think to BS to have to do that but we dealing with **** parts what can you do. I got about tablespoon of water in bellows. I love most customers never even look, get 10-12 times out on lake, gimbal bearing corrodes, shift cable fked built in repeat work. nice business plan....

I cant get pic to load but you can actually see gasket material on both sealing surfaces at top, the gasket literally sheared. Remember i paint mine before installing and the paint sticks to gasket to point i have to use a buffing pad to clean the surface after scraping with razor blade. I am not paining anymore. It sheared because gasket has an axle it rolls the orange sealing bead!!!
 

Rick Stephens

Admiral
Joined
Aug 13, 2013
Messages
6,118
As stated, seen it, rode that rodeo a number of times. Switched to Tungsten Marine gaskets. I did try the Goop thing too for a while, but goop doesn't come off easily and removes any paint that it comes in contact with.
 

Searay205

Chief Petty Officer
Joined
May 27, 2018
Messages
468
Tungsten showing up later this week! Man what blast from the past that is the Old Aftermarket discount marine. On a side note, option 13 install gasket, let extrude. Where it extruded remove, use exacto knife cut either side of extruded part, did out gasket where extruded, did do not pull use knife to cut don't want to pull out and make wider area. NOW use Permatex Ultra Black in grove you made. THAT WORKs. That is what i did when I first found it right before going out on water and when i removed outdrive the permeated ripped apart. That was a permanent solution BUT I didn't know how much water if any got in my bellows, no way to tell without removing. You can use a little metal ruler to push the gasket inward, all you need is a little gap for the RTV.

tape either side of seam with blue painter tape. smear that RTV in void area, push in hard back and forth then remove tape. it looks absolutely perfect.
 
Last edited:
Top