Those seal the head to block doing both compression and water sealing...by the way I have only seen 2 o-rings on these models fail.
I But my compression tester seems to be faulty. See the video.
Speaking of 0-rings, isn't that about the third tester you used there, Pastor? I'm thinking you do not have it screwed in snug enough. I don't know if it's correct, but I get mine started (to avoid cross threading), then screw it in holding the rubber hose -- snug, but just hand tightened. I've never had it leak down (press the release to reset it to 0.)


I haven't tried this, but maybe some smoke or steam around the head and compression tester would give a clue as to a leak location.
Those seal the head to block doing both compression and water sealing...by the way I have only seen 2 o-rings on these models fail.
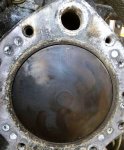
Just put a thin circular bead of silicon around it as the seal for the t-stat is in the head. The pits in head are 100% are they are porosity pits from the aluminum casting process...they wont hurt a thing as the will eventually fill in with carbon.(the black dots you are seeing now)
Bud, for the future, you can buy some blue dye (Steel Blue Layout Fluid) that is painted on the head, before you sand it down. As you sand the head, the remaining blue shows the warpage. When the blue is gone, the head is flat or close to it.
Machine shops used the stuff in the 60's, but have better methods now. Us amateurs can still benefit.