Time to get started on the starcraft resto.

SigSaurP229

Commander
Joined
Oct 1, 2008
Messages
2,123
Re: Time to get started on the starcraft resto.

Ohh I know Curt I just didn't have the time to get it built. (I wasted all my spare lumber on a table saw table).

I've really been lagging behind my epoxy and gluvit is supposed to be in this week, and we have planned a road trip Saturday to go get the Arauco. So I need to have the gut out done before this weekend.
 

SigSaurP229

Commander
Joined
Oct 1, 2008
Messages
2,123
Re: Time to get started on the starcraft resto.

I will get something for it, it is just a matter of time, in actuality what will probably happen is me busting up three pallets and building a stand from that.

I was actually going to have my neighbor bring his excavator to lift the engine with but then it would have been a pain to get the thing into the shop.

So I hooked it up to a pulley and put the truck in gear let it ease forward and off she came.
 

jbcurt00

Moderator
Staff member
Joined
Oct 25, 2011
Messages
25,197
Re: Time to get started on the starcraft resto.

Yeah, if Bwana Don & I had shop envy yesterday, today is only worse :cold:

Oh well, I works w/ what I got's :)

And will 1 day know the joy of pride in resto & ownership :joyous:

Nice to see the sewage pit has a bottom & all manner of funk can be disposed of & you can move on.....

Have a good middle of the week & travel safe over yonder for plywood....
 

SigSaurP229

Commander
Joined
Oct 1, 2008
Messages
2,123
Re: Time to get started on the starcraft resto.

Yeah I am getting there slowly but surely. I am hoping that the gut out will be done soon, and I can get the hull cleaned before the trip this weekend. Hopefully by next week flooring will be going down.
 

SigSaurP229

Commander
Joined
Oct 1, 2008
Messages
2,123
Re: Time to get started on the starcraft resto.

Yeah, if Bwana Don & I had shop envy yesterday, today is only worse :cold:

Oh well, I works w/ what I got's :)

And will 1 day know the joy of pride in resto & ownership :joyous:

Nice to see the sewage pit has a bottom & all manner of funk can be disposed of & you can move on.....

Have a good middle of the week & travel safe over yonder for plywood....


Drag one of them down this way, I will put it up for you to do the resto, no fiberglass though ;)
 

SigSaurP229

Commander
Joined
Oct 1, 2008
Messages
2,123
Re: Time to get started on the starcraft resto.

Ok so for today's update, Everyone please bear with me as this is where I am really starting to get into the nuts and bolts and am going to have a ton of questions.

We started today with a nasty sludgy mess and ended up with this.

20130306_162624_zpse052c5e5.jpg


20130306_162635_zpsa49b928b.jpg


Then we moved on to strip the remaining non factory transom pieces.

20130306_144712_zps88b5444c.jpg


Honestly I think I am just going to cut the factory speedo tube remove it and patch the hole.

Here we can see where the previous owner installed a kicker bracket completely missed on one of the holes and just left it open.
20130306_144721_zpsc4107114.jpg


Now we get into my major concerns, the splashwell has broken away from the transom it is bad and a silicone patch job as well. My thought on fixing this was to screw and aluminum 90 degree piece to the inside of the transom draw it tight and pop rivet the splashwell to the new aluminum angle. Is my thought process correct in this line of thinking.

20130306_140756_zpsc1854dd1.jpg


20130306_140803_zps7528cb95.jpg


Additionally my plan is to pop the splashwell off so that I can get to transom much easier, however I am having some serious issues removing it so advice would be of great use.

Continued
 

SigSaurP229

Commander
Joined
Oct 1, 2008
Messages
2,123
Re: Time to get started on the starcraft resto.

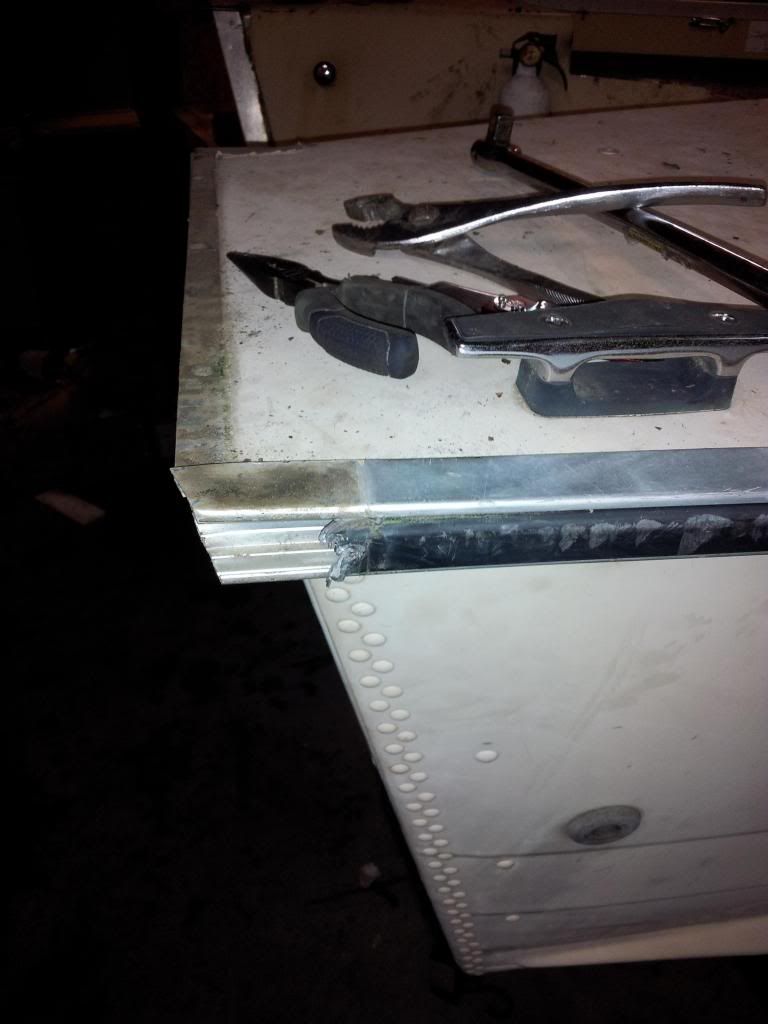
I have removed the trim over top of the transom and drilled the 6 six rivets, I have removed the four short screws up top and the 6 remaining screws on the inner portion of the transom. Now as far as I can tell the only thing that is holding it on is the rubrail trim holding it from up top over the gunwales.

You can see it here
20130306_144703_zps6deba6f2.jpg


Is the only way to remove that is to remove the full rubrail and trim all the way to the bow? If so how do I remove the rubrail without completely destroying it?

Those two corner pieces screws were mangled when I tried to remove them. Luckily that piece of mangled rub rail will fit under the corner trim so it won't be seen.

20130306_144703_zps6deba6f2.jpg
 

ezmobee

Supreme Mariner
Joined
Mar 26, 2007
Messages
23,767
Re: Time to get started on the starcraft resto.

I'd love to be able to offer some advice but your splashwell is totally different from mine. Mine just butted up against the wood transom so that area you have with a crack is just a folded under butt joint on mine. Also, I didn't have to remove any rubrail or anything, I just snipped off an inch or so of the overlaying sheet metal and was able to pull the transom wood out.
 

GA_Boater

Honorary Moderator Emeritus
Joined
May 24, 2011
Messages
49,038
Re: Time to get started on the starcraft resto.

You do have a different splashwell than most of those here. What year is the boat?
 

SigSaurP229

Commander
Joined
Oct 1, 2008
Messages
2,123
Re: Time to get started on the starcraft resto.

I am pretty sure it is a 1985 though that is from memory as I don't have the hull tag number with me.
 

jbcurt00

Moderator
Staff member
Joined
Oct 25, 2011
Messages
25,197
Re: Time to get started on the starcraft resto.

Were any of Budski's recent posts a mid-80's 18ftr?

Based on the older hulls, I'd guess the center & side console 80's boats would have similar splashwells on their OB versions..... But that's a guess.........

Be back.....

EDIT: It looks like Dozer's mid 80's projects are your best bet for similar splashwell details. Might hit him w/ a PM, and include as many pix showing how it's attached & oriented to the hull. He may be able to help..........
 
Last edited:

SigSaurP229

Commander
Joined
Oct 1, 2008
Messages
2,123
Re: Time to get started on the starcraft resto.

Yeah I sent him a PM. I don't know if it was actually attached at some point it is really hard to tell as the alumimnum has a smooth edge to it. I am sure that it wasn't slathered in silicone from the factory. One way or another I have to get this transom out no later than friday as I need plywood measurements.
 

SigSaurP229

Commander
Joined
Oct 1, 2008
Messages
2,123
Re: Time to get started on the starcraft resto.

Oh PS am I posting to many pics, or should I be doing it another way rather than inserting from photobucket?
 

jbcurt00

Moderator
Staff member
Joined
Oct 25, 2011
Messages
25,197
Re: Time to get started on the starcraft resto.

Nope, big & large pix & directly in the thread instead of an attachment that has to be 'opened'. IMHO


The splashwell was likely just up tight to the transom plywood on the up side. Down below the splashwell looking up at the seam there's probably a row of screws holding it to the plywood.

Once it pulled away, the previous owner added the silicone.
 

SigSaurP229

Commander
Joined
Oct 1, 2008
Messages
2,123
Re: Time to get started on the starcraft resto.

there was definetly a row of screws as I removed them all. I don't know exactly what in the world boat I have.
 

SigSaurP229

Commander
Joined
Oct 1, 2008
Messages
2,123
Re: Time to get started on the starcraft resto.

I need to get the HIN off of the transom tag because my starcraft seating is different than I have ever seen. I can't find another boat like her no matter how hard I try. I have been looking for Pics, I am pretty sure it was all factory seating, but mine came equipped with two back to back seats built in jumper seats in the stern and full bow seating.
 

GA_Boater

Honorary Moderator Emeritus
Joined
May 24, 2011
Messages
49,038
Re: Time to get started on the starcraft resto.

I say post the pics in the thread. They're big enough to show detail and linking to PB to see pics is a pain for me. IMHO.

Speaking of pics, look at post #119 in this thread. Took me a while until I found a transom with the same shape as yours. http://forums.iboats.com/starcraft-boats/180-ss-new-forums-554607-5.html

This pic


If your transom wood is mulchy, the screws (sorta circled in red) holding the splashwell flange to the transom have pulled out and the PO tried to patch it with the goop. I can't see if there is a flange on the bottom of the SW.

Here is another thread with the same transom you have, but he's just getting to the put together stage in the last pages. http://forums.iboats.com/boat-restoration-building-hull-repair/1975-starcraft-140-evinrude-ob-restoration-progress-finally-491394-18.html Around post #437 is a good pic of the complete splashwell, but it doesn't show the flanges.
 

jbcurt00

Moderator
Staff member
Joined
Oct 25, 2011
Messages
25,197
Re: Time to get started on the starcraft resto.

Good news & bad news.............

Good news is I think this pix, helps solve the mystery:
20130306_162635_zpsa49b928b.jpg


The corner of the splashwell directly above the fire extinguisher is a FOLDED corner stamped into an aluminum sheet.

There may be some seams, interior or exterior corners that are riveted together to make the splashwell, but here's the bad news....

I think you need to pull the vinyl insert in your rubrail & remove a portion of the rubrail in this pix, to access rivets below it:
20130306_144703_zps6deba6f2.jpg


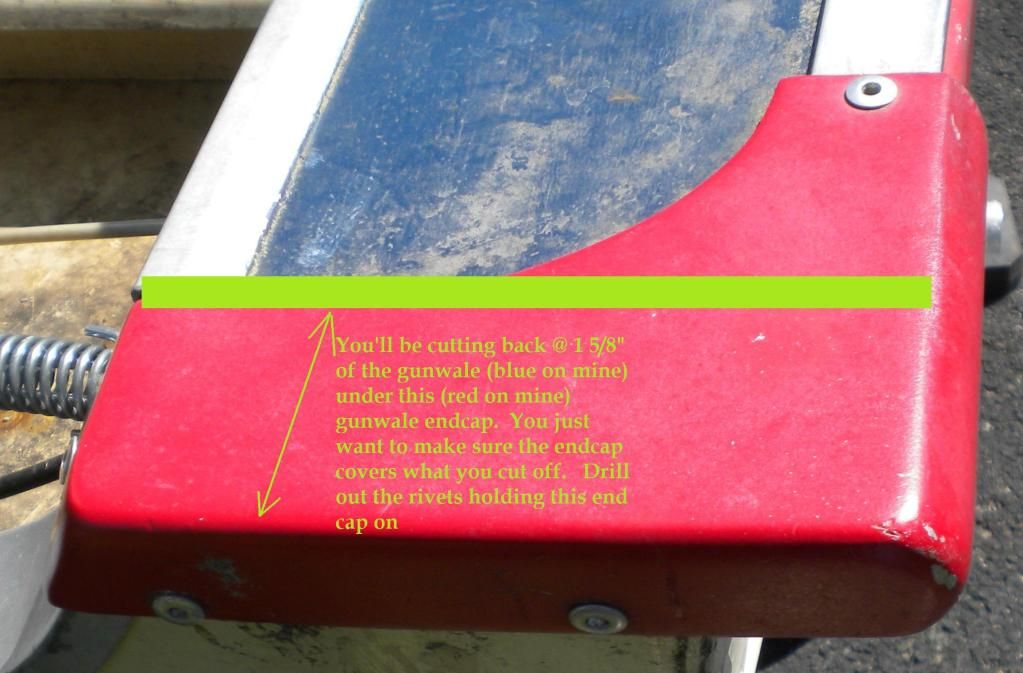
Unlike mine, you've got a HUGE flat panel on either side of the splashwell, on mine, I could just cut back some of the top of the gunwale to get the transom ply out. The splashwell isn't integral to the gunwale like it is on yours:
DSCN1929-1.jpg

So I can just remove the transom end caps, cut or bend the gunwale up out of the way.

That's how I see it anyway...........
 

jbcurt00

Moderator
Staff member
Joined
Oct 25, 2011
Messages
25,197
Re: Time to get started on the starcraft resto.

I need to get the HIN off of the transom tag.
The HIN should be on the transom in the upper right corner of this pix somewhere:
20130306_144712_zps88b5444c.jpg

GA's got some good links too.......
 
Top