want to run my engine out of the boat.

Scott Danforth

Grumpy Vintage Moderator still playing with boats
Staff member
Joined
Jul 23, 2011
Messages
50,338
@brian3127

to run the motor outside the boat with or without the harness (which was covered before by Bondo, AD, Chris, Scott)

hook up the garden hose to the thermostat housing
hook up fuel tank to the fuel pump
wire the block to the battery - using a 4 gauge or larger cable
wire the starter B terminal to the battery +using a 4-gauge or larger cable
run a 16 gauge wire from the battery + to the coil + (you are now "hot wired" that is also where the term came from)

turn on the water

then take a short piece of 16 gauge wire and touch the B terminal and the S terminal on the starter (or use a screw driver) and your motor is now cranking. once it runs, remove the wire or screw driver.

to shut off, remove the wire from the battery to the coil.
 

Bondo

Moderator
Staff member
Joined
Apr 17, 2002
Messages
71,110
is there a parts diagram of the 10 pin plug for my motor so i can buy the correct one. im going to need the engine side and boat side harness
i tried to do a search and all i get are oem part numbers with no picture.
I would like to see what im buying.
Ayuh,...... Why,..??..??..??

Whatcha got, works just fine,......
 

achris

More fish than mountain goat
Joined
May 19, 2004
Messages
27,468
Ayuh,...... Why,..??..??..??

Whatcha got, works just fine,......
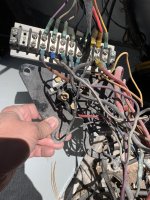
Works? Yeah... Safe, not so much. A USCG inspector would have pink kittens if he saw that...

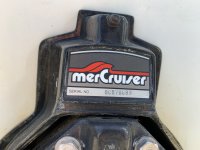
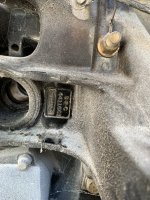
Brian, from what I can see you have an absolutely beast of a frankenMerc. Your serial number is indeed from 1978, but the rocker cover and shift gear (and the EST distributor) scream much much later, even into the Gen II drive era. I'm curious as to what drive you have, and inner transom plate.

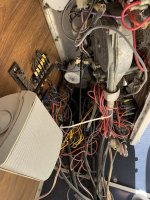
So to tidy up that rat's nest of an electrical system (I use the word 'system' in its loosest possible context)... I would start with literally ripping all the wiring off that engine and starting again. Here's a bunch of links for you to look at to give you an idea of what I would suggest. (All these suggestions are based on the instrument panel having a Voltmeter, not an Ammeter. Please confirm.)

Engine bulkhead mounted 10 pin plug and pigtail wiring and MOUNTING PLATE.

Instrument harness 10 pin plug
If your soldering is up to scratch, solder and adhesive lined heat shrink the instrument harness connections rather than crimp. Crimps are open to corrosion and will make for a bulky and difficult to deal with connection point. Soldering done right should be virtually undetectable.

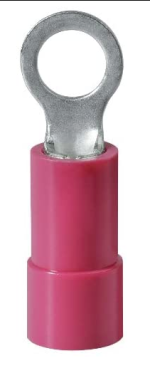
I would go out and buy a box of red ring crimp terminals for the component ends of the harness wires.
1651012665323.png
I'd also get a bunch of different coloured heat shrink tubing (of the right size) and heat shrink tube each ring terminal. Please don't be tempted to use spade connectors in place of ring terminals. Yes they are 'easier' to put on, but they also slip off a lot easier too.
You'll also need the right tool to crimp them. Don't buy a cheap tool, results will be poor. Get one like THIS.

And you'll need a circuit diagram. Once you let me know what instruments you have I can get you the right diagram. Better yet, start posting up lots of photos. Drive, inner transom plate, trim pump, instrument panel (front and back), starter motor wire connections, alternator, distributor, coil.... ect. The more information you can provide the better we can help you...

If this all feels like too much hard work, you may be able to buy a fully made up engine harness from Mercury, for over $400.... It's your choice.

Chris.......
 
Last edited:

alldodge

Moderator
Staff member
Joined
Mar 8, 2009
Messages
42,637
Works? Yeah... Safe, not so much. A USCG inspector would have pink kittens if he saw that...

Brian, from what I can see you have an absolutely beast of a frankenMerc. Your serial number is indeed from 1978, but the rocker cover and shift gear (and the EST distributor) scream much much later, even into the Gen II drive era. I'm curious as to what drive you have, and inner transom plate.

So to tidy up that rat's nest of an electrical system (I use the word 'system' in its loosest possible context)... I would start with literally ripping all the wiring off that engine and starting again. Here's a bunch of links for you to look at to give you an idea of what I would suggest. (All these suggestions are based on the instrument panel having a Voltmeter, not an Ammeter. Please confirm.)

Engine bulkhead mounted 10 pin plug and pigtail wiring.

Instrument harness 10 pin plug
If your soldering is up to scratch, solder and adhesive lined heat shrink the instrument harness connections rather than crimp. Crimps are open to corrosion and will make for a bulky and difficult to deal with connection point. Solering done right should be virtually undetectable.

I would go out and buy a box of red ring crimp terminals for the component ends of the harness wires.
View attachment 359505
I'd also get a bunch of different coloured heat shrink tubing (of the right size) and heat shrink tube each ring terminal. Please don't be tempted to use spade connectors in place of ring terminals. Yes they are 'easier' to put on, but they also slip off a lot easier too.
You'll also need the right tool to crimp them. Don't buy a cheap tool, results will be poor. Get one like THIS.

And you'll need a circuit diagram. Once you let me know what instruments you have I can get you the right diagram. Better yet, start posting up lots of photos. Drive, inner transom plate, trim pump, instrument panel (front and back), starter motor wire connections, alternator, distributor, coil.... ect. The more information you can provide the better we can help you...

If this all feels like too much hard work, you may be able to buy a fully made up engine harness from Mercury, for over $400.... It's your choice.

Chris.......

Unless you can find a USCG inspector to agree, I call this YOUR opinion only. Spewing opinion is what many do here, but don't throw the USCG in the mix unless you have proof
 

76SeaRay

Lieutenant Junior Grade
Joined
Aug 24, 2017
Messages
1,071
If you go with heatshrink and/or crimp lugs get the kind that have adhesive sealant on the inside of the shrink and the terminal insulator to seal up the connections. Helps prevent corrosion in the long term.
 

brian3127

Chief Petty Officer
Joined
Jun 10, 2007
Messages
507
Ayuh,...... Why,..??..??..??

Whatcha got, works just fine,......
not really. Last year before the engine died this happened a couple of times start the engine to go out it then it would stall. try to start it again turn the key and everything went dead. and would do nothing hit all the breaker buttons no help.
load the boat back on the trailer and head home. when we got home looked everything over hooked the muffs but and it would start.
so we have an electrical problem somewhere. this is why im looking to rewire it.
 

Bondo

Moderator
Staff member
Joined
Apr 17, 2002
Messages
71,110
not really. Last year before the engine died this happened a couple of times start the engine to go out it then it would stall. try to start it again turn the key and everything went dead. and would do nothing hit all the breaker buttons no help.
load the boat back on the trailer and head home. when we got home looked everything over hooked the muffs but and it would start.
so we have an electrical problem somewhere. this is why im looking to rewire it.
Ayuh,.... That sounds like dirty rotten wirin' connections,.... probably a ground,....
Start at the battery, 'n clean All of the connections to shiny clean metal,....
 

brian3127

Chief Petty Officer
Joined
Jun 10, 2007
Messages
507
Works? Yeah... Safe, not so much. A USCG inspector would have pink kittens if he saw that...

Brian, from what I can see you have an absolutely beast of a frankenMerc. Your serial number is indeed from 1978, but the rocker cover and shift gear (and the EST distributor) scream much much later, even into the Gen II drive era. I'm curious as to what drive you have, and inner transom plate.

So to tidy up that rat's nest of an electrical system (I use the word 'system' in its loosest possible context)... I would start with literally ripping all the wiring off that engine and starting again. Here's a bunch of links for you to look at to give you an idea of what I would suggest. (All these suggestions are based on the instrument panel having a Voltmeter, not an Ammeter. Please confirm.)

Engine bulkhead mounted 10 pin plug and pigtail wiring and MOUNTING PLATE.

Instrument harness 10 pin plug
If your soldering is up to scratch, solder and adhesive lined heat shrink the instrument harness connections rather than crimp. Crimps are open to corrosion and will make for a bulky and difficult to deal with connection point. Soldering done right should be virtually undetectable.

I would go out and buy a box of red ring crimp terminals for the component ends of the harness wires.
View attachment 359505
I'd also get a bunch of different coloured heat shrink tubing (of the right size) and heat shrink tube each ring terminal. Please don't be tempted to use spade connectors in place of ring terminals. Yes they are 'easier' to put on, but they also slip off a lot easier too.
You'll also need the right tool to crimp them. Don't buy a cheap tool, results will be poor. Get one like THIS.

And you'll need a circuit diagram. Once you let me know what instruments you have I can get you the right diagram. Better yet, start posting up lots of photos. Drive, inner transom plate, trim pump, instrument panel (front and back), starter motor wire connections, alternator, distributor, coil.... ect. The more information you can provide the better we can help you...

If this all feels like too much hard work, you may be able to buy a fully made up engine harness from Mercury, for over $400.... It's your choice.

Chris.......
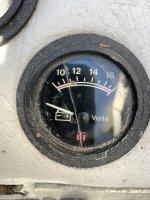
if it doesn't rain i will check what the battery charge meter is i believe its volts though.
 

achris

More fish than mountain goat
Joined
May 19, 2004
Messages
27,468
Unless you can find a USCG inspector to agree, I call this YOUR opinion only. Spewing opinion is what many do here, but don't throw the USCG in the mix unless you have proof
Simple. If a spark occurred between a couple of those exposed terminals (and salt reduces resistance and increases the likelihood of said spark), and fuel vapour was present, a fire or explosion would ensue. That terminal strip does not comply to SAE-J1171, so no, a USCG inspector would not approve it! That is not an opinion, it is a fact. As a marine dealership principal I was also an approved insurance agent. Part of being an agent was accepting proposals for marine insurance. I was required to inspect boats prior to the insurance company accepting them as a risk. I was required to know the rules of what was acceptable, and what wasn't. That terminal strip is a no-brainer of 'not acceptable'. So that should answer your question of 'throwing USCG rules in the mix unless I have proof'.... Good enough?

Chris......
 

alldodge

Moderator
Staff member
Joined
Mar 8, 2009
Messages
42,637
Simple. If a spark occurred between a couple of those exposed terminals (and salt reduces resistance and increases the likelihood of said spark), and fuel vapour was present, a fire or explosion would ensue. That terminal strip does not comply to SAE-J1171, so no, a USCG inspector would not approve it! That is not an opinion, it is a fact. As a marine dealership principal I was also an approved insurance agent. Part of being an agent was accepting proposals for marine insurance. I was required to inspect boats prior to the insurance company accepting them as a risk. I was required to know the rules of what was acceptable, and what wasn't. That terminal strip is a no-brainer of 'not acceptable'. So that should answer your question of 'throwing USCG rules in the mix unless I have proof'.... Good enough?

Chris......

No not simple.
There is a coil, slave relay, trim relays on and around the motor which have exposed terminals. Gas fumes are heavier then air. Your taking a bit of actual info and expanding on it to meet your story.
 

Scott06

Admiral
Joined
Apr 20, 2014
Messages
6,782
not really. Last year before the engine died this happened a couple of times start the engine to go out it then it would stall. try to start it again turn the key and everything went dead. and would do nothing hit all the breaker buttons no help.
load the boat back on the trailer and head home. when we got home looked everything over hooked the muffs but and it would start.
so we have an electrical problem somewhere. this is why im looking to rewire it.
Could have been the key switch or neutral safety switch. What Bondo recommends is a very good start clean and tighten all connections. Under the dash often times 12v supply to the switch and 12v back to ignition on are often daisy chained through the gauges- lots of potential for loose connections and corrosion.
bottom line it may have nothing to do with the harness itself.
 

76SeaRay

Lieutenant Junior Grade
Joined
Aug 24, 2017
Messages
1,071
If it was running before, you might want to figure out why it isn't running now and get that fixed first. As mentioned above, clean all connections, look for a broken wire, check switches are making proper contact, relays and starter are working, etc.. Then, if you decide to clean up the wiring and go to the round plugs, any new problems that occur after rewire you know something is miss wired in your conversion. If you rewire from the start, you might create multiple problems that make it even more difficult to diagnose.
 

nola mike

Vice Admiral
Joined
Apr 22, 2009
Messages
5,444
No not simple.
There is a coil, slave relay, trim relays on and around the motor which have exposed terminals. Gas fumes are heavier then air. Your taking a bit of actual info and expanding on it to meet your story.
True. There isn't any electrical reason to single out a terminal block with isolated positives as being more of a spark hazard than say, the exposed positives on the starter? Or the alt? Or the slave, or...?
 

brian3127

Chief Petty Officer
Joined
Jun 10, 2007
Messages
507
Works? Yeah... Safe, not so much. A USCG inspector would have pink kittens if he saw that...

Brian, from what I can see you have an absolutely beast of a frankenMerc. Your serial number is indeed from 1978, but the rocker cover and shift gear (and the EST distributor) scream much much later, even into the Gen II drive era. I'm curious as to what drive you have, and inner transom plate.

So to tidy up that rat's nest of an electrical system (I use the word 'system' in its loosest possible context)... I would start with literally ripping all the wiring off that engine and starting again. Here's a bunch of links for you to look at to give you an idea of what I would suggest. (All these suggestions are based on the instrument panel having a Voltmeter, not an Ammeter. Please confirm.)

Engine bulkhead mounted 10 pin plug and pigtail wiring and MOUNTING PLATE.

Instrument harness 10 pin plug
If your soldering is up to scratch, solder and adhesive lined heat shrink the instrument harness connections rather than crimp. Crimps are open to corrosion and will make for a bulky and difficult to deal with connection point. Soldering done right should be virtually undetectable.

I would go out and buy a box of red ring crimp terminals for the component ends of the harness wires.
View attachment 359505
I'd also get a bunch of different coloured heat shrink tubing (of the right size) and heat shrink tube each ring terminal. Please don't be tempted to use spade connectors in place of ring terminals. Yes they are 'easier' to put on, but they also slip off a lot easier too.
You'll also need the right tool to crimp them. Don't buy a cheap tool, results will be poor. Get one like THIS.

And you'll need a circuit diagram. Once you let me know what instruments you have I can get you the right diagram. Better yet, start posting up lots of photos. Drive, inner transom plate, trim pump, instrument panel (front and back), starter motor wire connections, alternator, distributor, coil.... ect. The more information you can provide the better we can help you...

If this all feels like too much hard work, you may be able to buy a fully made up engine harness from Mercury, for over $400.... It's your choice.

Chris.......
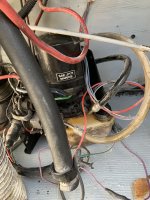
Here are pics it is volts. Transom mount and wiring back at the engine area and under the dash
 

Attachments

  • 28F6CB98-A6EA-431C-9CA1-B83F679C1533.jpeg
    28F6CB98-A6EA-431C-9CA1-B83F679C1533.jpeg
    2.3 MB · Views: 19
  • 375E61CE-CD8F-4FC5-8E49-FA5324406E00.jpeg
    375E61CE-CD8F-4FC5-8E49-FA5324406E00.jpeg
    1.8 MB · Views: 21
  • 6D5211E6-8D1B-4092-BA57-68AD0BF79021.jpeg
    6D5211E6-8D1B-4092-BA57-68AD0BF79021.jpeg
    2.1 MB · Views: 21
  • AD91CF6B-164A-4706-A5ED-BAE8ADC0326A.jpeg
    AD91CF6B-164A-4706-A5ED-BAE8ADC0326A.jpeg
    2.4 MB · Views: 23
  • B5D6346D-EAF2-46D7-A6AF-707593AB0592.jpeg
    B5D6346D-EAF2-46D7-A6AF-707593AB0592.jpeg
    2.1 MB · Views: 23
  • 553CBA70-CAA4-430C-A979-6BA95091C4E2.jpeg
    553CBA70-CAA4-430C-A979-6BA95091C4E2.jpeg
    1.8 MB · Views: 23

achris

More fish than mountain goat
Joined
May 19, 2004
Messages
27,468
Here are pics it is volts. Transom mount and wiring back at the engine area and under the dash
Yeah, it's a bit messy down there, ah...
Your transom assembly is an Alpha One. I suspect the drive is too.
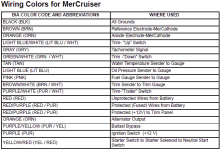
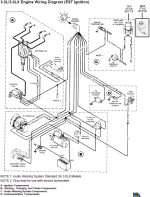
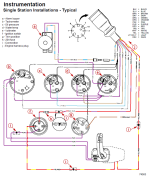
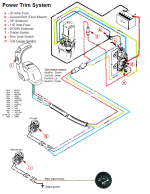
You have a 2 solenoid Oildyne trim pump. What I suspect has happened is the original engine was damaged (possibly freeze cracked) and the previous owner found an older block to replace the broken one. That's why you have a 1978 engine block and everything else is 1989. Here are the cirrus diagrams that should help you... (The reason for a couple being couloured is that I have printed and laminated them A3 and put them on my boat, for reference if I ever need to, and as I don't have a 4 cylinder, it never got the colour treatment, sorry.. )...

1651101524742.png

1651101599667.png

Dash.PNG

2Sol-trim.PNG
 
Last edited:

achris

More fish than mountain goat
Joined
May 19, 2004
Messages
27,468
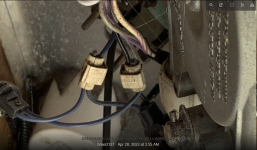
Oh dear, I've just found something .... You need to get rid of these things...

1651132554629.png

They are nothing but canned trouble, and they'll bite you when you least expect it...

Chris....
 

brian3127

Chief Petty Officer
Joined
Jun 10, 2007
Messages
507
Yeah, it's a bit messy down there, ah...
Your transom assembly is an Alpha One. I suspect the drive is too.
You have a 2 solenoid Oildyne trim pump. What I suspect has happened is the original engine was damaged (possibly freeze cracked) and the previous owner found an older block to replace the broken one. That's why you have a 1978 engine block and everything else is 1989. Here are the cirrus diagrams that should help you... (The reason for a couple being couloured is that I have printed and laminated them A3 and put them on my boat, for reference if I ever need to, and as I don't have a 4 cylinder, it never got the colour treatment, sorry.. )...

View attachment 359582

View attachment 359583

View attachment 359581

View attachment 359580
Thanks for your help.
 

brian3127

Chief Petty Officer
Joined
Jun 10, 2007
Messages
507
Yeah, it's a bit messy down there, ah...
Your transom assembly is an Alpha One. I suspect the drive is too.
You have a 2 solenoid Oildyne trim pump. What I suspect has happened is the original engine was damaged (possibly freeze cracked) and the previous owner found an older block to replace the broken one. That's why you have a 1978 engine block and everything else is 1989. Here are the cirrus diagrams that should help you... (The reason for a couple being couloured is that I have printed and laminated them A3 and put them on my boat, for reference if I ever need to, and as I don't have a 4 cylinder, it never got the colour treatment, sorry.. )...

View attachment 359582

View attachment 359583

View attachment 359581

View attachment 359580
what is the purpose of the filter that runs from the coil to the distibutor.
 
Top