DIY reupholstering of boat seats/captain's chairs

natemoore

Master Chief Petty Officer
Joined
Jun 13, 2009
Messages
844
Re: DIY reupholstering of boat seats/captain's chairs

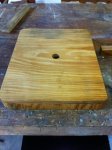
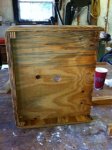
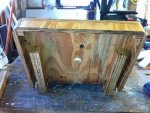
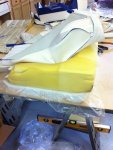
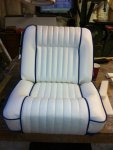
Here's the redone seat back. The three flaps on the inside are stapled to the wood bottom in order to form a nice pocket for your butt and back.

Hmmm. It seems one of my posts disappeared. I was explaining why I had to redo the pleated section. Basically, I didn't consider how to put on the horizontal flap before I stampeded to the sewing machine to put it all together, so I had to break out my second most used tool in this project--the seam ripper--and take it apart, fold the pleated section over, sew a little 1/4" wide fold, then sew the flap the the fold. It only set me back a couple of hours.
 

Attachments

  • tn_IMG_0613.JPG
    tn_IMG_0613.JPG
    81.4 KB · Views: 0
  • tn_IMG_0612.JPG
    tn_IMG_0612.JPG
    80 KB · Views: 0
  • tn_IMG_0615.JPG
    tn_IMG_0615.JPG
    43.2 KB · Views: 0

natemoore

Master Chief Petty Officer
Joined
Jun 13, 2009
Messages
844
Trim down excess vinyl

Trim down excess vinyl

The last thing I did on the vinyl covers was to trim off the excess piping and vinyl from the inside seams. Be careful not to cut into the stitches. I took this opportunity to inspect and restitch as necessary all the seams, especially where welting overlaps welting.

Sewing 101: Start a seam with a forward/reverse/forward stitching pattern. End a seam the same way. This prevents unraveling of the stitches.

The tool I used is a fret-nipper, part of my guitar building tool chest. You can buy something similar to this at Lowes, but it isn't flush cutting like mine.
 

Attachments

  • IMG_0616.jpg
    IMG_0616.jpg
    146.9 KB · Views: 0

natemoore

Master Chief Petty Officer
Joined
Jun 13, 2009
Messages
844
Now some wood working

Now some wood working

I loosely based the new wood on the shape of the old. I had to make them a little smaller (same width, 1" less height). I determined the right size (I hope) by trial and error fitting of the new vinyl on the old wood backers.

One of the things I wanted was a captain's chair style seat with the comfort and look of the original lounge seats. So, I had to figure out a way to attach the seat and back at the correct angle with sufficient strength to hold a bouncing body.

The result was an angled support made out of doubled-up 3/4" exterior grade plywood. I got the angle from the old frame. To make these, first I cut out a master template using a band saw and sanding station. I traced out seven more pieces, scribing a 1/8" offset line around the template with a carpenter's pencil, i.e., I wanted them slightly larger so that I could use the template and a flush cutting bit to finish the new part.

So, I cut out all seven rough blanks with a bandsaw, screwed the template to the slightly larger blank, then used my bench top shaper with a 3/4" dia. flush cutting bit. With eight finished supports, I glued two together to make a total of four strong, 1-1/2" x 1-1/2" plywood supports. Since the surface of the plwood is pretty rough, I used polyurethane glue since it expands and fills voids.

You'll notice that I trimmed off some of the inside near the curve. This will give some space for the vinyl that wraps around the seat bottom.
 

Attachments

  • tn_IMG_0623.JPG
    tn_IMG_0623.JPG
    108.5 KB · Views: 0
  • tn_IMG_0624.JPG
    tn_IMG_0624.JPG
    119.5 KB · Views: 0
  • tn_IMG_0625.JPG
    tn_IMG_0625.JPG
    120.9 KB · Views: 0
  • tn_IMG_0626.JPG
    tn_IMG_0626.JPG
    121.3 KB · Views: 0

natemoore

Master Chief Petty Officer
Joined
Jun 13, 2009
Messages
844
Re: Now some wood working

Re: Now some wood working

All four seat backs/bottoms are identical. I made the sides 1-1/2" thick to match the thickness of the supports previously mentioned. I'm not really sure now how to finish the backs yet. I may make a vinyl wrapped panel out of 1/2" plywood and attach it with stainless steel screws and trim washers after the seat cover is wrapped and stapled to the wood back, or I may nail on the 1/2" plywood back and wrap/staple the vinyl to the back, then use vinyl and hidem to make it look finished. I'll cross that bridge later.

I used polyurethane glue to glue all these pieces together, and a band saw and sanding station to shape the radiused corners.

The seat backs/bottoms will be attached to the supports using 10-32 x 2-1/4 SS screws and threaded inserts. Everything was sealed using a couple of heavy coats of Lenmar conversion varnish sealer.
 

Attachments

  • tn_IMG_0619.JPG
    tn_IMG_0619.JPG
    56.3 KB · Views: 0
  • tn_IMG_0620.JPG
    tn_IMG_0620.JPG
    61.8 KB · Views: 0
  • tn_IMG_0621.JPG
    tn_IMG_0621.JPG
    52.4 KB · Views: 0
  • tn_IMG_0622.JPG
    tn_IMG_0622.JPG
    53.5 KB · Views: 0

natemoore

Master Chief Petty Officer
Joined
Jun 13, 2009
Messages
844
Re: Now some wood working

Re: Now some wood working

Here's how they go together. Note the threaded inserts and the space I made on the supports to allow some relief for the vinyl.
 

Attachments

  • tn_IMG_0627.JPG
    tn_IMG_0627.JPG
    58 KB · Views: 0
  • tn_IMG_0629.JPG
    tn_IMG_0629.JPG
    59.2 KB · Views: 0
  • tn_IMG_0631.JPG
    tn_IMG_0631.JPG
    94.8 KB · Views: 0
  • tn_IMG_0633.JPG
    tn_IMG_0633.JPG
    56.9 KB · Views: 0

natemoore

Master Chief Petty Officer
Joined
Jun 13, 2009
Messages
844
Re: DIY reupholstering of boat seats/captain's chairs

And the assembled wood seats. I'll have to disassemble them to attach the vinyl, but that's easy.
 

Attachments

  • tn_IMG_0631.JPG
    tn_IMG_0631.JPG
    94.8 KB · Views: 0
  • tn_IMG_0632.JPG
    tn_IMG_0632.JPG
    107.3 KB · Views: 0
  • tn_IMG_0634.JPG
    tn_IMG_0634.JPG
    103.5 KB · Views: 0

natemoore

Master Chief Petty Officer
Joined
Jun 13, 2009
Messages
844
Re: DIY reupholstering of boat seats/captain's chairs

If you need to cut the foam, a bandsaw works great. If you don't have a bandsaw, an electric knife works fine, too. I trimmed about an inch off the bottom of the seat back foam, but I don't think I'll have to do that for the bottom foam, at least not now.
 

Attachments

  • tn_IMG_0618.JPG
    tn_IMG_0618.JPG
    44.8 KB · Views: 0
  • tn_IMG_0617.JPG
    tn_IMG_0617.JPG
    41.9 KB · Views: 0

Bob_VT

Moderator & Unofficial iBoats Historian
Staff member
Joined
May 19, 2001
Messages
26,072
Re: DIY reupholstering of boat seats/captain's chairs

I am going to move this to the restoration section where there are similar people involved in the same project!
 

natemoore

Master Chief Petty Officer
Joined
Jun 13, 2009
Messages
844
putting it all together

putting it all together

I cut these 1/2" foam strips on my bandsaw. These go around the outside edge of the wood bottom and back to give some padding and make it look smooth. I determined that 1/2" wasn't enough, so I added another strip, making it 1" thick.

Next, I stapled the rectangular foam bottom to the wood bottom, then put some plastic drop cloth over the foam and wood. 1 mil seems to be the thickest you can use without seeing it through the vinyl.

The flap that runs perpendicular to the pleats is first flap that is stapled in place. You don't really have to make it tight, just take out the slack. Use your tape measure to mark the center of all these components and line it all up.

Now staple the side flaps and insert the other foam piece. I tucked some more plastic around the foam like the original seat had. This is not ideal because there is no drainage plan. I just thought of something. Wrap the U-shaped piece of foam with plastic before inserting it under the vinyl and make sure both folds of plastic overlap the wood sides and front. Then you'll have a drainage plan. Shoot! Why didn't I think of that yesterday evening?:mad:

Oh well, I built a shelter for my boat, and I don't usually go on the water if rain is expected, so this will probably be fine.

I pulled the vinyl down around the seat bottom, used a few clamps to see how I needed to massage the vinyl to get all the wrinkles out. Now it's just stretching and stapling and trimming.

Remember the 1/8" I trimmed from the inside of the back supports to give some relief for the vinyl that is stapled to the bottom of the wood? Well, I had to make those longer by about an inch. I also had to cut the pipe out of the welting. I think once my stainless steel 10-32 x 2-1/4" screws come in today and I ratchet them down, it will compress the vinyl enough to keep the outside edges parallel and in plane with the outside of the back supports.
 

Attachments

  • tn_IMG_0635.jpg
    tn_IMG_0635.jpg
    55.1 KB · Views: 0
  • tn_IMG_0636.jpg
    tn_IMG_0636.jpg
    59.1 KB · Views: 0
  • tn_IMG_0637.jpg
    tn_IMG_0637.jpg
    65.7 KB · Views: 0
  • tn_IMG_0638.jpg
    tn_IMG_0638.jpg
    45 KB · Views: 0

natemoore

Master Chief Petty Officer
Joined
Jun 13, 2009
Messages
844
Re: putting it all together

Re: putting it all together

Stapling the side flaps. Inserting U-shaped foam. Tucking plastic. Stretching and stapling.
 

Attachments

  • tn_IMG_0639.jpg
    tn_IMG_0639.jpg
    40.8 KB · Views: 0
  • tn_IMG_0640.jpg
    tn_IMG_0640.jpg
    63 KB · Views: 0
  • tn_IMG_0641.jpg
    tn_IMG_0641.jpg
    52.4 KB · Views: 0
  • tn_IMG_0642.jpg
    tn_IMG_0642.jpg
    51.9 KB · Views: 0

natemoore

Master Chief Petty Officer
Joined
Jun 13, 2009
Messages
844
Re: putting it all together

Re: putting it all together

Another little SNAFU. I didn't notice that the pleated section on the seat back was tapered somewhat, so I did have to trim some of the inside of the U-shaped foam since my new pleated section is 12" wide and the old one was a couple inches narrower at the top. I also had to glue a couple of 3/8" thick strips of foam here and there to fill voids and eliminate unsightly wrinkles and puckering in the pleats near the top. I really don't need to explain that in detail. If you've gotten this far in the project, you'll know what to do.

This first seat turned out way better than I could have imagined. I'm very satisfied, and I'm a very anal retentive person. In hindsight, nothing was particularly difficult. Having the right tools is a must ($700 walking foot sewing machine purchased used for $450).

My biggest mistake, which I overcame, was not compensating for any difference in width between the new welting and the old welting. I think the original welting had a 3/8" flat part, and the new welting had a 1/2" flat part. I should have made the pattern 1/8" bigger around all sides to compensate.

One thing that I'm just going to have to live with is that on some seams, you can see the white thread in the blue welting. Ideally, it should not be visible, but since I joined vinyl-welting-vinyl in two passes instead of one, the two different stitches didn't always line up, especially in the tight curves. So the stitch that is on the outside is the one that is seen. Again, it's only in a couple of spots. Not a big deal considering that I saved about $350 on these two seats alone versus buying them ready-made from Bass Pro Shops (plus they match the rest of the vinyl perfectly).

I still haven't decided on an elegant way to cap the backside, but I've got some ideas.

Next will be the aft section of the boat, then the cockpit sides. I'm doing that last since I'll have to take the throttle stick apart to remove the starboard panel, and we're taking the boat camping with us at Rocky Bayou in Niceville, FL in Veterans Day weekend.

You really need to move to Florida. November and December here are wonderful! January and February can get really cold. I actually have to wear blue jeans a few days during those months, as opposed to shorts.:)
 

Attachments

  • tn_IMG_0643.jpg
    tn_IMG_0643.jpg
    45.7 KB · Views: 0
  • tn_IMG_0644.jpg
    tn_IMG_0644.jpg
    58.9 KB · Views: 0
  • tn_IMG_0645.jpg
    tn_IMG_0645.jpg
    49.4 KB · Views: 0

jimmy wise

Petty Officer 1st Class
Joined
Sep 6, 2012
Messages
288
Re: putting it all together

Re: putting it all together

Very nice! Best dyi upholstery I have seen. Do you have a welt foot for the machine? Not a zipper foot but a welt foot. If you do its a little bigjust practice sewing with it. You will get the feel of how it sews and it will help with the thread showing. Its hard to get welting nice and tight without sewing over
 

jimmy wise

Petty Officer 1st Class
Joined
Sep 6, 2012
Messages
288
Re: putting it all together

Re: putting it all together

Sorry. I was going to give you an idea for the seat backs. U can use hides. Its made to hide stapled or make a ply seat back with a pocket and drew it on
 

jimmy wise

Petty Officer 1st Class
Joined
Sep 6, 2012
Messages
288
Re: DIY reupholstering of boat seats/captain's chairs

Damned phone! Hidem is what its called. Screw the seat backs on
 

natemoore

Master Chief Petty Officer
Joined
Jun 13, 2009
Messages
844
Re: putting it all together

Re: putting it all together

Very nice! Best dyi upholstery I have seen. Do you have a welt foot for the machine? Not a zipper foot but a welt foot. If you do its a little bigjust practice sewing with it. You will get the feel of how it sews and it will help with the thread showing. Its hard to get welting nice and tight without sewing over

Thanks!

I covered the machine in post #7. It is a welting foot. If you're able to sew the vinyl/welting/vinyl in one pass, then there's no way the thread will show, but I decided that was an impossibility. It's hard enough to keep the welting and a single layer of vinyl aligned properly going around those tight corners, much less trying to do two layers and welting, especially when they start getting some bulk. It's something I'll live with.
 

natemoore

Master Chief Petty Officer
Joined
Jun 13, 2009
Messages
844
Re: putting it all together

Re: putting it all together

Sorry. I was going to give you an idea for the seat backs. U can use hides. Its made to hide stapled or make a ply seat back with a pocket and drew it on

That was one of my ideas, but as it turned out, I didn't have enough wrap-around on the seat bottom front and seat back top, so I'm going to have to cover a plywood panel with vinyl and screw it on with trim washers (or maybe devise a hidden attachment method). That won't look too bad. If I radius the back side of the panel and wrap the vinyl around and staple to the inside, I can add welting between the panel and the seat back.

Or I can just fold over and sew the edges of a square of vinyl, staple that directly to the seat back, pulling it tight, then applying the hidem around the edges. That would be acceptable, too, and wouldn't add to the bulk.

Or I could get some teak or mahogany and make a back that has some utility...drink holders, storage, fold up table, i.e., hinged at the top, folds upward to make a seat back height table...lots of possibilities.
 

JDA1975

Lieutenant
Joined
Aug 27, 2011
Messages
1,385
Re: putting it all together

Re: putting it all together

if all else fails and you decide to use screw us some stainless screw and get a snap washer

10122012235.jpg


and cover it with a vinyl covered button

10122012236.jpg


if you don't have any access to someone with a button press (most fabric suppliers can make you buttons) then PM me and I will send you my address...send me some vinyl and I can make you some buttons
 

natemoore

Master Chief Petty Officer
Joined
Jun 13, 2009
Messages
844
Re: putting it all together

Re: putting it all together

if all else fails and you decide to use screw us some stainless screw and get a snap washer

10122012235.jpg


and cover it with a vinyl covered button

10122012236.jpg


if you don't have any access to someone with a button press (most fabric suppliers can make you buttons) then PM me and I will send you my address...send me some vinyl and I can make you some buttons

Cool. I use something similar to that to install my cabinets. Nylon washer that goes between screw and cabinet, then a white plastic cap that snaps on. That may be better than the hidem. Thanks.
 

jimmy wise

Petty Officer 1st Class
Joined
Sep 6, 2012
Messages
288
Re: putting it all together

Re: putting it all together

Yea I've never sewed on a sailright .......I have a consew and different welt feet. The size for the cord you are using helps. Like I said nice work
 

natemoore

Master Chief Petty Officer
Joined
Jun 13, 2009
Messages
844
Re: putting it all together

Re: putting it all together

Yea I've never sewed on a sailright .......I have a consew and different welt feet. The size for the cord you are using helps. Like I said nice work

Thanks for the compliment.

Buying the right machine was agonizing. First I bought an old 1940s Singer 15-91, thinking that it was a beast that could sew anything. After all, it weighs a ton, right? Well, that didn't work out too great. It kept breaking the No. 69 thread after a dozen stitches, or so. So I got rid of it and started looking at industrial models. Found a couple locally pretty cheap. They weren't walking foot types, but the owners swore that they could do upholstery with no problem. Not wanting to throw good money after bad, I decided that a walking foot was a must and turned to eBay. All these sewing forums cautioned about the deception that goes on there, with scrupulous sellers coaxing material through their machines to make it look like it could do anything. Then you've got two sellers with machines that look almost identical to the Sailrite LS-1 making claims that "it's made in the same Taiwanese factory," but their machines are half the price. Turns out that only the castings are from the same factory. The internals are different. Plus, I found very negative reviews on sewing forums and the same suspicious 5-star reviews all over the internet. When the people at Tuff Sew wouldn't answer my specific questions about the Taiwan factory issue, I decided against them. The Morse website looked very amateurish and was totally lacking in information about their machines, except for their "same as Sailrite" claim.

Then I went to the Sailrite website and found tons of good information, how-to videos, video demonstrations of the machine in action. Called up the company and immediately got through to a very helpful expert. I believe he was the guy in all the videos and the owner of the company. I was getting ready to drop $700 for a brand new one when I found a used one on eBay for $450. Called the seller who seemed like a good guy and he was very knowledgeable about the capabilities of the machine, so I bought it.

It was a good decision. It's an excellent machine with outstanding customer support.
 
Top