dixie hustler "deck job" (turned full rebuild)

Status
Not open for further replies.

mwe-maxxowner

Master Chief Petty Officer
Joined
Jun 20, 2012
Messages
825
Re: dixie hustler "deck job" (turned full rebuild)

Alright. As is the transom stops about 2-3" from the top of the hull. Should I cut it a little shorter at the top to give me more room to tab?
 

Woodonglass

Supreme Mariner
Joined
Dec 29, 2009
Messages
25,930
Re: dixie hustler "deck job" (turned full rebuild)

It should be flush with the top of the External skin of the Hull. why is it short?
 

mwe-maxxowner

Master Chief Petty Officer
Joined
Jun 20, 2012
Messages
825
Re: dixie hustler "deck job" (turned full rebuild)

20130123_134833.jpg


Its like this. How do you tab the top, then?
 

Woodonglass

Supreme Mariner
Joined
Dec 29, 2009
Messages
25,930
Re: dixie hustler "deck job" (turned full rebuild)

OK, I AM an Old Dumb Okie!!! DUH forgot this is an I/O. You're fine!!!! Tabbing on top is not as critical as the sides and bottom. Tab it as much as you can on top and don't worry about it. Sorry for the confusion on my part.
 

mwe-maxxowner

Master Chief Petty Officer
Joined
Jun 20, 2012
Messages
825
Re: dixie hustler "deck job" (turned full rebuild)

Alrighty. I keep going back and forth, back and forth with this idea or that method or this material on my "plan". I feel like having a solid, decisive, documented plan for this job will be imperative to getting it done in a timely manner once I'm able to get to the nitty gritty. So here goes.

I will use arauco plywood which I can hopefully find at home depot for the transom, stringers, and floor. I want to lam the two sheets of plywood together with titebond 3 wood glue, and clamp and screw it until It dries. I want to coat the back of the transom (outer skin side) with epoxy for waterproofing, then coat the edges and face with one layer of csm (and resin of course) I then plan to liberally apply pl to the skin of the transom and trowel with a notch trowel, and clamp the pee out of it for 3 days or so while it dries. I want to use friscoboaters idea of cutting it away from the drain a bit and use pvc to extend the drain and fill in with pb. I plan to make my first batch or so of pb with equal parts cabosil, csm fibers, and resin, then adjust with succeeding batches to my liking?

After all is ready I'll tab the transom in with 8" csm. Next I will cover the transom with a layer of 1708, extending 3-4 inches past the csm tabbing. Lastly I will finish the transom with a layer of 1708, extending another 3-4 inches past the previous layer. After this all cures I will cut the keyhole, and drill all necessary holes, then coat the insides of the holes with epoxy for waterproofing. I may additionally squirt a shot of 5200 in all holes where a screw or bolt are going through.

A) Good for the transom? Missing anything?

Next I plan to move on to the stringers. These will also be arauco ply. I've played with the idea of the short 3" tall outer stringers being fir 2x material since they are so short. I'll probably cut everything else first, and if there is plenty of wood I'll make them ply. If not I will probably not go get another sheet of expensive ply for them. Jay recommended to me that tall stringers be ply, shorter ones can be lumber. But, I digress. I think, from looking, I can get my stringers, bulkheads, motor mounts, etc. all out in one piece. (not literally one whole piece, but sections) and I can use them as templates, so cutting the new ones should be easy.

I want to extend the existing bulkheads in front of and behind the fuel tank to span the entire width of the boat, and I'll use some pink foam to create templates for that and get them fit properly. I want to assemble the entire stringer/bulkhead/motor mount network inside the boat, and glue and nail it together with my brad nailer. I want to drill small, maybe 1" limber holes from each section into the next to the bilge.

I'll suspend all this 1/4" above the hull, and squirt liberal amounts of pl under the stringers, which will of course have to dry for 3 days or so. Now I will create a coved transition from stringers to hull with pb to make the glass easier to lay. First layer of glass for tabbing will be csm, from about an inch away from stringer's top to 3 inches or so onto the hull. Next will be a layer of 1708, down the sides and past the end of the csm. I won't have room to go another 3 or 4 inches past with each layer as with the transom, though. Now another layer of csm. Then another overlapping layer of 1708. Tear/stretch some csm to make it conform better, and cap the stringers with a layer of the csm. Once all cured, I will glue a painted or perhaps epoxied ( $ :( ) cleat 2x2 to each stringer with pl. This will be for screwing the deck to so I don't have stringers rot if I don't have a screw hole sealed well enough somewhere.

B) Good for the stringers? Miss anything? I'm trying to type this up without referring back to references, to see if I have indeed learned my processes in theory so I can more quickly go through my steps.

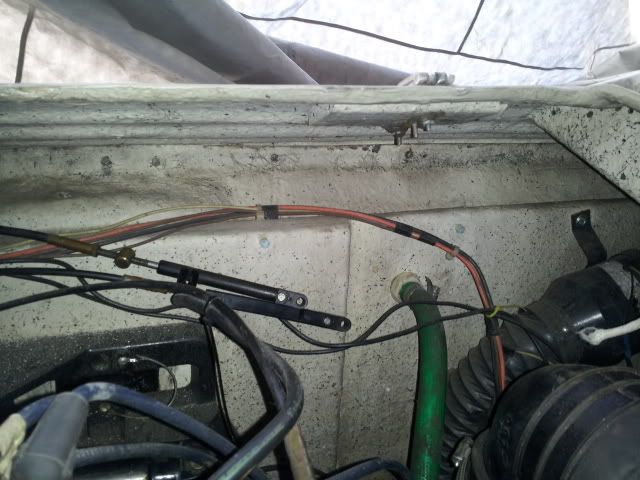
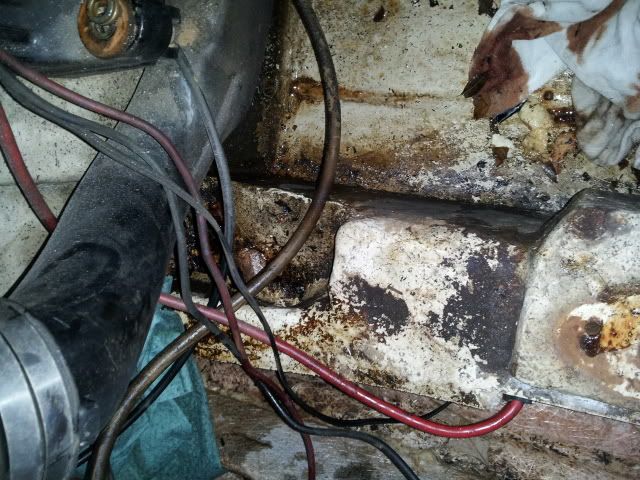
Here is where I may be thinking too much. If you look, near the bottom of that shelf running along my hull, where the old floor met it and was tabbed onto it, there is about a half-three quarter inch gap between the bottom of that foam shelf and the hull as it slopes up. I have been thinking about coating a small 3" wide length of plywood with a layer of csm, and pl gluing it to the hull, running right along the bottom of that "shelf", right below where the deck will rest. Maybe even tab this to the hull/shelf bottom with a layer of 1708. When the deck goes down, I can glue the ply to this strip, and it will support the edges of the deck and give me a place to screw the edges to also.

C) Not needed? Or problematic?

I must remember to seal all limber holes I drilled with epoxy before this next step. Now it's time to foam. Pretty straightforward. I may use the false deck method, and just weight the false deck. That way if I pour too much foam, I think the false deck would rise before my hull distorted. This leaves the foam more waterproof because I won't be shaving so much of it off the top. Once all foamed I want to take a router with a half inch wide/deep bit and create grooves in the foam for the water that will never get in because I will do such a good job and take such good care of the boat to flow on top of the foam and to the bilge. Going through the stringers where needed. I want to use epoxy to paint about a 6" wide strip over the stringers and bulkheads, because I can trust it to seal the stringers best if my csm cap isn't the best and where I have cut through them. Then I will paint over the rest of the top of the foam (not over where I epoxied) with the recemmended paint for waterproofing the foam. Juuuuuuust in case.

Next up is the deck. The deck will be measured and templated with pink sheet foam, then cut out in arauco ply and test fitted just to be sure. Once good to go with the fitment I will coat the underside with ONE (?) coat of epoxy, and the edges at least where the joints in the deck will be. But I'm thinking the outside edges also. Where it won't be visible I think I may use pl for filleting, so I'll want those edges to be sealed. I'll run a bead over the top of my stringers AND cleats of pl, place my deck pieces, and screw to my cleats. I'll run each screw in, back it out, squirt 5200, then replace the screw.

D) How far apart should I put the screws? They are basically for holding it till the pl sets so I'm thinking not really that many?

After the pl has cured, I'll create my fillets where visible with pb. If I've gotten good with pb by then I may do it all with pb. Up front under the seats and in the rear, though, I may just use pl. Once all dried and set up, I will tab all around with one layer of 8" 1708. Next up will be a layer of csm, overlapping the first by about 2 " ( this is about all I'll have room to go past). I also need to remember to tab the deck down into the bilge area under the motor. Then I will lay a layer of 1708, overlapping the previous as much as I have room for. Finishing up I will lay a layer of csm over the deck.

E)Sound good? I'm assuming where I stop a section of matt/cloth and start a new, I overlap about 3"? Should I stagger the overlaps somehow so that I don't get so much buildup in one spot?

I want to reuse my seat bases, as there was nothing wrong with them. It was just three 8" squares of plywood glued together. I'll sand it up to make it a little purdier, and epoxy it if there is any left. Then I'll glue them to the deck. I also just wanna glue slabs of wood to the deck in the motor compartment for the battery and trim pump. No screws into my deck! Ever!

I want to gelcoat it with an off white, so I'm assuming hit the whole deck up with maybe a 120 then a 180 sandpaper with a hand sander, then clean acetone and gel?

I feel like I'm forgetting something, but I can't think of anything. I don't plan to leave any accesses to the tank. If I ever have problems with it I know where it is. I'll cut it out then repair when I'm done with whatever needs doing.

gotta go...didn't have time to finish the post...edit it tonight and finish up :/
 

Woodonglass

Supreme Mariner
Joined
Dec 29, 2009
Messages
25,930
Re: dixie hustler "deck job" (turned full rebuild)

I like it except...I would use PB to Glue the Transom and NOT PL. Not saying you can't just that I think PB gives a Much Better Bond. Your boat your choice. Remember Epoxy sticks to just about anything. Poly....Not so much.
 

mwe-maxxowner

Master Chief Petty Officer
Joined
Jun 20, 2012
Messages
825
Re: dixie hustler "deck job" (turned full rebuild)

Remember Epoxy sticks to just about anything. Poly....Not so much.


I don't understand. The pb will be made with poly resin. If not I'm completely confused on it's composition :p. I've based a lot of my plan off jay's builds to be honest, and I just noticed him using it and saying it gave him much more working time. With all my uncertainties I want plenty of time to get it where I'm satisfied.

Thanks again so much wood and jig. You two have gone out of your way to give me such good advice and read all my posts. I'm sure you've sighed and rolled your eyes at me more than once.

I dread this, but the peace of mind that my boat is COMPLETELY sound will be awesome! I know I will still have an old motor and outdrive, and the hull is a little scarred, but it will be a like new boat otherwise. And if, in a few years, if the motor lets up, a rebuild or a new motor and I (basically) WILL have a new boat. I like the 4.3. Seems a good compromise between the 3.0 and the 302/305/350 with decent fuel usage and good power. I noticed the thing has power steering, I didn't know any boats did. I love that! I noticed it steered so much easier than my old boat, and my dad's (rotten) bayliner, and my friend's bayliner capri, but I didn't know why. One of the reasons I prematurely fell in love with it and ended up with a half rotted boat ha ha.
 

jigngrub

Fleet Admiral
Joined
Mar 19, 2011
Messages
8,155
Re: dixie hustler "deck job" (turned full rebuild)

So how long after you're done restoring your boat do you think it will take your dad to hit on you to restore his boat?

... maybe no skiing this summer?:)
 

Woodonglass

Supreme Mariner
Joined
Dec 29, 2009
Messages
25,930
Re: dixie hustler "deck job" (turned full rebuild)

You mentioned Poly and Epoxy. Just wanted to make sure you understood the adhesion formula. PL Adhesive can at times leave bubbles and voids in the laminations due to outgassing etc. I know some members use it to glue the transom to the skin and so I'm not saying not to just that I prefer using PB If coat the skin first with epoxy then the Poly will not adhere well. I'd recommend staying with one product or the other and not mixing them.
 

mwe-maxxowner

Master Chief Petty Officer
Joined
Jun 20, 2012
Messages
825
Re: dixie hustler "deck job" (turned full rebuild)

Ah okay. So instead I'll cover the back side too with a layer of csm so the pl can stick. The pl will not stick to the epoxy coat. Noted and plan adjusted!

I would LOOOOOOOOOOVE to restore my dads boat. But sadly I don't think he'll go for it :(. He is either just not paying attention because he doesn't want to get into it or he believes his boat is fine. I have no doubt his boat is as bad or worse than mine. My floor felt fine except for one spot. His was bad enough he felt a need to put a floor over it, in essence. I need to sneak into his building and get some pictures haha.

Does my plan, including the order and amount of my layups, all sound adequate?

There will be skiing this summer. My boat WILL be done. Maybe not by the start but soon thereafter. Plus the boat sitting beside mine is my best friends. We'll take it out to wash all the fiberglass off me :). The boat ramp is about 15 min away.
 

mwe-maxxowner

Master Chief Petty Officer
Joined
Jun 20, 2012
Messages
825
Re: dixie hustler "deck job" (turned full rebuild)

Anyone notice that short ski pylon in the boat? I want to glass a piece of wood to the bulkhead there behind the tank to screw this too. Glassed separately from the bulk and then tabbed to it. There is a piece of wood glassed to the cap with a u bolt securing it right behind the bench seat I may replace. Would this thing be sturdy enough to pull a tube from?
 

mwe-maxxowner

Master Chief Petty Officer
Joined
Jun 20, 2012
Messages
825
Re: dixie hustler "deck job" (turned full rebuild)

Motor came out today!

20130130_094701.jpg


I was able to borrow a cherry picker from a friend and it worked well.

20130123_115550.jpg


Tight fit!

20130130_095018.jpg


The boat came with a free 14mm deep well socket. How nice!

20130130_104945.jpg


Here is a top view of one center stringer, where the motor mount is. You can see where the last few inches, near the transom, steps down a couple of inches. I would really like to just leave that stringer the same height all the way to the transom. I see no reason I can't? The exhaust piping would still clear just fine. I got the steering assembly unbolted. I started unscrewing a few other things and a storm came up.

I gotta figure out how I'm gonna tie up all the cables/wiring etc out of my way so I can work. I think I can set the steering assembly on the side shelf and secure it with some ties or something.
 

jigngrub

Fleet Admiral
Joined
Mar 19, 2011
Messages
8,155
Re: dixie hustler "deck job" (turned full rebuild)

Now it's time to decapitate that boat and start cuttin', rippin', and grindin'!
 

mwe-maxxowner

Master Chief Petty Officer
Joined
Jun 20, 2012
Messages
825
Re: dixie hustler "deck job" (turned full rebuild)

Yup. Except the cap is gonna stay on I've decided. I'll just work around it and deal with it ha ha. I guess I'll cut out the stringers and the transom next, and get that tank out of there. Any bright ideas on how to deal with the fuel filler hose and vent hose? I guess I'll run them through a hole like they were factory, but use some of the can spray foam to seal the hole as best I can, then paint the foam well with something waterproof and run a little silicone around the top as well.

I'm getting together what will (hopefully) be my last order to uscomposites. I'm still not decided as to whether I will go with 3 layers of csm on the deck, csm 6 oz csm, or csm 1708 csm. I think the deciding factors are A) will either combo be significantly stronger than the other two, and B) will any certain combination take much more resin than any of the others?

So far I have ordered 1/2 gal of epoxy for the bottom of the deck, 5gal poly resin, 28 linear yards of 50" wide 1.5 csm, 15 linear yards of 50" wide 1708, 10 qts cabosil, 16 yards of 6" wide 1708 tape, one 16 lb foam kit, and 1 lb of quarter chopped strand. Along with a bubble roller and a small radiused bubble roller, and a few misc mixing containers, rollers, etc.

I know I'll need to get at least five, if not ten more gal of poly, probably some more 1708, and one more foam kit. But this was all that was in the bank for now :p. I've also ordered gimbal bearing, seals and such associated with that, bellows, and lower shift cable, so it's getting pricey.

I think I've decided to go with 3 layers of csm on the deck. It's just so much cheaper than the 1708 and the 6 oz. I also think i've decided to use one coat of textured durabak, and two coats of smooth on the deck top. Can't even think about ordering this right now.

How long does the arauco plywood need to dry, so I know how soon to buy it?
 

Woodonglass

Supreme Mariner
Joined
Dec 29, 2009
Messages
25,930
Re: dixie hustler "deck job" (turned full rebuild)

No need to decapitate an I/O boat in most cases. You can get to the transom with the cap on. Plywood should acclimate for about a week in your work area. Arauco plywood is pretty dry when you get it.
 

mwe-maxxowner

Master Chief Petty Officer
Joined
Jun 20, 2012
Messages
825
Re: dixie hustler "deck job" (turned full rebuild)

Why is it that the transom is only doubled up up in about a 2' center section ? Why can't it just be doubled all the way across?
 

Woodonglass

Supreme Mariner
Joined
Dec 29, 2009
Messages
25,930
Re: dixie hustler "deck job" (turned full rebuild)

That's typical for I/O's. Due to the way the Engine and the Outdrive are connected, it's really all that's required.
 

mwe-maxxowner

Master Chief Petty Officer
Joined
Jun 20, 2012
Messages
825
Re: dixie hustler "deck job" (turned full rebuild)

But doubled up all the way won't hurt anything? Seems to me it would give me a few less places to filet and have some challenging glassing?
 

jigngrub

Fleet Admiral
Joined
Mar 19, 2011
Messages
8,155
Re: dixie hustler "deck job" (turned full rebuild)

But doubled up all the way won't hurt anything? Seems to me it would give me a few less places to filet and have some challenging glassing?

If your transom is straight/flat all the way across it won't hurt a thing to double the wood all the way across, just more material.

Some I/O and OB transoms have odd angles or are radiused and require being pieced in like that.
 
Status
Not open for further replies.
Top