1960's 13' MFG carefree Rebuild (complete noob, i know nothing about this!)

Jon Sob

Master Chief Petty Officer
Joined
Jun 11, 2011
Messages
827
Re: 1960's 13' MFG carefree Rebuild (complete noob, i know nothing about this!)

I used three pieces of 3/8" fir and glued them together with PL Premium. I used a trowel with 1/8" grooves to spread the PL and the PB. This was before I knew about the curve. I sanded the curve into the wood and then sealed the entire piece with CSM. I then put the transom in and glued it to the stern with PB. After it was tabbed in I then covered it with a layer of CSM and 2 layers of 1708.

DSCF1834.jpg

DSCF1869.jpg
 

sphelps

Supreme Mariner
Joined
Nov 16, 2011
Messages
11,486
Re: 1960's 13' MFG carefree Rebuild (complete noob, i know nothing about this!)

3 layers of 3/8 ply is 1-1/8 " so you have 3/8 left for glass and glue to bond the pieces together, I think some of the other guys used PL premium glue or titebond III to glue the wood together . I guess you would have to install the pieces one at a time gluing them together and once dry take the clamps off take the whole transom out then lay some csm on the side facing the outside skin then install with the pb . After you fillet and finish the inside glass you should have around 1-1/2 " thickness .
I hope that made since..:facepalm::)

Wow me and jon posted at the same time and gave you the exact same answer.
Only I was thinking glue it together in the boat to get the right radius curve..
 

jbcurt00

Moderator
Staff member
Joined
Oct 25, 2011
Messages
25,187
Re: 1960's 13' MFG carefree Rebuild (complete noob, i know nothing about this!)

.. Hmmmmm,.... Jon sob says his transom was 1.5 inches originally, maybe ill add another piece of plywood and make it 4 pieces for the transom. That would be pretty strong. What do you mean by it will leave me 3/8 for laminating
When you laminate the 3pcs of ply together, at 3/8" per, that's a total of 1 1/8" of total wood in your plywood build up for the transom. If you are trying to hit a total finished thickness of 1 1/2", you've got 3/8" of space available for the PB (or PL) to the transom and however you're gluing the 3pcs of ply to each other. And the layers of glass & resin you'll apply to the plywood on the inside & wrapping the tabbing onto the hull sides.

Does that ^^^ make sense?

Also, how should I glue these pieces together? I. know it needs to be done one at a time, Do I need to use PB or could I just use woodglue to save on poly resin? I understand that using the Peanut butter would require me to glass a piece of csm to each piece of wood. After which I would lay the pb down and put the next piece of wood down. Should csm be glassed to each side of the pieces of plywood? Gosh, I wish I could find woodoglasses pictures, they were so helpful! I miss him too, he always chiimed in and was willing to help

Since you are probably laying these sheets in 1 at a time, this is how I'd do that (Jon will hopefully chime in if he notices any thing amiss):


  1. Sand/grind the repairs you made to the hull in prep of moving forward, feathering the edges
  2. Cut the plywood pcs to fit, @ 1/8" gap on both port/starboard sides & to the hull bottom. When clamped into place the ply pcs will get shorter against a curve
  3. Since the ply is so narrow, it may prove difficult to CSM & resin the edges of the ply before you laminate them to each other
  4. I'd prep the transom skin that you patched & smoothed/feathered, and cover it w/ thin mil plastic, stuck & taped as best you can to minimize it's thickness, and prevent accidentally gluing the plywood into place
  5. Take the 1st pc of ply and cover the interior face w/ either PL or TiteBond3 glue, making sure to cover it well, with a thin layer of glue (a notched trowel would work w/ either) set the wood into place against the transom skin
  6. Quickly coat the next pc of ply with PL of TB3 (only the inside face, the side facing the bow) and place it against the 1st pc of ply
  7. Take the last pc of ply and sandwich it against the 2nd pc of ply
  8. Use the WOG clamps to secure the 3 pcs of ply against the exterior transom skin

EDIT: Please note that these steps, from start to finsih, need to be completed fairly quickly, before the glue between ply sheets starts to set up. And that surface tension of the glue may make it difficult to adjust the 3pcs of ply to align properly once they are stuck to 1 another. To ensure there are no air pockets or voids in the glue layers, relief holes can be drilled thru each sheet prior to starting the layup, 1/4"-3/8" would probably be sufficient. Then once all 3 pcs are cured to shape, a 3/8" - 1/2" hole can be drilled thru all 3 sheets to allow the PB or PL to key into the transom wood & help keep it well stuck to the transom skin....

Once the ply laminations cure in a curve shape, you can take them out of the clamps, clean up the excess glue and remove them from the hull. Although it now has a slight curve, the 1 pc transom can now be prepped & finished as a 'normal' transom. With the curve, the ply edges of each pc will not be even. If you can, you might trim them to flush so you can more easily CSM & resin the edge. Prep & CSM the back & front of the new single pc plywood transom.

Once that CSM is done on the edges & faces, scuff the back side of the transom plywood lamination. Acetone clean it & the transom skin that was prepped previously, then apply PB or PL. Set the plywood into place and clamp again.

Use enough, but not so much pressure to over squeeze the PL or PB out of the joint. Just enough to securely bed the wood into your PB or PL.

There should be a little squeeze out. If you've used PB, take a large kitchen spoon (I HIGHLY RECOMMEND A METAL SPOON FROM THE DOLLAR STORE, NOT THE KITCHEN) and create a cove, curved transition between your transom ply & both of the boats sides & the bottom hull.

PL used between the plywood pcs will take 24+/-hrs to cure. Maybe longer. PL used between the plywood lamination & your transom skin will take at least as long, probably longer. You will want to wait at least 72 hours before using ANY poly resin anywhere near where you've used PL.

Tab, CSM/1708 the newly installed transom wood to the hull:)

Jon's version is somewhat more brief:facepalm: But no less accurate:cool:
 
Last edited:

jbcurt00

Moderator
Staff member
Joined
Oct 25, 2011
Messages
25,187
Re: 1960's 13' MFG carefree Rebuild (complete noob, i know nothing about this!)

I used three pieces of 3/8" fir and glued them together with PL Premium. I used a trowel with 1/8" grooves to spread the PL and the PB. This was before I knew about the curve. I sanded the curve into the wood and then sealed the entire piece with CSM. I then put the transom in and glued it to the stern with PB. After it was tabbed in I then covered it with a layer of CSM and 2 layers of 1708.

3 layers of 3/8 ply is 1-1/8 " so you have 3/8 left for glass and glue to bond the pieces together, I think some of the other guys used PL premium glue or titebond III to glue the wood together . I guess you would have to install the pieces one at a time gluing them together and once dry take the clamps off take the whole transom out then lay some csm on the side facing the outside skin then install with the pb . After you fillet and finish the inside glass you should have around 1-1/2 " thickness . I hope that made since..:facepalm::) Wow me and jon posted at the same time and gave you the exact same answer.
Only I was thinking glue it together in the boat to get the right radius curve..

Seems as though they are both much more brief then I am:eek:

All make sense & would be a good method......;)

I channeled a little of the WOG spirit though:D <<--- does not constitute an endorsement from WOG, nor does it ensure a better end result...... It only means my keyboard has a shorter life expectancy:rolleyes:
 

sphelps

Supreme Mariner
Joined
Nov 16, 2011
Messages
11,486
Re: 1960's 13' MFG carefree Rebuild (complete noob, i know nothing about this!)

Yea but you filled in all the little details.. You get an A+.
 

jbcurt00

Moderator
Staff member
Joined
Oct 25, 2011
Messages
25,187
Re: 1960's 13' MFG carefree Rebuild (complete noob, i know nothing about this!)

Yea but you filled in all the little details.. You get an A+.

Thanks, a broken watch, something something twice a day something something:)

If I can give back 1/2 of what I've learned, or 10% as much as WOG, I'll be satisfied.....:cool:
 

Jon Sob

Master Chief Petty Officer
Joined
Jun 11, 2011
Messages
827
Re: 1960's 13' MFG carefree Rebuild (complete noob, i know nothing about this!)

Great job jb ...... that is exactly the way to do it. I just want to say that I am not crazy about the idea of using PL to install the transom to the fiberglass skin. I would use the PB because I think it would fill in any voids that may present and I would also drill some "air" holes to allow any trapped air to escape.
 

jbcurt00

Moderator
Staff member
Joined
Oct 25, 2011
Messages
25,187
Re: 1960's 13' MFG carefree Rebuild (complete noob, i know nothing about this!)

Great job jb ...... that is exactly the way to do it.
Thanks, but see busted watch comment above:)

I just want to say that I am not crazy about the idea of using PL to install the transom to the fiberglass skin. I would use the PB because I think it would fill in any voids that may present and I would also drill some "air" holes to allow any trapped air to escape.

I agree, PL was my preferred adhesive, but I don't think I prefer it any longer. Many of the perceived benefits I thought it offered, were negated by other less then ideal attributes. The tendency to skim over & fail to maintain adhesion in the heat was chief among them, the 72hr wait is a very close 2nd. Has it's uses, even in a boat on a budget rebuild.

It was very much like the light bulb that came on that lead me to the Jet. That didn't pan out as I'd hoped, but it should let me reach my goal of splashing sooner. The FireFlite will splash, 1 day. Just probably not 1 day soon:rolleyes:
 

BoatgoatmfgVT

Petty Officer 1st Class
Joined
Jul 3, 2012
Messages
218
Re: 1960's 13' MFG carefree Rebuild (complete noob, i know nothing about this!)

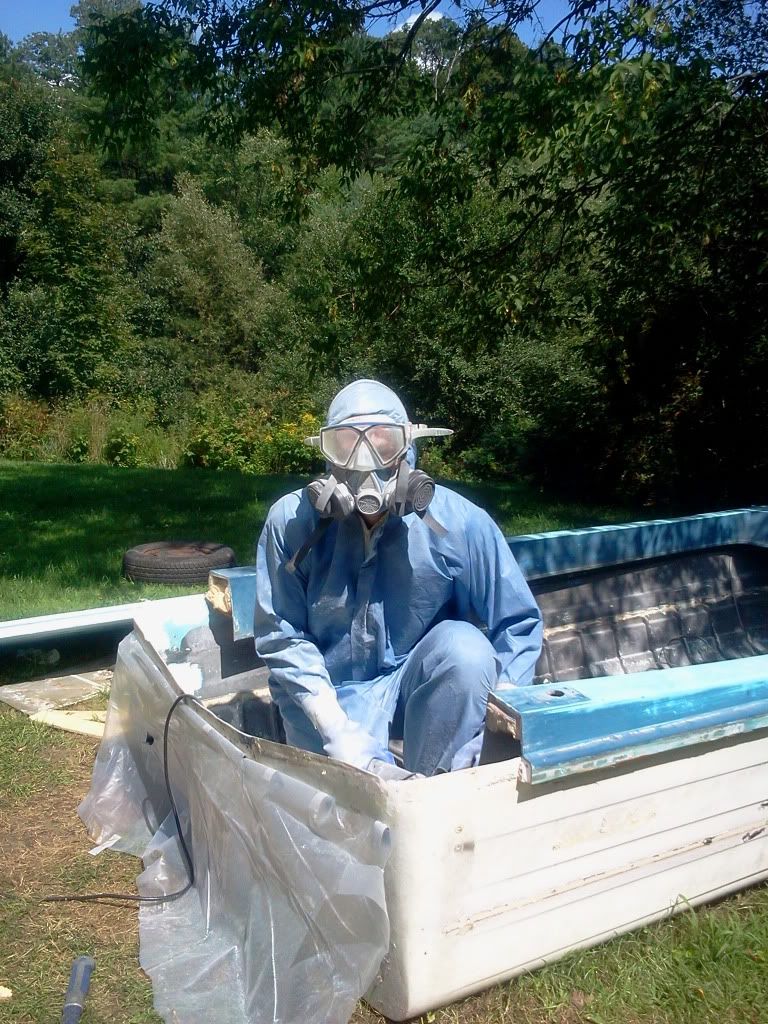
Hey guys, its been a long time since an update. I've been repairing my truck, i had to overhaul my drumbrakes and change some brake lines and stuff. Got all that done and i've gotten back to work on the boat. I've built the clamps and cut out the transom pieces and glued them all together. Heres some pics showing what i've done:)
2012-08-01_151144.jpg
2012-08-01_190322.jpg
2012-08-01_190406.jpg
2012-08-01_190437.jpg
2012-08-01_191005.jpg


The transom dried perfectly to the curve of the transom, i've very happy with it. I took it out and Sanded the edges smooth and removed the excess glue. Tomorrow i'm going to be coating it with poly resin, then another lay of resin and then i'll put csm around the whole thing. Progress should move along quite smoothly from this point on. I'll get more pics up tomorrow.
 

jbcurt00

Moderator
Staff member
Joined
Oct 25, 2011
Messages
25,187
Re: 1960's 13' MFG carefree Rebuild (complete noob, i know nothing about this!)

Man, you really should change that signature line:redface: That won't apply soon, if it did....

Great progress... Love the dusty blue man look

Glad the 3/8" ply set to the curve
 

sphelps

Supreme Mariner
Joined
Nov 16, 2011
Messages
11,486
Re: 1960's 13' MFG carefree Rebuild (complete noob, i know nothing about this!)

Yep your attire matches the boat color perfectly !
The transom is looking great BG ! Looks like ya got a good plan and it's going well..
 

BoatgoatmfgVT

Petty Officer 1st Class
Joined
Jul 3, 2012
Messages
218
Re: 1960's 13' MFG carefree Rebuild (complete noob, i know nothing about this!)

Thanks a lot you guys, your support andadvice has helped immensely! WAY MORE HELP THEN THIS FIBERGLASS BOOK I GOT ON AMAZON FOR 15 BUCKS.... But seriously, I couldn't do this without you guys, I really mean that. I think tomorrows going to be the day I glue, errr,. I mean PB the transom in. Now, WOG's pic for transoms says the 1708 needs to over lap the floor port and starboard sides 8 to 10 inches, how am I going to do that around thatt rib? These are my two ideas: 1. I add pb to the rib to form it into a more gradual slope which will be easier to fiberglass over. 2. I completely remove the rib by grinding it away and then replace it with a wooden rib once allthe fiberglassing is done. What do you guys think?
 

Bob_VT

Moderator & Unofficial iBoats Historian
Staff member
Joined
May 19, 2001
Messages
26,084
Re: 1960's 13' MFG carefree Rebuild (complete noob, i know nothing about this!)

Don't stress to much on that bottom rib being in the way. Just make sure things are sealed up and just go as far as you can. If it's 2" that's okay too. The inside bottom gets stress from the motor and it is a push from the boattom on the outside and a pulling on the top of the transom. Thnk about the forces exerted by an outboard hung on the transom. Adding PB might work.

WOG is back..... I am sure he will lend his thoughts too.

I absolutely would NOT cut that rib out ;) Just work around it best you can.

Looking very good. It's in better shape than the sheriffs cars in the North Kin-DUMB :D No hope for those cars but tons of hope for your boat!!!
 

Woodonglass

Supreme Mariner
Joined
Dec 29, 2009
Messages
25,930
Re: 1960's 13' MFG carefree Rebuild (complete noob, i know nothing about this!)

Very NICE work BGMVT!!! Curve came out GREAT!!!! Make sure and fill any voids in the edges of the wood and then give it a good coat of resin. When the resin tacks up lay your first layer of CSM and leave about 2" of over lap. Use just enuf resin to wet it out and make it go "CLEAR". When it tacks up use your hand to tug the edges and tear the CSM and make it "Hairy". Then use a cheap Chip brush and DAB at the hairy edges with resin to overlap the edges with glass. Now flip it over and do the exact same thing to the other side. When your done it's ready to install. Like Bob said don't worry about the bottom, just go to the rib and stop. the sides take all the torque.;) Your're lookin good!!!
 

BoatgoatmfgVT

Petty Officer 1st Class
Joined
Jul 3, 2012
Messages
218
Re: 1960's 13' MFG carefree Rebuild (complete noob, i know nothing about this!)

Very NICE work BGMVT!!! Curve came out GREAT!!!! Make sure and fill any voids in the edges of the wood and then give it a good coat of resin. When the resin tacks up lay your first layer of CSM and leave about 2" of over lap. Use just enuf resin to wet it out and make it go "CLEAR". When it tacks up use your hand to tug the edges and tear the CSM and make it "Hairy". Then use a cheap Chip brush and DAB at the hairy edges with resin to overlap the edges with glass. Now flip it over and do the exact same thing to the other side. When your done it's ready to install. Like Bob said don't worry about the bottom, just go to the rib and stop. the sides take all the torque.;) Your're lookin good!!!

Okay, so i cut the piece of csm to fit the front surface, and make it 2 inches wider on all sides. Then lay it down over freshly rolled out resin, and then roll it out till its clear. Then when its tacky i make up some more resin to do the edges, then cut the excess and repeat for theother side?? I laid my first layer of resin down, i think its dry already:eek: Will this be a problem? I can go cover it with csm asap
 

GT1000000

Rear Admiral
Joined
Jul 13, 2011
Messages
4,916
Re: 1960's 13' MFG carefree Rebuild (complete noob, i know nothing about this!)

Okay, so i cut the piece of csm to fit the front surface, and make it 2 inches wider on all sides. Then lay it down over freshly rolled out resin, and then roll it out till its clear. Then when its tacky i make up some more resin to do the edges, then cut the excess and repeat for theother side?? I laid my first layer of resin down, i think its dry already:eek: Will this be a problem? I can go cover it with csm asap


As long as the resin is not the type with wax already added into it, and it hasn't been more than a couple of days since you laid it down, just wipe it with Acetone...it should fell kinda tacky/sticky afterwards...then go to town...:)

BTW, great looking progress so far...
32.gif
 

Woodonglass

Supreme Mariner
Joined
Dec 29, 2009
Messages
25,930
Re: 1960's 13' MFG carefree Rebuild (complete noob, i know nothing about this!)

Yep, I'd mix some resin pour some on the transom roll it out and then lay the CSM on top of it and bubble roll it out. Pour more resin on top as needed till clear. when it tacks up, tear the edges then dab them over the sides then flip her over and do the other side. TIP: if You drive a nail in the ends of two pieces of 1x2 and lay them across a pair of saw horses you can lay the transom on the four nail points and not worry about the sticky transom sticking to anything when to do the other side.;)
 

BoatgoatmfgVT

Petty Officer 1st Class
Joined
Jul 3, 2012
Messages
218
Re: 1960's 13' MFG carefree Rebuild (complete noob, i know nothing about this!)

Oh crap, i accidentally got resin on the overlap sides:facepalm: Now i gotta waitt ill its all dry so i can grind the glass flush and then i'll make corner pieces of csm to go around the edges, woops. I didnt make enough resin to begin with so i had to franticly mix more and thats why i ended up being sloppy and getting it all over the edges. I'll figure a way, at least the flat surface is rolled out and csm'd properly
 

jbcurt00

Moderator
Staff member
Joined
Oct 25, 2011
Messages
25,187
Re: 1960's 13' MFG carefree Rebuild (complete noob, i know nothing about this!)

Torn edges of CSM over hanging the plywood edge. Scrap material torn into smaller pcs works too. The feathery edges of torn CSM sand easy:)

This video may help:

Instead of ground down existing damaged/cracked gel/glass you'll be working along the edge of the plywood. But similar technique w/ torn CSM.....

If that's your worst redo, you'll be doing great.
 

Jon Sob

Master Chief Petty Officer
Joined
Jun 11, 2011
Messages
827
Re: 1960's 13' MFG carefree Rebuild (complete noob, i know nothing about this!)

These are my two ideas: 1. I add pb to the rib to form it into a more gradual slope which will be easier to fiberglass over.

This is exactly what I did on mine. Great job so far ..... looking good
 
Top